
Greeetings,
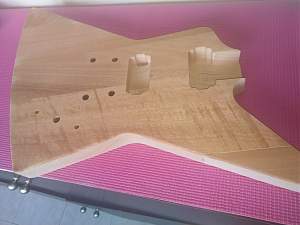
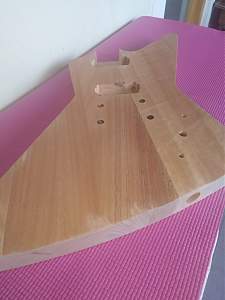
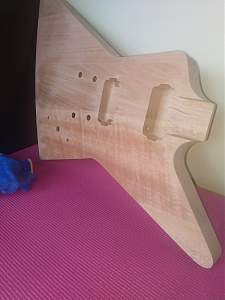
This kit is for a friend. I've checked the package and contents of this kit and everything seems fine. Took some pictures for you guys and found some issues....


Greeetings,
This kit is for a friend. I've checked the package and contents of this kit and everything seems fine. Took some pictures for you guys and found some issues....
Next, I've proceeded with a mock build....


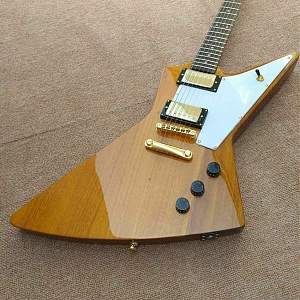
So, if I'm correct the main issue according to the pictures is the gap on the neck pocket. I've removed and attached the neck three times, slowly to make sure I was doingeverything right, but the gap remains. The neck fits tighty... How can I fix this?
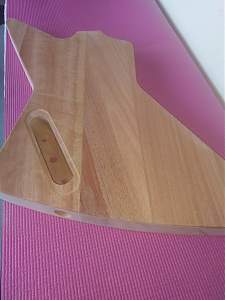
Also, and this is a cosmetic one, if you zoom on the first picture of the body you see some sort of gap line. Part of it has glue, and some other does not... Suggestions to deal with this?
I think in terms of positioning everything seems fine. Did I miss something?
Kind regards....
Last edited by rjmc; 16-02-2020 at 10:26 PM.
I am newish around here and I am sure that others more experienced will chime in.
The gap could be filled with shims from wood veneer depending on its width.
The veneer is very thin (1 mm) and available on ebay (depending where you are).
As to the gap, that looks a bit grim.
If you are doing a solid colour you could fill it and then spray over it.
If however, you want to stain the wood then it will be visible.
Depending on your location returning the body/kit might be an option.
Email Adam and see what he suggests.
Cheers, FB.
Hi FB,Originally Posted by Fatboy

Thank you for your reply. I'll wait for some more answers before get in touch with Adam. I think this is to be stained, unless my friend changes his mind about the color or anything else....
The finish my friend wants is on the following picture

I think you'll struggle to get a glossy stained finish on the EX1. The body pieces have their grain patterns at very different angles to each other. They are also joined at an angle (compared to the centre line of the neck), rather than parallel to it (as in your example photo). You can fill the small gaps at the neck join with filler, but it will be hard to make the colour match and not be noticeable.
As long as the body pieces are securely glued together, then any gap between pieces can again be filled in and sanded flat.
My EX1 was similar with regards to the angled body blocks and the neck gaps, so I went for a solid colour finish. This allowed me to get a very smooth neck/heel joint indeed.
It's probably not what you want to hear, but it's the best way to get a good looking guitar from the kit. The EX1 kit really isn't put together at the factory properly to get a really good looking natural finish that's anything like an original korina-bodied Explorer. A pickguard will help, but the standard ones will have a hole in for the pickup selector switch, and the kit has the selector switch positioned between the volume and tone knobs.
You can, (like I and several others have done), rout out your own selector switch channel and fill in and redrill the centre hole to be another volume knob position, but it's more work and another reason not to use a see-through finish.
You can certainly have a go at staining to try and achieve a similar finish to your example. You'll first need to grain fill the mahogany, sand it flat and then use a pale yellow-brown stain on top of that. As the body is mahogany rather than korina, you'll find it hard to match the colour in the photo, as the mahogany is naturally more red-brown than yellow-amber. You can stain a wood darker, but it's very hard to make it lighter. Possibly try a white stain first.
Then you'll need a good clear coat on the top, possibly one or two layers with an amber tint in, and then fully clear lacquer over that. Using amber tint would depend on how light the body was after staining, as you won't want to make it too dark. Gibson would use a nitro lacquer, but acrylic or polyurethane would be cheaper and easier to get hold of.

Wise words from Simon.
The ugly join on the lower front horn is pretty bad but the mismatched slabs of timber and being mahogany makes me think colour in that photo would be extremely hard to achieve. Hog tends to have too much darker red/brown tones and a wipe down with turps or metho should give you an idea of the 'wet' colour you already have to work with.
My Basswood EX-1 has some mismatched timbers but thankfully they were mostly the same lighter shade and I fluked a similar colour to what you want. If I was to try again Feast & Watson Golden Teak looks to be closest colour match.
Cheers, Waz
# 1 - EX-5 https://goo.gl/fQJMqh
# 2 - EX-1 https://goo.gl/KSY9W9
# 3 - Non PBG Tele https://goo.gl/W14G5g
# 4 - Non PBG J Bass https://goo.gl/FbBaFy
# 5 - TL-1AR GOTM Aug 2017 https://goo.gl/sUh14s
# 6 - MMB-4 Runner-up GOTM Oct 2018https://goo.gl/gvrPkp
# 7 - ES-1 Runner-up GOTM Aug 2018https://goo.gl/T9BEY8
Greetings Wazkelly and Simon Barden,
I think I forgot to mention, but I have 0 experience with wood, woodworking, finishes, etc... So I'm starting from ground 0.
And with this in mind, what should I do?
Hi Buddy, find some turps or metho, add to a cloth so it is just damp, and proceed to wipe down the surface of body.
This will show many things but mostly what it should look like with just a natural clear coat and hopefully also show up glue spots, filler, or areas to be filled plus any other minor flaws not otherwise visible when dry.
The perpendicular edges will have rather obvious machine marks from where the timber was cut to shape and you will need to sand these out and suggest starting with 80 grit before moving on to 120 grit, and for the really stubborn bits on end grain you need to sand with the grain rather than across until you get everything really smooth. Once smooth all over you can then sand in the direction of the body shape on those edges.
Need to make sure you use a decent sanding block. I prefer to use a cork one as they are light, can be used for wet sanding, and they seem to last quite a long time plus inexpensive.
BE EXTREMELY CAREFUL NOT TO OVERSAND.......by this I mean polishing the timber so smooth and fine that it repels any stain. Personally I go hard at it with 80, 120 then lighter with 180, stop & assess as sometimes this is as far as you need to go if trying to get timber to absorb a lot of colour. 240 grit done feather light is OK but any higher is just starting the polishing process.
As for the neck, being maple it should feel pretty smooth straight out of the box and again maybe a bit of 80 if you feel the need to dig in for any reshaping otherwise 120 should be all you need to use and possibly a feather light run over with 180.
That should keep you going for several days or more and best to take your time. Treat this like a marathon, not a sprint race, and remember to enjoy what you are doing.
Cheers, Waz
# 1 - EX-5 https://goo.gl/fQJMqh
# 2 - EX-1 https://goo.gl/KSY9W9
# 3 - Non PBG Tele https://goo.gl/W14G5g
# 4 - Non PBG J Bass https://goo.gl/FbBaFy
# 5 - TL-1AR GOTM Aug 2017 https://goo.gl/sUh14s
# 6 - MMB-4 Runner-up GOTM Oct 2018https://goo.gl/gvrPkp
# 7 - ES-1 Runner-up GOTM Aug 2018https://goo.gl/T9BEY8
Hi Wazkelly
What do you mean with "turps or metho"?
About sanding, when do I know that I should go from one grit to another? How do I know when it is enough?
The Neck on this kit is also mahogany with ebony fingerboard... so same thing, right?
About the ugly join, I can put there my finger nail... Is there any way to fix it for dummies?
Thank you for your replies and patience.....
'turps' is short for 'turpentine', the sort artists use for thinning oil paints. 'Metho' is short (Australian) for methylated spirit. We say 'meths' in the UK.
 Posting Permissions

 Reply With Quote