Page 2 of 6 FirstFirst 1 2 3 4 ... LastLast
Results 11 to 20 of 52

Thread: Popping Cherry with Hardtail Strat

  1. #11
    Here's a pic of the setup on the laser:
    Click image for larger version. 

Name:	centerline1.jpg 
Views:	149 
Size:	130.2 KB 
ID:	31524
    It's my miter saw, but it works and I have it on hand!
    The neck is just sitting there for the pic, but I held it tight in the pocket, lined up the neck, then removed the neck without moving the body.
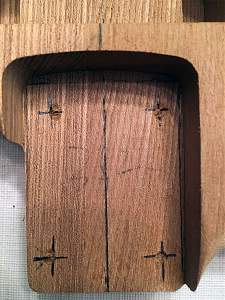
    I used a pencil to trace the centerline down the body:
    Click image for larger version. 

Name:	centerline2.jpg 
Views:	139 
Size:	160.9 KB 
ID:	31525

    This is the lowest tech way I could think of to mark the four new hole positions:
    Click image for larger version. 

Name:	neckpocket5.jpg 
Views:	121 
Size:	204.8 KB 
ID:	31526
    A 1.5" x 2" square piece of paper with a centerline drawn to hold up to the centerline in the pocket.
    Mark the corners:
    Click image for larger version. 

Name:	neckpocket6.jpg 
Views:	180 
Size:	199.2 KB 
ID:	31527

  2. Liked by: Thunderbird

  3. #12
    Drill 1/4" holes (the same size as the neck plate):
    Click image for larger version. 

Name:	neckpocket7.jpg 
Views:	137 
Size:	187.8 KB 
ID:	31529

    Click image for larger version. 

Name:	neckpocket8.jpg 
Views:	129 
Size:	191.5 KB 
ID:	31530

    It's not perfect, but I can live with it:
    Click image for larger version. 

Name:	neckpocket9.jpg 
Views:	146 
Size:	122.6 KB 
ID:	31531

    Who's the drunken monkey now?

  4. #13
    GAStronomist FrankenWashie's Avatar
    Join Date
    Jan 2016
    Location
    Glebe, NSW
    Posts
    5,666
    Quote Originally Posted by FunkedOut View Post

    Who's the drunken monkey now?

    Me, Saturday evening, after the Super Rugby Final.

    Nice work on the plug and re drill, it seems to be a constant issue for factory. You've also scored a really nice looking body for your first build.

    I look forward to seeing how it all goes!
    FrankenLab
    Hand crafting guitars, because Death Rays are expensive.


  5. Liked by: Thunderbird

  6. #14
    I put the body and neck on the laser again after clamping them together to confirm alignment.
    Then took the same 1/4" drill bit I used to drill the body to just mark the neck.
    Then drilled those 4 pilot holes on the drill press:
    Click image for larger version. 

Name:	neck-holes.jpg 
Views:	127 
Size:	166.8 KB 
ID:	31558

    I then attached the neck with undersized screws so I could get rid of the clamp and put it all together on the laser again:
    Click image for larger version. 

Name:	centerline3.jpg 
Views:	145 
Size:	156.6 KB 
ID:	31557

    I marked the pick guard and bridge holes:
    Click image for larger version. 

Name:	body-holes1.jpg 
Views:	120 
Size:	161.3 KB 
ID:	31559

    ...and drilled the pilot holes on the drill press:
    Click image for larger version. 

Name:	body-holes2.jpg 
Views:	134 
Size:	160.6 KB 
ID:	31560

    I marked the strap button holes with a rule and drilled those holes with a hand drill. Roughing it.

  7. #15
    The bridge can be used for either a side load or through-body string up.
    The through-body holes are a bit sharp where the string would break over to the saddle.
    They could use a bit of rounding over here:
    Click image for larger version. 

Name:	bridge1.jpg 
Views:	137 
Size:	170.4 KB 
ID:	31568

    The underside of saddles are not the cleanest either.
    I plan to file out these edges a bit.
    To help out stringing the guitar, if nothing else.
    Click image for larger version. 

Name:	bridge2.jpg 
Views:	122 
Size:	225.0 KB 
ID:	31567

    At this point, I am considering leaving this guitar as a side load and perhaps drill the through-body holes later, once I'm convinced the bridge landed in the right place and intonation is spot on.

    On that subject, I measured the scale (25.375") and marked it on the body while the neck was screwed to the body.
    Prior to doing so, I made sure all of the saddles were adjusted to 1/3 of their travel less than fully extended.
    This would leave 7/64" (2.78mm) worth of extension capability for the high e string and 7/32" (5.56mm) worth of retraction capability for the low E string.

    With the saddles arranged in that fashion, the neck screwed in place and everything lined up on the laser, I found that everything lined up beautifully along the centerline. However, in order for the saddles to line up with the scale line I had drawn, the pick guard had to be trimmed about 3/64" (1.19mm).

    After comparing the pickguard with a fender pickguard I had on hand, I determined that they shared the same spacing for the neck to bridge.
    I decided to place the bridge up against the pickguard and not trim it.
    This configuration leaves 1/16" (1.59mm) worth of extension capability for the high e string and 17/64" (6.75mm) worth of retraction capability for the low E string. I think this will be enough, but I am not confident enough to blast 6 holes completely through the body.
    I figure over the next few years, we can go back over this guitar and get replacement tuning machines, pickguard/electronics, bridge and tackle the holes at that time. I have to leave myself room for more birthday gifts.

    At this point, the body is ready to be sanded and finished.
    Last edited by FunkedOut; 04-07-2019 at 02:09 AM.

  8. #16
    I've been keeping busy these last few days. It's time for an update on the process.

    Started sanding with 80 grit, removing all of the tooling marks and getting the shape right.
    Followed up with 120 grit, getting the last bits in shape, like the rounded edge along the top and back.
    With everything nice and smooth at 120 grit, I wiped down the body with a damp rag (distilled water) to raise the grain and let it dry overnight.
    Next day, I hit it lightly with fresh 220 grit to remove the fuzz.

    Clean and smooth, ready for color:
    Click image for larger version. 

Name:	body01.jpg 
Views:	134 
Size:	110.9 KB 
ID:	31613

    Click image for larger version. 

Name:	body02.jpg 
Views:	135 
Size:	103.1 KB 
ID:	31614
    Last edited by FunkedOut; 10-07-2019 at 10:32 AM.

  9. #17
    For color, I decided to use dye powder and mix my own. I used a product line from KEDA; https://www.kedadyeinc.com
    I have no affiliation with them, just sharing for the sake of anyone looking to try a similar stunt for the first time, like myself!
    This stuff is soluble in water or alcohol. They recommend 70% rubbing alcohol because the water help dissolving the dye.
    I mixed 0.50g of dye powder with 2oz of warm water, then added 6oz of denatured alcohol.
    Here is the yellow and the red:
    Click image for larger version. 

Name:	dye.jpg 
Views:	117 
Size:	106.3 KB 
ID:	31615

    I figured it would be easier to mix the dyes in liquid form, rather then weighing tiny amounts of powder.
    I settled on 1 part yellow to 20 parts red for entire body.
    After the first coat of dye, the grain raised a tiny bit. I used a 400 grit paper to tame those fibers, without sanding through too much color.

    Here it is after a couple coats:
    Click image for larger version. 

Name:	body03.jpg 
Views:	123 
Size:	96.1 KB 
ID:	31616

    Click image for larger version. 

Name:	body04.jpg 
Views:	127 
Size:	91.1 KB 
ID:	31617

    When this dye dries on the wood, the red turn a shade of pink. As soon as the dye is wet again, it turns a beautiful blood red. Here's to hoping that when the Tru-Oil hits it, it makes a nice color!
    Last edited by FunkedOut; 11-07-2019 at 07:54 PM. Reason: spellcheck

  10. #18
    After letting it dry overnight, I mixed up an 8oz solution of black dye to try my hand at a burst. Simple red to black.
    I started with applying the black to the edges and then rounding the edge to the back and top.
    Then mixing some red and black dye, rubbing in the edge of the black.
    Then taking some red and rubbing in the edge of the rubbed in edge.
    Rinse and repeat for a couple days until it looks right or my eyes are crossed.
    I think I am happy with it when its wet:
    Click image for larger version. 

Name:	body05.jpg 
Views:	145 
Size:	115.3 KB 
ID:	31618

    Click image for larger version. 

Name:	body06.jpg 
Views:	125 
Size:	109.8 KB 
ID:	31619

    It's fairly wet in these pics but already staring to dry. Alcohol does not give you much time before its gone.
    There's still a bit of streaking in the black on the edges.
    I plan to hit the entire body with red one last time tomorrow to smooth out all the streaks.
    Then let the body dry for a few days before getting the first coat of Tru-Oil applied to lock this color in!
    Last edited by FunkedOut; 11-07-2019 at 07:54 PM. Reason: spellcheck

  11. Liked by: dave.king1, FunkedOut

  12. #19
    I did a light bit of sanding with 400 grit today in a couple of small areas (black / end grain) that had some grain raised through the soaking.
    Touched those up with black, then rubbed the whole thing down with red.
    Going to let it dry overnight before getting the first coat of TruOil on it.

    Not much of an update, I know, but I'm using this thread as a place to keep my notes as well so, here's the other nugget:
    I ended up settling on a ratio of 30:1 (yellow:red) for a light orange color I plan to use on the neck.
    My plan there is to tint the Tru-Oil with the dye and apply thin coats until I like the color.
    Then finish with more straight Tru-Oil if needed.

  13. #20
    Overlord of Music McCreed's Avatar
    Join Date
    Oct 2018
    Location
    AUS
    Posts
    3,552
    That's looking good FunkedOut.

    I'd have reservations about adding your dye mixture to the Tru Oil if it has water mixed into it. TO & water won't get along.

    And FWIW, I prefer to tint the wood and clear coat (Tru Oil, Poly etc) over that. I know others will tint their clear, but it's not how I do it.

    If you're dead set on tinting the TO, maybe mix a batch of dye with just the alcohol. If you have any issue with the granules dissolving, strain it before adding to the TO. I'm sure the dye strength will still be just fine even if if not 100% dissolved.

    If you don't think so, dip your bare finger into it and see how long it takes to get the stain off! (just KIDDING!!! - don't do it!!!)
    Making the world a better place; one guitar at a time...

  14. Liked by: FunkedOut

Page 2 of 6 FirstFirst 1 2 3 4 ... LastLast

Posting Permissions

  • You may not post new threads
  • You may not post replies
  • You may not post attachments
  • You may not edit your posts
  •