Page 3 of 8 FirstFirst 1 2 3 4 5 ... LastLast
Results 21 to 30 of 74

Thread: The Resonator

  1. #21
    Member GreyFloyd's Avatar
    Join Date
    Nov 2018
    Location
    Freo
    Posts
    110
    Thanks Overlord! Thought I'd post my first kit build of an LP and my custom orange!!

  2. #22
    Member GreyFloyd's Avatar
    Join Date
    Nov 2018
    Location
    Freo
    Posts
    110
    Click image for larger version. 

Name:	2018-11-28 09.35.57.jpg 
Views:	253 
Size:	435.8 KB 
ID:	29173Click image for larger version. 

Name:	2018-11-28 09.37.21.jpg 
Views:	264 
Size:	402.2 KB 
ID:	29174

  3. #23
    Member GreyFloyd's Avatar
    Join Date
    Nov 2018
    Location
    Freo
    Posts
    110
    Stewmac says you shouldn't glue or attach in any way the spider cone to the guitar. My spider cone has four screw holes which suggests to me that it should be screwed to the rim. Puzzled!?!!

  4. #24
    GAStronomist FrankenWashie's Avatar
    Join Date
    Jan 2016
    Location
    Glebe, NSW
    Posts
    5,666
    Don’t screw it down GF, you might need to check that it is not sitting proud on those burrs though.
    Whole point of the lip is that is sits firmly against the body and you shouldn’t need any glue or similar to get it to sit right.
    FrankenLab
    Hand crafting guitars, because Death Rays are expensive.


  5. #25
    Member cork sniffer's Avatar
    Join Date
    Dec 2015
    Location
    South Coast NSW
    Posts
    348
    Quote Originally Posted by GreyFloyd View Post
    Stewmac says you shouldn't glue or attach in any way the spider cone to the guitar. My spider cone has four screw holes which suggests to me that it should be screwed to the rim. Puzzled!?!!
    Stewmac are correct.
    Beauty of an alloy cone and raw timber rim is you can gently rotate the cone through a few degrees with a little down pressure and the alloy will mark the high spots on the rim. Keep sanding the dark witness marks away until you have cone contact all of the way around the rim and it's job done. String pressure will hold all in place.

  6. Liked by: kuanjb

  7. #26
    Member GreyFloyd's Avatar
    Join Date
    Nov 2018
    Location
    Freo
    Posts
    110
    Thanks FW/CS. Just wondered why it had the four screw holes. Still getting marks on the base of the body while rotating so will continue to sand and hopefully not go right thru the back!! Or should that be sanding the rim? Don't seem to have any marks there.

  8. #27
    Member
    Join Date
    Oct 2018
    Location
    Canberra, ACT
    Posts
    249
    Quote Originally Posted by GreyFloyd View Post
    Thanks FW/CS. Just wondered why it had the four screw holes. Still getting marks on the base of the body while rotating so will continue to sand and hopefully not go right thru the back!! Or should that be sanding the rim? Don't seem to have any marks there.
    You'll probably have to cut out the bottom like CS and FW.

    Sent from my LG-H930 using Tapatalk

  9. #28
    GAStronomist FrankenWashie's Avatar
    Join Date
    Jan 2016
    Location
    Glebe, NSW
    Posts
    5,666
    Quote Originally Posted by GreyFloyd View Post
    Thanks FW/CS. Just wondered why it had the four screw holes. Still getting marks on the base of the body while rotating so will continue to sand and hopefully not go right thru the back!! Or should that be sanding the rim? Don't seem to have any marks there.
    You won’t go through the back of the body, but there is an air gap between the central wood core and the back ply.
    if you go through then I’d just remove the whole section. It won’t affect anything
    FrankenLab
    Hand crafting guitars, because Death Rays are expensive.


  10. #29
    Member cork sniffer's Avatar
    Join Date
    Dec 2015
    Location
    South Coast NSW
    Posts
    348
    Quote Originally Posted by GreyFloyd View Post
    Still getting marks on the base of the body while rotating so will continue to sand and hopefully not go right thru the back!! Or should that be sanding the rim? Don't seem to have any marks there.
    Go back to post #13 in this thread date 21/11/18.
    Have a good look at the two photos and then cut the bottom out of your body. This will allow the cone edge to sit on the rim that will then require sanding until the cone sits supported all of the way around.
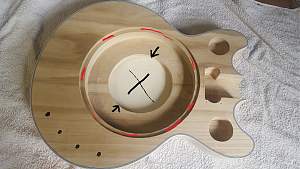
  11. #30
    Member cork sniffer's Avatar
    Join Date
    Dec 2015
    Location
    South Coast NSW
    Posts
    348
    Check this photo.
    Cut away the area with black X.
    Rub cone and sand over and over again at red lines.
    EDIT, This photo already gas the offending base cut away at black X.

    Click image for larger version. 

Name:	20180404_153249.1.jpg 
Views:	250 
Size:	468.5 KB 
ID:	29175
    Last edited by cork sniffer; 28-11-2018 at 06:25 PM.

Page 3 of 8 FirstFirst 1 2 3 4 5 ... LastLast

Posting Permissions

  • You may not post new threads
  • You may not post replies
  • You may not post attachments
  • You may not edit your posts
  •