
Thats so sad Simon, after you had it looking so good. I was expecting to see a brilliant, finished product in your next post. So sorry mate. Hope all goes well this time. We are all cheering for you.
Wayno.


Thats so sad Simon, after you had it looking so good. I was expecting to see a brilliant, finished product in your next post. So sorry mate. Hope all goes well this time. We are all cheering for you.
Wayno.
Build-1 ES-3 June 2016 GOTM.
Build-2 IB-1S
Build-3. ES-12G June 2019 GOTM.
Build-4 Gene Simmons axe bass. 43 year project done.
Build-5. TL-1S May 2021 GOTM joint winner.

That's very disappointing Simon I'm sorry to see this has happened to you after all the hard work you have put into this build. I can sympathize with you due to having to start over on my last build as well it can drain the motivation really fast.
I was wondering why we haven't seen you online much recently.
I'm sure you will get on top of it though and produce something brilliant.
Best of luck with it mate.
#1 JMA-1 Completed http://www.buildyourownguitar.com.au...ead.php?t=8180
#2 Non PBG LP Completed http://www.buildyourownguitar.com.au...ead.php?t=8416
#3 STR-1JR Completed http://www.buildyourownguitar.com.au...ead.php?t=8468

Oh Simon that would have peeved me off no end as well was a lovely shad of red mate, at least you can pull out the sander and go again at least it wasn't on a veneer top really feel for you mateOriginally Posted by Simon Barden

My facebook
126 guitars done so far still going, 34 Starts, 25 Teles, 27 Les Pauls, 11 SGs, 8 Hollow Body, 21 Super Strats

It is on a veneer top!
What's really annoying is that on the rest of the body, including the same area on the bottom horn, the Tru-Oil's thick and taking ages to sand off!
Done the back and sides, now doing the top, but my Amazon prime order of sandpaper still hasn't turned up yet and I've exhausted all my good sandpaper, and the cheap stuff is going in the bin as it's useless.
Well I've been carrying on sanding as the new sandpaper eventually turned up.
Back and most of the sides done here:
Then I started on the top and have gone as far as I dare go on one side without sanding through the veneer:
So I will be carrying on sanding tomorrow.
And then I'll have to start on sanding the neck back. The stain won't be the same otherwise, plus I tried some nitro lacquer on top of the Tru-Oil and it bubbled up, so I can't leave it as it is and just spray clear nitro over the top. I need to re-do the headstock face anyway, as my gold-pen backed 'Three-Thirty' decal got damaged when I was sanding the Tru-Oil finish over it level, so I'll use some pearl veneer with a decal over it in a similar way to the main logo.
Onwards and upwards.

That's one huge setback Simon...
Do you have any thoughts as to why it happened? Not a happy mix between your stain and the Tru-oil, or something going on in the wood?
Builds-
#18 PBG GSH-1R https://www.buildyourownguitar.com.a...ad.php?t=10236
#17 PBG PBA-4 https://www.buildyourownguitar.com.a...ead.php?t=9984
#16 PBG IB-1Q http://www.buildyourownguitar.com.au...ead.php?t=8754
#15 PBG TLA-12 http://www.buildyourownguitar.com.au...ead.php?t=8444
#14 PBG PRS-1H
#11 Scratch build AC15 clone headhttps://www.buildyourownguitar.com.a...ead.php?t=7686
#09 PBG ES-1TL
#07 partscaster Alder Denim Tele.
Not really. That area got the same treatment as the rest of the body, but the TO simply must have been thinner there. I vaguely remember having one run around that location which I had to sand back, but was trying only to sand the run and certainly not that whole area. Of course it is the most pronounced curved raised area on the guitar, so more easily over-sanded (and maybe the TO coats wiped thinner), but the corresponding lower bout didin't show similar symptoms and has already undergone some rigorous sanding with coarse sandpaper without getting anywhere near to the wood.

Man, what a bummer.
Just discovering the lumpy bits on the ES-1 picked up from Tony yesterday and found it very easy to sand through veneer on both horns. Doesn't take much effort at all as they are the steepest part at that end of the body.
# 1 - EX-5 https://goo.gl/fQJMqh
# 2 - EX-1 https://goo.gl/KSY9W9
# 3 - Non PBG Tele https://goo.gl/W14G5g
# 4 - Non PBG J Bass https://goo.gl/FbBaFy
# 5 - TL-1AR GOTM Aug 2017 https://goo.gl/sUh14s
# 6 - MMB-4 Runner-up GOTM Oct 2018https://goo.gl/gvrPkp
# 7 - ES-1 Runner-up GOTM Aug 2018https://goo.gl/T9BEY8
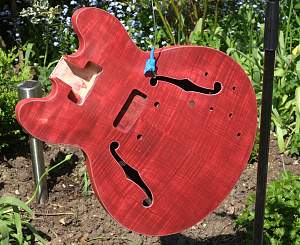
Well, I finished sanding the top:
So it was time for the staining. Shots taken after the initial applications.
Top:
Back:
Spirit-based stain seems more forgiving than water-based. It doesn't leave a tide mark at the edges and it dries more quickly, so there's less likelihood of runs.
The sharp-eyed amongst you will have spotted the elephant in the room; the small area on the top horn where I've sanded through the veneer. So now I've got to try and patch it up somehow. It might be out with the acrylic paints and paint that area. But I'll need to match the colour to how the rest of the guitar looks with clear coat on (which will be a brighter red).

Such a bummer about that. Is it worth trying to 'paint in' a bit of grain?
First (proper) build: http://www.buildyourownguitar.com.au...ead.php?t=8546
Second build: http://www.buildyourownguitar.com.au...ad.php?t=10229
 Posting Permissions

 Reply With Quote