
Very nice. Looks great.
Sent from my SM-A520F using Tapatalk


Very nice. Looks great.
Sent from my SM-A520F using Tapatalk
# 1 - EX-5 https://goo.gl/fQJMqh
# 2 - EX-1 https://goo.gl/KSY9W9
# 3 - Non PBG Tele https://goo.gl/W14G5g
# 4 - Non PBG J Bass https://goo.gl/FbBaFy
# 5 - TL-1AR GOTM Aug 2017 https://goo.gl/sUh14s
# 6 - MMB-4 Runner-up GOTM Oct 2018https://goo.gl/gvrPkp
# 7 - ES-1 Runner-up GOTM Aug 2018https://goo.gl/T9BEY8

Great job. You must be proud of the final result.
Current:
GTH-1
Completed:
AST-1FB
First Act ME276 (resurrected curb-side find)
ES-5V
Scratchie lapsteel
Custom ST-1 12 String
JBA-4
TL-1TB
Scratch Lapsteel
Meinl DIY Cajon
Cigar Box lap steel
Wishing:
Baritone
Open D/Standard Double 6 twin neck

Quick question, I have the same kit with the same bridge which I finished last year. I didn't recess the bridge, but am thinking that I might have to. Did you rout the hole? How deep is it recessed? The action on mine is a little high with the bridge at the lowest point. This seems to be a common problem with these kits.
I'm thinking of dismantling the bass and replacing the nut as well as refinishing the headstock. It has sat since I finished it as I don't play bass any more in a band, but I'd like to make it right.
There's a link to my build in my signature below.
Thanks!

Nice work on the top there Viv.
Build-1 ES-3 June 2016 GOTM.
Build-2 IB-1S
Build-3. ES-12G June 2019 GOTM.
Build-4 Gene Simmons axe bass. 43 year project done.
Build-5. TL-1S May 2021 GOTM joint winner.
I changed to a Gotoh bridge, I wanted something heavier, in the hope it would get me closer to that rick-o-sound. I tried the bridge without recess into the body, remember also that I added a top, but if you look closely you can see that is actually recessed so the bridge was just above the original surface. Secondly there is a very slight neck break angle. It is very small, but I expected that would allow the higher bridge. Wrong! In the end I routed down to the original body, and remounted the bridge there. The bridge itself has small black height adjustable saddles. see pic.Originally Posted by Andyxlh

The saddles come out easily enough and on the low E and B strings (remember its a five string) I have filed those down to get still lower action. I do suspect that if I want to get a bit lower I would need to route about 1-2 mm into the body.
I think the trick is to start high and work down!
Really nice look to yours, it looks brilliant finished.
Thank you! I think I have the same bridge in 4 string, or very similar. I think we are in a similar situation, I have filed the saddles also, but at the lowest position the action is still marginal with no further adjustment possible. I don't really want to stuff up the finish, but to get the best out of it I will need to have some more adjustability........ ho hum, I might think about it for a week or two...
Yeah, I have bought the same bridge for a fiver and also a 4 stringer and with both the lowest setting has saddles sitting way too high.
Still scratching my head as to whether they are worth mucking around with or to try something else. Recessing into body is not something I wish to attempt.
# 1 - EX-5 https://goo.gl/fQJMqh
# 2 - EX-1 https://goo.gl/KSY9W9
# 3 - Non PBG Tele https://goo.gl/W14G5g
# 4 - Non PBG J Bass https://goo.gl/FbBaFy
# 5 - TL-1AR GOTM Aug 2017 https://goo.gl/sUh14s
# 6 - MMB-4 Runner-up GOTM Oct 2018https://goo.gl/gvrPkp
# 7 - ES-1 Runner-up GOTM Aug 2018https://goo.gl/T9BEY8
I used a laser to work out the various levels so I could be sure I had the neck positioned how I wanted it. I used the laser to check the level of my bench. Then checked that the guitar body was set level. Then put the neck in place and ensured I had the neck break angle how I wanted it. If you look at the image you might see how small the break angle is. This was so I could fit the GOTOH bridge without burying it in the body!
You can see the neck is almost flat with the body, but not quite. I could have increased the angle, but I was worried about having to then raise the bridge.
While I was there with the laser I also checked that the neck was dead on the centreline of the guitar.
I checked everything 3 times. No rush to glue the neck in... :-)
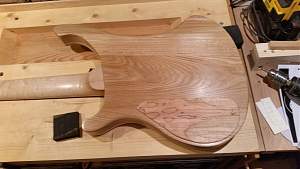
I used the shape of the body to provide a guide for routing the top. The more deliacte areas around the neck I shaped by hand with sand paper. I also used a router to get a rough cut on the relief patterm I wanted in the top. I wanted to get away from the completely flat surface of a guitar body and come up with something much more organic.
A little more routing later, again using the holes already routed into the body as a guide, and I had the recesses for the pickup holes. Note that I could use all the original wiring channels created by Pitbull, so I didn't need to worry about that, apart from the earth wire to the bridge. One carefully drilled hole later...
I used some pieces of card as templates for the pickup covers and the bridge...
Last edited by Vivg; 07-06-2018 at 04:50 PM.
Being an engineer, I wanted access to my soldering (or collecting of dry joints if you prefer!), consequently I departed from the original plan and put a cover over the control cavity for easy and frequent access. My apologies to all the people I can here screaming Noooooo! Oops too late!
I added another piece of thin maple to reinfoce the area in the cavity under the top. I intended to recess the controls so I made sure I have a good 8-10 mm to play with.
I then made a cover plate out of the same Spalted Maple, strangely it just looked right to me.
 Posting Permissions

 Reply With Quote