
DECEMBER 2017
38 coats on the top/32 on the headstock/28 on the back and neck. Wet sanded with 6000 micro mesh
42 coats on the top/36 on the headstock/32 on the back and neck. Wet sanded with 8000 micro mesh


DECEMBER 2017
38 coats on the top/32 on the headstock/28 on the back and neck. Wet sanded with 6000 micro mesh
42 coats on the top/36 on the headstock/32 on the back and neck. Wet sanded with 8000 micro mesh

Impressive that you kept a count.
After ten, I've lost track of time and space.
Spectacular finish you have there. 'twas a success at the end...wasn't it?
cheers, Mark.
JANUARY 2018
44 coats on the top/38 on the headstock/44 on the back and neck. Wet sanded with 12000 micro mesh
Throughout this process I would occasionally sand through and have to do minor touch-ups. My biggest fear was accidentally sanding too much on the top and hitting the sunburst, but fortunately that never happened
Thanks Mark! It actually turned out better than I expected, but this is my first time doing an oil finish so I didn't really know what to expect.Originally Posted by king casey


Very impressive. I tend to lose count once past 30 or more coats.
Sent from my SM-A520F using Tapatalk
# 1 - EX-5 https://goo.gl/fQJMqh
# 2 - EX-1 https://goo.gl/KSY9W9
# 3 - Non PBG Tele https://goo.gl/W14G5g
# 4 - Non PBG J Bass https://goo.gl/FbBaFy
# 5 - TL-1AR GOTM Aug 2017 https://goo.gl/sUh14s
# 6 - MMB-4 Runner-up GOTM Oct 2018https://goo.gl/gvrPkp
# 7 - ES-1 Runner-up GOTM Aug 2018https://goo.gl/T9BEY8
I took lots of notes as I built; otherwise I'd have lost count well before 30!
Oh my, this is such a treat. Beautiful work, TRV.
'As long as there's, you know, sex and drugs, I can do without the rock and roll.'
Thank you pablo!
FEBRUARY 2018
Once I was happy with the finish I let it cure for four weeks. This eternity was a good opportunity to start learning about how wiring works. After the four weeks had elapsed I polished the guitar with Meguiar's Ultimate Compound.
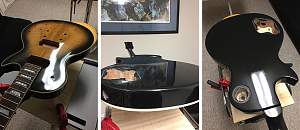
Then it was time to tackle levelling the frets, but first I had to remove the old nut. I carefully scored around the base of the nut with an X-Acto knife and gently tapped it off with a hammer. Apparently I scored it too lightly because when I knocked the nut off it took a tiny bit of the binding, some material at the end of the fretboard and some of the finish with it. Darn.
I glued the small piece of binding back on, filled any divots, stained and applied a more Tru Oil to the affected areas.
After I overcame that mishap I got back to the task at hand. I don't have a notched straight edge, so I found a dead-straight piece of hard wood and used a router to notch it
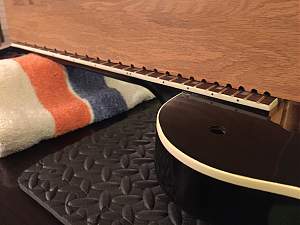
Once the neck was straight I masked off the fretboard, taped some 320 grit sandpaper to the top of my homemade notched straight edge and used it to sand the frets level. Next I crowned the frets with a triangle file then sanded with 320 & 600 grit, and finally polished with 0000 steel wool
Afterwards I removed the masking and cleaned the fretboard with lemon oil.
 Posting Permissions

 Reply With Quote