Page 4 of 10 FirstFirst ... 2 3 4 5 6 ... LastLast
Results 31 to 40 of 94

Thread: trv's Spalted Maple LP-1SS

  1. #31
    Member trv's Avatar
    Join Date
    Apr 2018
    Location
    Winnipeg, Canada
    Posts
    131
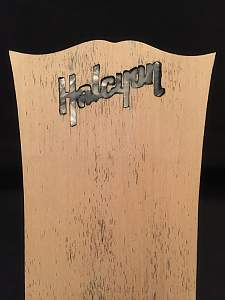
    The overlay was glued onto the headstock and routed flush along the sides. Again, pay no mind to the stain... more experiments
    Click image for larger version. 

Name:	HALC_0330.JPG 
Views:	416 
Size:	173.8 KB 
ID:	25878

    I used CA glue and ebony filler dust to fit the inlay. Some of the gaps weren't as tight as I would have liked, but this being my first attempt I was ok with it. I don't really understand why, but somehow the combination of the CA glue and the ebony filler dust caused the inlay to turn really grey
    Click image for larger version. 

Name:	HALC_0340.JPG 
Views:	379 
Size:	301.6 KB 
ID:	25879

  2. #32
    Member trv's Avatar
    Join Date
    Apr 2018
    Location
    Winnipeg, Canada
    Posts
    131
    Unfortunately I couldn't live with it. During this build I tried not to let myself settle if I thought I could do something better, even if it meant doing things over again... which is probably why it took 11 months to complete. So I started over and several hours later I had this (again)
    Click image for larger version. 

Name:	HALC_0350.JPG 
Views:	352 
Size:	389.4 KB 
ID:	25880

    Speaking of doing things multiple times, I tweaked the shape of the headstock yet again making it a little slimmer at the bottom. Anyway, here's a comparison of the old and new inlay. They both came from the same sheet of celluloid, so you can see something definitely went wrong with the first one
    Click image for larger version. 

Name:	HALC_0360.JPG 
Views:	339 
Size:	215.8 KB 
ID:	25881

  3. #33
    Overlord of Music Sonic Mountain's Avatar
    Join Date
    Jul 2017
    Location
    Toowoomba, Qld.
    Posts
    3,261
    Quote Originally Posted by trv View Post
    Then it came time for the logo. Although my build is based on a specific branded guitar (am I allowed to say their name here?) I'm not trying to pass it off as one. At first I designed a logo using my surname in their typestyle, but aesthetically it didn't work; it literally didn't fit. So since this is inspired by the Halcyon Les Paul, I just went with Halcyon.

    Using a rotary tool with 1/32" bits, a jeweller's saw, various files, X-Acto blades, a few hours and Dog Day Afternoon on in the background (I have no idea why I remember that), I ended up with this
    Attachment 25873
    Rad, I'm a bit fan of clever headstock logos and metal work- Edit- whoops just saw its celluloid. Still looks great. It took me many, many goes to get the Black Cherry Headstock right so don't feel bad

    Re the amount of builds, I do have a big advantage having a workshop and tools and I also work from home...in that workshop, so if things are quiet in my day job I can wonder over and tinker on the build table.

    Compared to building cars (my previous hobby) these are so much easier to work on and finish off.

    (BTW Nice to see a Canuck on the forum, my Dad hails from Duncan B.C)
    Build 1 - Shoegazer MK1 JMA-1
    Build 2 - The Relliecaster TL-1
    Build 3 - The Black Cherry SG AG-1
    Build 4 - The Sonicaster TL-1ish
    Build 5 - The Steampunker Bass YB-4
    Build 6 - The Howling Gowing ST-1

    "What I lack in talent I make up for with enthusiasm"

  4. #34
    Member trv's Avatar
    Join Date
    Apr 2018
    Location
    Winnipeg, Canada
    Posts
    131
    Using the rotary tool I routed out the old inlay and glued the new one in the cavity
    Click image for larger version. 

Name:	HALC_0370.JPG 
Views:	338 
Size:	174.0 KB 
ID:	25882

    This time instead of using CA glue and ebony dust, I used epoxy tinted with the ebony dust to fill the gaps
    Click image for larger version. 

Name:	HALC_0380.JPG 
Views:	350 
Size:	266.5 KB 
ID:	25883

  5. #35
    Member trv's Avatar
    Join Date
    Apr 2018
    Location
    Winnipeg, Canada
    Posts
    131
    The holes for the tuners were spaced a bit further apart than I wanted so I filled them with a 7/16" dowel
    Click image for larger version. 

Name:	HALC_0390.JPG 
Views:	340 
Size:	161.3 KB 
ID:	25884

    Using a flush cut pull saw I cut the ends off the dowels and sanded them flat to the headstock with 180 grit
    Click image for larger version. 

Name:	HALC_0400.JPG 
Views:	354 
Size:	193.2 KB 
ID:	25885

  6. #36
    Member trv's Avatar
    Join Date
    Apr 2018
    Location
    Winnipeg, Canada
    Posts
    131
    SEPTEMBER 2017

    And now it was time for everyone's favourite job... sanding!

    I sanded the overlay using 400 grit, then masked off the fretboard, the end of the neck and the top of the body. Next I grain filled the back of the body and neck with watered down wood filler... this probably wasn't necessary. I sanded the back and sides of the body and neck with 220 grit, dampened it to raise the grain and repeated this process a few times. Lastly, I refined of the shape of the transition where the headstock meets the neck.

    Using a 25/64" bit I redrilled the tuner holes
    Click image for larger version. 

Name:	HALC_0410.JPG 
Views:	381 
Size:	437.0 KB 
ID:	25886

  7. #37
    Member trv's Avatar
    Join Date
    Apr 2018
    Location
    Winnipeg, Canada
    Posts
    131
    Quote Originally Posted by Sonic Mountain View Post
    Rad, I'm a bit fan of clever headstock logos and metal work- Edit- whoops just saw its celluloid. Still looks great. It took me many, many goes to get the Black Cherry Headstock right so don't feel bad

    Re the amount of builds, I do have a big advantage having a workshop and tools and I also work from home...in that workshop, so if things are quiet in my day job I can wonder over and tinker on the build table.

    Compared to building cars (my previous hobby) these are so much easier to work on and finish off.

    (BTW Nice to see a Canuck on the forum, my Dad hails from Duncan B.C)
    That's great that you have the freedom to tinker at times throughout the day, I could see how that could help!

    Cars are another story, I do as much of my own maintenance as I can, but fabrication would be well beyond my skill set at this point.

    I've never been to Duncan, but if it's in B.C. I'm sure it's beautiful.

  8. #38
    Member trv's Avatar
    Join Date
    Apr 2018
    Location
    Winnipeg, Canada
    Posts
    131
    Another thing I wanted to try during this build was to screen print a wordmark on the headstock. I already had a screen (from a previous semi-successful attempt at printing t-shirts) so I got some emulsion, printed the artwork on a transparency and exposed my screen using sunlight
    Click image for larger version. 

Name:	HALC_0420.JPG 
Views:	346 
Size:	353.2 KB 
ID:	25887

    If you're wondering why I stepped the art six times on the screen, it's because that's how many fit on there and I just hoped one of them would work!

    At the same time I treated the back of the body, neck and overlay with wood conditioner and applied 2 coats of Saman Black water based stain. Then I alternated sanding and staining starting with 220, then moving to 320 grit.

    My first attempt at screen printing on a scrap piece of wood. Not quite there yet, but it's a start
    Click image for larger version. 

Name:	HALC_0430.JPG 
Views:	341 
Size:	361.0 KB 
ID:	25888

  9. #39
    Member trv's Avatar
    Join Date
    Apr 2018
    Location
    Winnipeg, Canada
    Posts
    131
    I had to thin out the ink a bit and adjust my technique, but eventually it got better. It took six test prints before I felt daring enough to try printing on the actual headstock
    Click image for larger version. 

Name:	HALC_0440.JPG 
Views:	358 
Size:	336.2 KB 
ID:	25889

  10. #40
    Member trv's Avatar
    Join Date
    Apr 2018
    Location
    Winnipeg, Canada
    Posts
    131
    Last shots before we introduce wood glue into this equation
    Click image for larger version. 

Name:	HALC_0460.JPG 
Views:	340 
Size:	402.3 KB 
ID:	25890Click image for larger version. 

Name:	HALC_0470.JPG 
Views:	358 
Size:	350.2 KB 
ID:	25891Click image for larger version. 

Name:	HALC_0450.JPG 
Views:	351 
Size:	307.0 KB 
ID:	25892

Page 4 of 10 FirstFirst ... 2 3 4 5 6 ... LastLast

Posting Permissions

  • You may not post new threads
  • You may not post replies
  • You may not post attachments
  • You may not edit your posts
  •