
Why not cut a disc of abalone, then print the reverse part of your logo in black. Put that on the abalone. Clear over it and put that into the hole in the veneer?


Why not cut a disc of abalone, then print the reverse part of your logo in black. Put that on the abalone. Clear over it and put that into the hole in the veneer?
There is a plastic / polyester that is quite strong as I used to use it for hinges on my RC planes and is easy to cut with a sharp knife called mylar which comes in various forms. It is used by draughtsmen for drawing and is used in the survival blankets so there are various thicknesses. From my understanding you are using a backing material so if the abalone breaks as it is brittle it will hold together via the backing. Most glues can be used with mylar, I used superglue and araldite but I am sure there are others. If you can get some thin double sided tape, I used a tape that is about the thickness of paper so there is no flex when pressure is applied via a knife so the abalone wont break, and use this to stick the mylar to a piece of wood then glue the abalone down onto the mylar. Once you cut out your design then use a solvent to dissolve the double sided tape glue to remove the item from the wood that doesn't react with the glue holding the abalone to the mylar. I used ethanol and am pretty sure it doesn't react with the mylar and superglue but it would need to be verified. Have used this method and material on a engraver machine I used to use with thin material with no problems which is another way of making your emblem as abalone is quite easy to engrave and cut out using an CNC engraver / router so if you know someone or can access such a machine would make your life a lot easier.
Builds :
# 1 - Non PBG ES-335
# 2 - Non PBG Tele Thin line
# 3 - Non PBG LP
# 4 - Non PBG SG
# 5 - RC-1
# 6 - TL-1
# 7 - ST-1 Custom
# 8 - SGB-30 + Non PBG SG
# 9 - Custom JRM-1DC 12 String
#10 - Custom ST-1 with P90's
#11 - Custom TL-1 with 27" Bari Neck
#12 - Custom JZ-6 Jazzmaster
#13 - AG-1 Factory Second
#14 - Custom JZ-6 Bass vi
#15 - EX-1R Factory Second
#16 - AGM-1
#17 - EXA-7

It's going to need to be sanded when in place, so anything printed on top isn't gong to survive the sanding.Originally Posted by Sonic Mountain

I realised that I didn't need to cut right through the backing plastic as long as I could remove the unwanted bits of abalone, I almost managed one like that, apart from a small corner that kept breaking off every time I tried to trim it back. But the fact that I could separate the abalone from the backing plastic showed that the glue wasn't strong enough to keep the abalone attached regardless.
I have now got some polyester ink jet printing film and have glued some of that onto the back of some more of the thin abalone sheet with superglue. Going to let that dry for a while and then see how I get on with that.
Well superglue didn't stick the plastic film to the abalone. It stuck to the abalone and left a nice clear covering when I simply peeled the plastic away with almost no force. The spray glue stuck it on much better.
I've now got a jewellers saw and will give that a go, but today is one of those days where anything I touch goes wrong, so I'll try it out another day.
I'm sure you won't be beat Simon and crack it eventually, sometimes we need to sit back, move onto other things then go back to it with a fresh mind
Build #1 Completed LP1S
Build #2 Completed STA-1M
Build #3 LP1F http://www.buildyourownguitar.com.au...ead.php?t=7767[url]
Build #4 PRS-1 http://www.buildyourownguitar.com.au...ead.php?t=7881[url]
Build #5 ST-1M http://www.buildyourownguitar.com.au...ead.php?t=7961[url]
Build #6 SGM-1 http://www.buildyourownguitar.com.au...ead.php?t=7857[url]
I will get there in the end. Now I've got the jewellers saw and had a quick go with it, I'm sure I'll find a way. I may even end up ordering some thicker abalone that's not quite so delicate.

Ah yes, youve had a poo finger Day. They happen. Chalk it up to experience and have a cuppa.
FrankenLab:
Turning tone wood into expensive sawdust since 2016!
Well I think I've sorted out the inlay issue, using a mixture of scoring round the shapes with a scalpel then using a Dremel engraving bit to remove the abalone in the middle. I realised that I don't need to cut all the way through the plastic backing, I just need to remove the abalone so that I can fill the gaps with black super glue. Though i'm not sure quite well how the superglue will stick to the plastic, so I've made holes right through in several locations, so that the glue can stick underneath (it should stick OK to the wood) come up through the holes and fill the pits in the abalone on the top, hopefully locking it into place. I've got a couple of inlays ready, but until I try each filling one with the superglue, then I won't know exactly how good they'll look, as the plastic backing is obviously a bit mangled from the engraving bit, so the abalone doesn't stand out much in contrast. Fingers crossed.
Anyway, in preparation, I've cut out a bit of veneer for the headstock face, cut a hole in it for the inlay to sit in, and glued it to the headstock. Luckily my inlay design just happened to be the same size as a UK 10 pence piece, so I had an easy template to draw around. Here I'm halfway through taping up the sides of the headstock to protect them from any glue runs. There's no way that I'd get a wet cloth to remove any excess in between the clamping pieces with the clamps in the way.
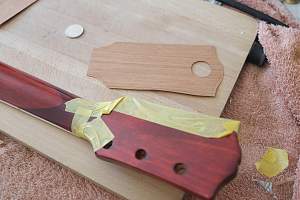
I just hope the veneer hasn't moved from its centred position when I clamped it up (cling film between the clamping piece and the veneer to avoid any sticking).
I've removed the plastic nut ready to fit a bone one, but noticed that there's a definite step down between the ledge the nut sits on and the headstock face; almost as if it was designed to have a veneer applied, as the veneer nicely removes that step. As these are kits from factories that also produce finished guitars, maybe it was!
The veneer is just slightly thinner than the inlay piece, but by the time the veneer is sealed and has a couple of coats of black paint on, it should be on a similar level. Then some wet sanding should bring everything nice and flat again.
Well, that's the plan!
Last edited by Simon Barden; 25-02-2018 at 10:06 PM.
And if it all goes wrong I can simply sand it all off and start again. Hours of fun!

Back in the day it was 'What happens when Dawn breaks' ah, memories.
cheers, Mark.
 Posting Permissions

 Reply With Quote