
Lol Simon. There's always one in every crowd.Originally Posted by Simon Barden


Lol Simon. There's always one in every crowd.

If it hadn't been him it would have been me Robin...
FrankenLab:
Turning tone wood into expensive sawdust since 2016!
Haha. Hi Frankie, OK then, 2 in every crowd
I had a thought with this, recalling your work in the fretless bass build where you put clear epoxy over the board.
It might have been possible to leave the binding noticeably proud of the face and then pour epoxy in to level the front face and protect the finish. that way you'd have preserved (for all eternity) the patina and colour of the wood, but given yourself an edge you could sacrifice to get your binding true and trimmed.
FrankenLab:
Turning tone wood into expensive sawdust since 2016!
Hey Frankie, I had that same thought myself. But decided against it.
My thought process at the time was that as this is probably going to be a wall hanging it won't get the usual use and abuse that us muso's inflict upon our instruments and will therefore stand the rigors of time. There is something tactile in the character of wood and although seen, that patina could not be felt (and I think Bev will want to) if it were covered by a layer of resin. I probably should have checked with Bev first, but she has left the whole project up to me and I went with a gut feeling.
Although not perfect if inspected closely, I am fairly happy with how its turned out so far. The flaws that are still there would not bother me if it were my guitar, but I have set myself a higher standard for Bev as it means so much to her.
A few before and after shots
BeforeAfter
BeforeAfter
I painstakingly scraped every glue spot with the blade until I got down to the level of the varnish. Fairly happy with how it turned out.
Cheers for the thought mate,
rob
It was just a thought that struck me, though your point about the tactility of wood is taken.
On the FrankenWashie resurrection I have left the timber raw, though polished up to the max with Micro mesh. Even though it is polished there is a subtle tactile difference between the Vic ash, the merbau, the Matai and the maple of the neck. It feels different under you hands than something coated, painted or oiled.
FrankenLab:
Turning tone wood into expensive sawdust since 2016!
That's interesting mate, I'm surprised that you can feel that sort of a difference.
I'm sure to a numpty like me it would all feel like, you know.........wood.
I know its been a little while since I last updated the thread but I have been slowly making progress with Bevs guitar, so I thought it was time to post a few more pics and get up to date.
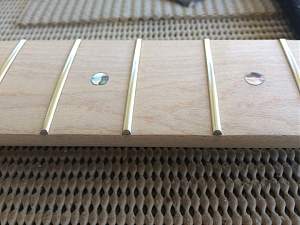
First thing was to level and dress the frets.
For those of you who have not yet attempted dressing frets, its fairly easy, but there are a few tools that are really helpful. I have done it without these tools but it is definitely easier (and highly recommended) that you get them if possible. If you plan on making just one guitar (good luck if you can stop at one) its best to get Dingobass to do it. That way you know that the job will be done properly, but if you are a masochist like me read on.
Once the neck has been levelled and taped off you grab a thick felt pen and run a line down the length of each fret.
Then, using a 12 radius block with 400 grit wet and dry paper, slowly, carefully, and lightly run the block up and down the full length of the neck until you have removed the felt pen from the crown of ALL the frets. You now know that all the frets should be the same height.
By now some (or most) of the frets have a flat crown so its time to get out the Fret File and re-crown the frets and get rid of the flat spots. Mark each fret with the felt pen as before, but this time you want to leave a very thin line of ink running down the centre of each fret. Be sure to try and leave some ink the full length of each fret. The frets should now be nicely domed. Its a good idea to check them as well with a Fret Rocker just in case there are some obvious boo boos.
Fret File
Fret Rocker
Then polish them up with wet and dry paper and finish with 000 then 0000 steel wool. When youre finished you should have removed all the files marks from the frets and they should be nice and shiny. Being a belt and braces kind of guy I will also use a fretboard protector you know, just in case.
......
.. Thats the neck done. Its one of those jobs that youll only know if youve done a good job when the guitar is finished. So fingerscrossed.
Last edited by robin; 03-04-2018 at 08:10 AM.
I am usually a devout Tru-Oil man, but seeing as I still had some MinWax Wipe-on Poly left over from my last guitar I used that instead.
The fretboard got about 14 coats of Poly, the neck 7 coats and the headstock the full monty, 21 coats. It has ambered up a bit more than I had hoped, but I dont mind it. I think it might be getting a bit old and thick. Oh, hang on, I think thats me.
Fretboard
Headstock
Next job will be to finish off the body. I have already stained it and applied 21 coats of Poly. It has streaked fairly badly from the wipe-on process so I will have to cut it back a bit.
 Posting Permissions


 Reply With Quote