
Nice work PeMe, what thickness was the steel you used for your forming die?


Nice work PeMe, what thickness was the steel you used for your forming die?
FrankenLab:
Turning tone wood into expensive sawdust since 2016!

Have just painted my headstock where I plugged the holes. Give the primer time to shrink back before committing to your top coat and gloss. Even after doing all that I could still see the old tuner holes. Just saying. I used Nitro tho.
Builds to date
#1, 3 string box guitar
#2, GR-1SF, November guitar of the month 2016
#3, Charvel Surfcaster tribute scratch build. ( Completed )
#4, Pawn shop Strat ( Completed )
#5, Current build MM-1Q
+1 to this. I had similar experience with plugging tailstop anchor holes in my LP build. At least 48-72 hours cure time per coat (Rustoleum 2x flat grey primer), plus a light wetsand (P1000) between each second coat to finally get a smooth finish across the plugs. I think i ended up with 6 coats on it prior to going back to colour.Originally Posted by JB RETRO

FrankenLab:
Turning tone wood into expensive sawdust since 2016!

Hope you have checked spacing between each tuner from the rear as from the front it didn't look too far off from being right?
# 1 - EX-5 https://goo.gl/fQJMqh
# 2 - EX-1 https://goo.gl/KSY9W9
# 3 - Non PBG Tele https://goo.gl/W14G5g
# 4 - Non PBG J Bass https://goo.gl/FbBaFy
# 5 - TL-1AR GOTM Aug 2017 https://goo.gl/sUh14s
# 6 - MMB-4 Runner-up GOTM Oct 2018https://goo.gl/gvrPkp
# 7 - ES-1 Runner-up GOTM Aug 2018https://goo.gl/T9BEY8
The steel is 1,5mm thick. I didnt sand or smoothen the whole out so the sharpness of the whole could do its work.
There was nothing wrong with the spacing of the wholes, but i will reshape the whole headstock so the wholes needs to me redrilled.
OK, fair enough and understand that 12 tuners take up a lot of real estate.
# 1 - EX-5 https://goo.gl/fQJMqh
# 2 - EX-1 https://goo.gl/KSY9W9
# 3 - Non PBG Tele https://goo.gl/W14G5g
# 4 - Non PBG J Bass https://goo.gl/FbBaFy
# 5 - TL-1AR GOTM Aug 2017 https://goo.gl/sUh14s
# 6 - MMB-4 Runner-up GOTM Oct 2018https://goo.gl/gvrPkp
# 7 - ES-1 Runner-up GOTM Aug 2018https://goo.gl/T9BEY8
Been down at my workshop for a couple of hours and getting closer for some paint on the body
Ive also started to work a bit on the headstocks
Last edited by PeMe; 15-07-2017 at 01:21 PM.

Oooh, that headstock work looks nice!
I had some issues with the primer vs paint and needed to sand it all down to bare wood and apply another primer that was compatible with my main paint.
so after a few days of frustration im now at where i was a few days ago, but this time the paint wont crack when i start to paint the guitar and necks.
Ive learned the hard way that you need to know BEFORE you start to put on the primer if it is compatible with the 2 componet paint and if you aren't shure, test it on some scrap wood you have lying around so you dont need to put loads and loads of work into sanding down to bare wood.
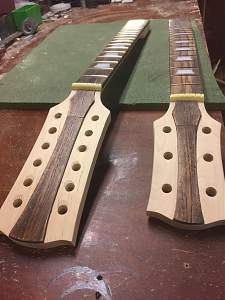
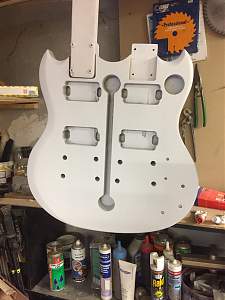
Here are some pics of where im currently at in the progress.
Body and necks
Headstocks
Still love the grain on the 6-string neck
The body, ive reposition the controlls bit as i felt that the bridge would be in the way.
I've also moves the jack to the front just because i can
 Posting Permissions

 Reply With Quote