Page 1 of 2 1 2 LastLast
Results 1 to 10 of 11

Thread: Spray masking techniques

  1. #1
    Member
    Join Date
    Jan 2017
    Location
    Canberra
    Posts
    177

    Spray masking techniques

    So, I think I'm almost at the end of the priming, and getting ready to put some colour spray on.

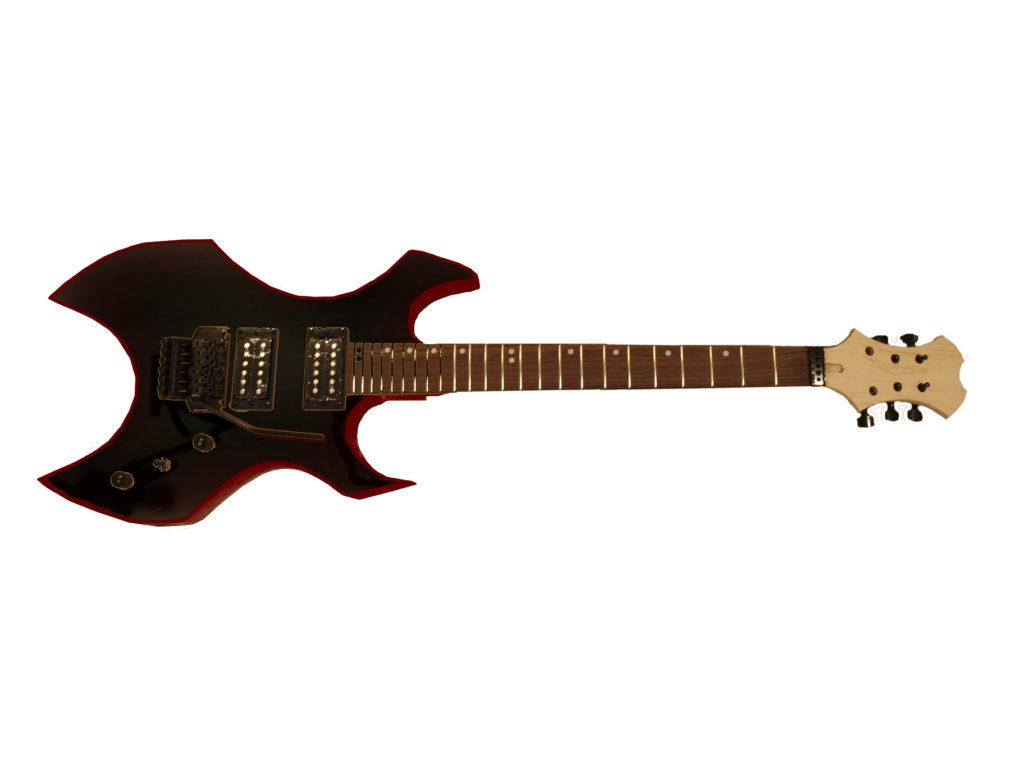
    The finish will have red on the edges, black on the top. Hoping for a nice clean line between the two.

    What approach do people use for masking off areas while doing other colours? Do you mask when spraying the first colour? Or do you just spray the first colour, knowing that it will get covered with the 2nd colour?

    I've been experimenting on a bit of scrap, and found that if I mask off and spray red, then remove the tape, mask off the other side and spray black, then I will get an obvious line where the edge of the red paint was. It leaves a raised ridge - I guess the red paint has raised up a bit where it can sit next to the tape while drying.

    Should I have lightly sanded down the edge of the red to remove that ridge before spraying the black?

    Or should I just not mask when spraying the red edges, let that dry, then mask off the bits I want to keep red and spray over with black.

    Any opinions welcome.

    The tape I have is professional painters tape, for use with spraying, varnish, lacquer, etc, with 10 day clean removal. It sounded convincing to me anyway.

  2. #2
    GAStronomist stan's Avatar
    Join Date
    Aug 2013
    Location
    Geelong, Vic
    Posts
    5,290
    Skinning cats mate, many ways...
    I think if you mask both ways you will still get an edge, and if you sand it you may end up with an imperfect meeting of paint lines.
    Just me , I'd do the red first and then mask it for the darker stripes, gently sand any obvious ridges and clear over to blend it all in...

  3. #3
    Member
    Join Date
    Jan 2017
    Location
    Canberra
    Posts
    177
    Thanks Stan. I'll try that out on my scrap and see how it goes.

    Here's the plan for the colours (assuming minds aren't changed before then...)


  4. #4
    GAStronomist stan's Avatar
    Join Date
    Aug 2013
    Location
    Geelong, Vic
    Posts
    5,290
    Very wise, plan on scrap. That will look great

  5. #5
    When I did my MB-1 colours, I did my lightest colours as my base coats, and went darker as I got closer to the top (barring a couple of small spots that were for little details.

    In terms of how I masked, I used 3mm Vinyl tape (3M brand if that matters, idk how many brands make the stuff) to do the edges, then used some form of painters masking tape to cover the areas around it, and if I had a massive space to cover, used some masking paper over the big parts so that the whole thing wasn't covered in tape.

    There was a tiny bit of bleed on some of the tighter corners, but nothing that a bit of careful scraping couldn't deal with.

    Masking:
    Click image for larger version. 

Name:	041 Closeup (Custom).jpg 
Views:	298 
Size:	516.2 KB 
ID:	19108

    Result:
    Click image for larger version. 

Name:	044 Closer now (Custom).jpg 
Views:	303 
Size:	313.8 KB 
ID:	19109

    Oh and with the edges: Yea also had a bit of an edge, but carefully sanded that down, not totally flush, but close enough that some clear coats would fill that out a bit

  6. #6
    Member
    Join Date
    Jan 2017
    Location
    Canberra
    Posts
    177
    Thanks B'lark, awesome looking example.

    If most of my build is black, with a small amount of red, could I do black all over, then cover with red? Or is the black underneath going to affect the red colour too much?

    I was spraying some scrap pieces today to test, but didn't prime the scrap first. I can now see why primer is important...the red peeled straight off the scrap wood! (Was using some old kitchen laminated MDF for test scrap.)

    More testing on scrap tomorrow planned, with primer first this time!

  7. #7
    Member Thigg88's Avatar
    Join Date
    Nov 2016
    Location
    Inverell nsw
    Posts
    55
    Red doesnt usually cover dark colours well in my experience. A grey or white is best for a bright strong final colour. I would spray the red first then mask it to spray the black. A easy way to minimise your tape bleed it after you mask spray a light coat of the masked colour(red in this case) around the tape edges. This kind of seals the tape with little bleeds of the same colour. Really works well to make your contrast colour line clean

  8. #8
    GAStronomist Simon Barden's Avatar
    Join Date
    Oct 2016
    Location
    Reading, UK
    Posts
    10,547
    Quote Originally Posted by Thigg88 View Post
    A easy way to minimise your tape bleed it after you mask spray a light coat of the masked colour(red in this case) around the tape edges. This kind of seals the tape with little bleeds of the same colour. Really works well to make your contrast colour line clean
    Great tip there, Thigg!

  9. #9
    Member
    Join Date
    Jan 2017
    Location
    Canberra
    Posts
    177
    Thanks Thigg, I just re-read your hint and realised what you meant (think I was tired last time!). That is a great idea.

    Next question... in my testing on scrap, I found that cheap electrical tape worked better than the expensive professional painters tape, when doing curves and corners. The electrical tape is slightly stretchy so I could curve it around in one piece and get a much nicer finish. With the painters tape, I had to cut out lots of tiny little fiddly bits of tape to go around corners, and the finish looked a bit crap.

    Does anyone have any good/bad experience with using electrical tape for masking? I've only done it once or twice on scrap, so don't know if I'm going to cause problems by using it on the guitar.

  10. #10
    Overlord of Music Dedman's Avatar
    Join Date
    Mar 2016
    Location
    The "Fabulous" Gold Coast
    Posts
    3,566
    you can get pvc pin striping tape from panel beaters supply and I've found that to be very good, I also use some very fine fibred paper tape used in scale model building
    Build 19 PSH-1 Kustom
    Build 18 HB-4S Kustom
    Build 17 WL-1 Kustom
    Build 16 TL-1TB Kustom
    Build 15 PBG-2-
    Build 14 FTD-1
    Build 13 RD-1 Kustom
    Build 12 DM-1S
    Build 11 MKA-2 -
    Build 10 Basic strat
    Build 9 JM Kustom
    Build 8 FV-1G
    Build 7 ES-2V
    Build 6- Community prototype
    Build 5 LP-1LQ
    Build 4 ES-5V
    Build 3 JR-1
    Build 2 GD-1
    Build 1 TLA-1

Page 1 of 2 1 2 LastLast

Posting Permissions

  • You may not post new threads
  • You may not post replies
  • You may not post attachments
  • You may not edit your posts
  •