
At the Big Green Shed in the tiling section they sell a tape for doing silicon which is two rows already spaced, so at least your spacing would be equal but I'm not sure how it would release from your paint prior. Anyway it's a thought


At the Big Green Shed in the tiling section they sell a tape for doing silicon which is two rows already spaced, so at least your spacing would be equal but I'm not sure how it would release from your paint prior. Anyway it's a thought
Builds to date
#1, 3 string box guitar
#2, GR-1SF, November guitar of the month 2016
#3, Charvel Surfcaster tribute scratch build. ( Completed )
#4, Pawn shop Strat ( Completed )
#5, Current build MM-1Q
Another possible option (apologies if you've already thought of this) is to paint the whole thing black first (or just paint a wide black line but that risks uneven tone in the other colours later). Then mask your pinstripe with narrow masking tape. Then paint the whole thing white. Then leave the pinstripe masking on and mask the white side off - which will be easier because you have the pinstripe width to overlap the masking on - then paint the blue.
Harder to describe than do
Last edited by billb; 22-01-2017 at 04:02 AM.

Interesting idea billb, thanks for that. Given I've already got the white down, I'm going to forge ahead and see what happens. If it all goes pear-shaped I can just sand back and start again (a bugger, but an option) and perhaps look at your option.Originally Posted by billb

Completed Builds: #1 TL-1 "Telemaster" (GOTM Oct 2016); #2 The "Maplecaster" scratch build; #3 JB-4 "Bass IV" (co-winner GOTM Jan 2017); #4 ST-1M "Surfcaster" (GOTM Apr 2017), #5 JZA-1 "EC Deluxe"
Thanks JB, another interesting one. I'll have a look next time I venture over to the dark side ;-)
Completed Builds: #1 TL-1 "Telemaster" (GOTM Oct 2016); #2 The "Maplecaster" scratch build; #3 JB-4 "Bass IV" (co-winner GOTM Jan 2017); #4 ST-1M "Surfcaster" (GOTM Apr 2017), #5 JZA-1 "EC Deluxe"
So, I'm now at the stage where both the body and the pickguard have had their base white coats...
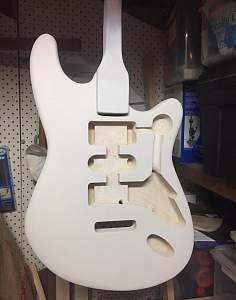
Next I'll lightly "wipe" some 600 or 800 over them, in particular along the masking line as I want the tape to make good contact to minimise bleeding. Then I need to actually fit the pickguard as the next step of masking and painting require it to be in place.
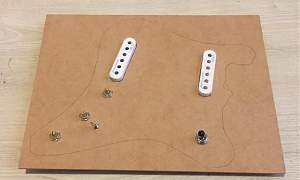
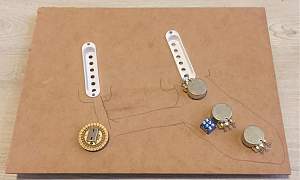
I've also whipped up a quick dummy pickguard and mounted the electronic stuff on it - I know this is going to be a fiddly wiring effort so wanted something nice and stable to work from. I've also roughly marked the routing wiring can be kept to the right length. Once this is finished it will simply a matter of attaching it to the real pickguard and then wiring in the jack and bridge ground.
Completed Builds: #1 TL-1 "Telemaster" (GOTM Oct 2016); #2 The "Maplecaster" scratch build; #3 JB-4 "Bass IV" (co-winner GOTM Jan 2017); #4 ST-1M "Surfcaster" (GOTM Apr 2017), #5 JZA-1 "EC Deluxe"
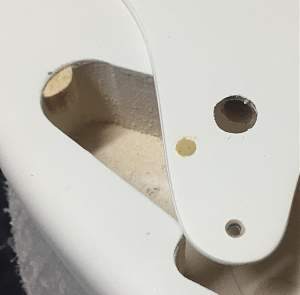
Well, pride before a fall! Went to mount the pickguard and two of the mounting screws are in spots over the cavity. Normally I turn mistakes into opportunities to do something different but no real options here. I've plugged one with timbermate and glued a small piece of wood in the cavity for another. Sadly it means I'm on hold for the next stage until I paint over the plug... ah well, thems the breaks.
Completed Builds: #1 TL-1 "Telemaster" (GOTM Oct 2016); #2 The "Maplecaster" scratch build; #3 JB-4 "Bass IV" (co-winner GOTM Jan 2017); #4 ST-1M "Surfcaster" (GOTM Apr 2017), #5 JZA-1 "EC Deluxe"
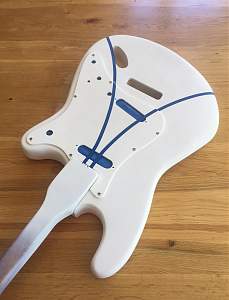
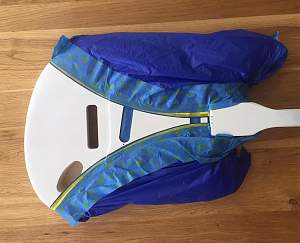
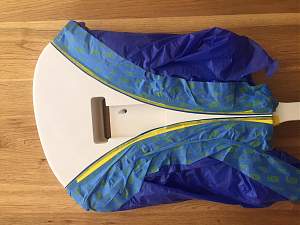
A good day - including a trip to Anagote Timbers to pick up some supplies for another build! On this one, all the white basecoating is done, and the issues with the pickguard are all solved. Today I've masked up the body, first with 3mm plastic auto trimmers masking tape, then with a couple of other tapes and a bunch of plastic sheeting. If the temperature drops a little in the next hour or so and the wind dies down, I'll try and get the first mist coat on. Btw, to get the long curves, I attached a pencil to a piece of string and then played around with the length of string to my thumb to get the right curve - made it a pretty simple job.
Completed Builds: #1 TL-1 "Telemaster" (GOTM Oct 2016); #2 The "Maplecaster" scratch build; #3 JB-4 "Bass IV" (co-winner GOTM Jan 2017); #4 ST-1M "Surfcaster" (GOTM Apr 2017), #5 JZA-1 "EC Deluxe"

Nice thinking and good string work there, Chuck! Looking good.
Cheers Simon, the string technique is something I've used when marking up bodies for reshaping too - it's a nice way to ensure a smooth curve!
Completed Builds: #1 TL-1 "Telemaster" (GOTM Oct 2016); #2 The "Maplecaster" scratch build; #3 JB-4 "Bass IV" (co-winner GOTM Jan 2017); #4 ST-1M "Surfcaster" (GOTM Apr 2017), #5 JZA-1 "EC Deluxe"
Tonight, after three coats of the blue, I unmasked! Pretty happy with the result other than a couple of bleed points where the blue joins the pickguard and on the corner of the neck pocket. The pickguard ones I kind of expected as it proved pretty difficult to mask the "step" between the two surfaces, and I've got no idea at all how the neck one happened!! Still, I think I should be able to clean them up enough to get by - it probably looks a bit worse in the photo than it does in real life. I'm really happy with the blue in that I wanted it to look like the blue was sprayed on a surfboard blank rather than absolutely solid. It'll be interesting to see how it all looks after clear coating.
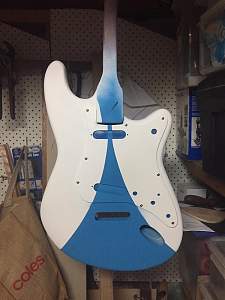
Still working on a couple of ideas for the black keyline...
Completed Builds: #1 TL-1 "Telemaster" (GOTM Oct 2016); #2 The "Maplecaster" scratch build; #3 JB-4 "Bass IV" (co-winner GOTM Jan 2017); #4 ST-1M "Surfcaster" (GOTM Apr 2017), #5 JZA-1 "EC Deluxe"
 Posting Permissions

 Reply With Quote