Page 4 of 12 FirstFirst ... 2 3 4 5 6 ... LastLast
Results 31 to 40 of 118

Thread: Chuck’s ST-1M “Surfcaster” build

  1. #31
    Mentor Chuck's Avatar
    Join Date
    Aug 2016
    Location
    Sydney
    Posts
    584
    Yep, Freeway switch on the lower horn.

    As far as the painting goes, I might as well reveal the plan. As I've said this is surf inspired. I'm a kneeboarder (yep, there are some of us left!) and I've always ridden Friar Tuck boards. The board in the middle of the picture below is my current favourite, so I'm modelling the paint scheme on it.

    Click image for larger version. 

Name:	IMG_0367.jpg 
Views:	147 
Size:	331.1 KB 
ID:	16372

    Flip the board on it's side and we're getting close. I'll start by painting the body and pickguard white. I'll then attach the pickguard and mask everything off to do the blue wedge (I'm not going to do the wiggly "sperm" tail - just a straighter kind of thing). That's why I need to be able to paint the pickguard. Then I'll mask again to get that black keyline. Hopefully it will work out and be quite striking, but we'll see!

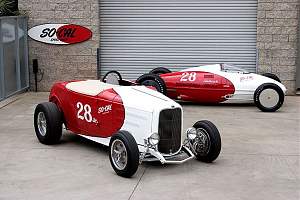
    I've also always loved what the guys at SoCal hotrods do with their artwork - you can see the similarities with the Friar Tuck paintjob in this pic.

    Click image for larger version. 

Name:	Socal.jpeg 
Views:	130 
Size:	78.5 KB 
ID:	16373
    Completed Builds: #1 TL-1 "Telemaster" (GOTM Oct 2016); #2 The "Maplecaster" scratch build; #3 JB-4 "Bass IV" (co-winner GOTM Jan 2017); #4 ST-1M "Surfcaster" (GOTM Apr 2017), #5 JZA-1 "EC Deluxe"

    In Progress:
    Build #6 N1R "Semi-scratch" build
    Build #7 JZA-1 Baritone

    The Cavan Project
    The Magnificent Compañeros

  2. #32
    GAStronomist wokkaboy's Avatar
    Join Date
    Dec 2012
    Location
    Perth WA
    Posts
    13,555
    cool plan Chuck, sure you can pull off a cool paint job like that. Love those hot rods too !
    Imagine owning one and going for a Sunday cruise on a nice sunny arvo !
    Current Builds and status
    scratch end grain pine tele - first clear coat on !
    JBA-4 - assembled - final tweaks
    Telemonster double scale tele - finish tobacco burst on body and sand neck

    Completed builds
    scratch oak.rose gum Jazzmaster - assembled needs setup
    MK-2 Mosrite - assembled - play in
    Ash tele with Baritone neck - neck pup wiring tweaks and play in

  3. #33
    Mentor Chuck's Avatar
    Join Date
    Aug 2016
    Location
    Sydney
    Posts
    584
    Oh, and I took a little more of the headstock to give it a better wave feel!

    Click image for larger version. 

Name:	130117 headstock final shape.jpg 
Views:	149 
Size:	80.2 KB 
ID:	16374
    Completed Builds: #1 TL-1 "Telemaster" (GOTM Oct 2016); #2 The "Maplecaster" scratch build; #3 JB-4 "Bass IV" (co-winner GOTM Jan 2017); #4 ST-1M "Surfcaster" (GOTM Apr 2017), #5 JZA-1 "EC Deluxe"

    In Progress:
    Build #6 N1R "Semi-scratch" build
    Build #7 JZA-1 Baritone

    The Cavan Project
    The Magnificent Compañeros

  4. Liked by: ThreeBbass

  5. #34
    GAStronomist wokkaboy's Avatar
    Join Date
    Dec 2012
    Location
    Perth WA
    Posts
    13,555
    nice stock shape Chuck that will fit in with the surf theme nicely !
    Current Builds and status
    scratch end grain pine tele - first clear coat on !
    JBA-4 - assembled - final tweaks
    Telemonster double scale tele - finish tobacco burst on body and sand neck

    Completed builds
    scratch oak.rose gum Jazzmaster - assembled needs setup
    MK-2 Mosrite - assembled - play in
    Ash tele with Baritone neck - neck pup wiring tweaks and play in

  6. #35
    GAStronomist FrankenWashie's Avatar
    Join Date
    Jan 2016
    Location
    Glebe, NSW
    Posts
    5,666
    Quote Originally Posted by Chuck View Post
    Oh, and I took a little more of the headstock to give it a better wave feel!

    Click image for larger version. 

Name:	130117 headstock final shape.jpg 
Views:	149 
Size:	80.2 KB 
ID:	16374
    Yep, yep that's looking fairly surf right there. Love it!
    FrankenLab
    Hand crafting guitars, because Death Rays are expensive.


  7. #36
    Overlord of Music andrewdosborne's Avatar
    Join Date
    May 2014
    Location
    Sydney, NSW
    Posts
    2,751
    I like the look of where this is heading, good stuff

    Sent from Android Nougat
    Current Projects
    #Planning 5 String Bass

  8. #37
    mmm... surfy.
    Scott.

  9. #38
    Mentor Nickosaurus's Avatar
    Join Date
    Mar 2014
    Location
    Adelaide
    Posts
    1,077
    Absolutely killer headstock mate

  10. #39
    Overlord of Music Andy40's Avatar
    Join Date
    Oct 2015
    Posts
    3,913
    I think you could do some damage to someone with that headstock...or catch a fish. Looks cool Chuck
    Build #1 - ST-1 - Completed
    Build #2 - LP-1SS - Completed
    Build #3 - TLA-1R - Completed
    Build #4 - SGD-612 - Completed
    Build #5 - ES-1G - Completed
    Build #6 - STA-1HT | Completed
    Build #7 - ST1JR - Completed
    Current Build #8 - JBA-4
    Build #9 - Semi-scratch build Tele x 2 - Completed
    Current Build #10 - PRS-1H
    Current Build #11 - AGJR-1 - Completed
    Current Build #12 - ATL-1SB
    Current Build #13 - GST-1
    Current Build #14 - FBM-1

  11. #40
    Mentor Chuck's Avatar
    Join Date
    Aug 2016
    Location
    Sydney
    Posts
    584
    Slowly making progress. Body and pickguard are primed and another coat will have the white base coat done. But now question for the painting experts as anything more than a single colour finish is new to me!

    The illustration shows what I’m doing – the body is painted white, and I’ll have the centre section painted blue. I figure I’ll use 3mm pinstripers masking tape to create the curve, then wider tape and newspaper to create the mask. The thing is I want a black keyline between the two colours.

    Click image for larger version. 

Name:	Masking.jpeg 
Views:	126 
Size:	100.1 KB 
ID:	16518

    I figure there are two options: 1) leave the masking in place, then create a second masking line 1mm wide on the blue part, cover all the blue with paper, then spray the line with black. Option 2 would be to finish the blue section, then take all the masking off, then mask .5mm on either side of the paint “join” line and then spray that bit black. I think the advantage of this is that I won’t be building up two layers of colour next to the white, but on the downside it will be a bit fiddly.

    What say the brains trust? Or any other ways of doing it?
    Completed Builds: #1 TL-1 "Telemaster" (GOTM Oct 2016); #2 The "Maplecaster" scratch build; #3 JB-4 "Bass IV" (co-winner GOTM Jan 2017); #4 ST-1M "Surfcaster" (GOTM Apr 2017), #5 JZA-1 "EC Deluxe"

    In Progress:
    Build #6 N1R "Semi-scratch" build
    Build #7 JZA-1 Baritone

    The Cavan Project
    The Magnificent Compañeros

Page 4 of 12 FirstFirst ... 2 3 4 5 6 ... LastLast

Posting Permissions

  • You may not post new threads
  • You may not post replies
  • You may not post attachments
  • You may not edit your posts
  •