Page 2 of 6 FirstFirst 1 2 3 4 ... LastLast
Results 11 to 20 of 53

Thread: JR-1 semi-scratch build

  1. #11
    Thanks Brendan, Wokks, Stan and Andy. The neighbour's kids may have learnt a few new words that day .
    I'm planning on a dark stain so hopefully the patch wont show, if it does will cross that bridge when I get to it.
    Asked Pabs to make a humbucker routing template (already had the P90 template from the last build). He asked if I was direct mounting the pup so he could adjust the template to suit. At the time was going to use a mounting ring, but the seed was planted and used his template as a master and made another with a smaller opening. If it doesn't work, can always go back to using a ring.
    During and after
    Click image for larger version. 

Name:	JR 18.jpg 
Views:	513 
Size:	232.3 KB 
ID:	13439Click image for larger version. 

Name:	JR 19.jpg 
Views:	503 
Size:	221.3 KB 
ID:	13440
    Stan, had the same thought about the control cavity and sketched out a shape that should work. After my mishap with the drill, wasn't going to try to freehand the rout, so made a couple of templates. Tried to line them up as close as possible to the cavity wall but both ended up a little off on the straight edge.
    Click image for larger version. 

Name:	JR 20.jpg 
Views:	531 
Size:	269.5 KB 
ID:	13441Click image for larger version. 

Name:	JR 21.jpg 
Views:	529 
Size:	264.1 KB 
ID:	13442
    After those pics were taken, cleaned up that bump with a chisel and with a little sanding should not be noticeable.
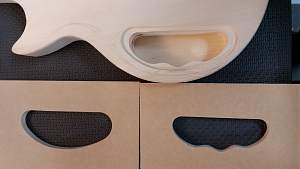
    The two templates
    Click image for larger version. 

Name:	JR 22.jpg 
Views:	507 
Size:	286.6 KB 
ID:	13443

  2. #12
    Drilled the holes for the Grover tuners and test fit
    Click image for larger version. 

Name:	JR 24.jpg 
Views:	409 
Size:	375.0 KB 
ID:	13444Click image for larger version. 

Name:	JR 25.jpg 
Views:	407 
Size:	384.5 KB 
ID:	13445
    The neck screw holes were pre-drilled, dowelled up one so I could round off that corner and fit the ferrules.
    Used an 8mm auger to drill the holes for the pup wires and a 3mm bit for the bridge earth wire, then made holes for the controls.
    Now I'm at the point where we usually start a kit from, time for a mock up.
    Click image for larger version. 

Name:	JR 26.jpg 
Views:	410 
Size:	293.4 KB 
ID:	13446Click image for larger version. 

Name:	JR 27.jpg 
Views:	422 
Size:	269.9 KB 
ID:	13447

    Grant

  3. #13
    GAStronomist stan's Avatar
    Join Date
    Aug 2013
    Location
    Geelong, Vic
    Posts
    5,290
    Nice work with the control cavity, love the headstock - a bit PRS, a bit Schecter, a lot cool

  4. #14
    Thanks Stan

    Been a bit lax keeping this up to date, time to show whats been happening.
    Started shaping the edges with a spokeshave to try to get a flat bevel face. Got the hang of fine adjusting the spokeshave just at the end of what I needed to do, kept getting chatter marks when not going with the grain or the blade wasn't set right.
    Attachment 14403
    Being a bolt on neck, used the screw holes to attach some extra pieces so the shaping didn't "fall" into the neck pocket ( found that on someones thread a while ago, not sure whose)
    Attachment 14404Attachment 14405
    And sanded up to 320 grit
    Click image for larger version. 

Name:	JR 33.jpg 
Views:	415 
Size:	263.2 KB 
ID:	14408Click image for larger version. 

Name:	JR 34.jpg 
Views:	410 
Size:	242.4 KB 
ID:	14409
    cont...

  5. #15
    Then onto colour. Used the U-beaut stains I already had and tried to go for an eggplant purple. On the test piece ( bit of plywood), couldn't quite get the shade I was after and decided to use diluted colortone cherry red as a base.
    Click image for larger version. 

Name:	JR 35.jpg 
Views:	435 
Size:	418.5 KB 
ID:	14410
    Two coats of purple over the red
    Click image for larger version. 

Name:	JR 36.jpg 
Views:	407 
Size:	342.0 KB 
ID:	14411
    The repair around the string through hole showed up a bit too much so used the airbrush to add more colour across the holes to try and make it less noticeable. While wiping on the colour, managed to pull out some of the timbermate in the patch, will try to fill with the wipe on poly. After first coat of poly
    Click image for larger version. 

Name:	JR 38.jpg 
Views:	394 
Size:	229.4 KB 
ID:	14412Click image for larger version. 

Name:	JR 39.jpg 
Views:	410 
Size:	177.3 KB 
ID:	14413
    Like I said, was trying for an eggplant colour, looks more like sliced beetroot

    Grant

  6. #16
    GAStronomist wokkaboy's Avatar
    Join Date
    Dec 2012
    Location
    Perth WA
    Posts
    13,555
    wow I haven't caught up with this thread for a while Grant, love the bevelled edge and the angled pups and staggered string through holes.
    I think it's time you build a scratch build axe you have more than enough skills to build a ripper.
    Love the colour too, I'd call it red wine colour not betroot !
    Current Builds and status
    scratch end grain pine tele - first clear coat on !
    JBA-4 - assembled - final tweaks
    Telemonster double scale tele - finish tobacco burst on body and sand neck

    Completed builds
    scratch oak.rose gum Jazzmaster - assembled needs setup
    MK-2 Mosrite - assembled - play in
    Ash tele with Baritone neck - neck pup wiring tweaks and play in

  7. #17
    Overlord of Music Dedman's Avatar
    Join Date
    Mar 2016
    Location
    The "Fabulous" Gold Coast
    Posts
    3,566
    all i can say is WOW
    Build 19 PSH-1 Kustom
    Build 18 HB-4S Kustom
    Build 17 WL-1 Kustom
    Build 16 TL-1TB Kustom
    Build 15 PBG-2-
    Build 14 FTD-1
    Build 13 RD-1 Kustom
    Build 12 DM-1S
    Build 11 MKA-2 -
    Build 10 Basic strat
    Build 9 JM Kustom
    Build 8 FV-1G
    Build 7 ES-2V
    Build 6- Community prototype
    Build 5 LP-1LQ
    Build 4 ES-5V
    Build 3 JR-1
    Build 2 GD-1
    Build 1 TLA-1

  8. #18
    Overlord of Music andrewdosborne's Avatar
    Join Date
    May 2014
    Location
    Sydney, NSW
    Posts
    2,751
    That's fantastic and love the colour

    Sent from my Moto G (4) using Tapatalk
    Current Projects
    #Planning 5 String Bass

  9. #19
    Member UpperCaseH's Avatar
    Join Date
    Jun 2016
    Location
    Melbourne
    Posts
    317
    That's looking great!

  10. #20
    Thanks Wokks, Dedman and Andrew.
    Looks like three pics aren't showing so here they are again
    Click image for larger version. 

Name:	JR 28.jpg 
Views:	399 
Size:	303.6 KB 
ID:	14414Click image for larger version. 

Name:	JR 29.jpg 
Views:	396 
Size:	316.0 KB 
ID:	14415Click image for larger version. 

Name:	JR 30.jpg 
Views:	419 
Size:	313.8 KB 
ID:	14416

    Will try to do a scratchy when I can source some affordable wood and decide on a shape/style, and then there's the neck. After looking at Simon's amazing builds, would love to give it a go, just seems like a big step.

Page 2 of 6 FirstFirst 1 2 3 4 ... LastLast

Posting Permissions

  • You may not post new threads
  • You may not post replies
  • You may not post attachments
  • You may not edit your posts
  •