Page 4 of 10 FirstFirst ... 2 3 4 5 6 ... LastLast
Results 31 to 40 of 97

Thread: My Diary - LPA-1, First time Pit bull Builder

  1. #31
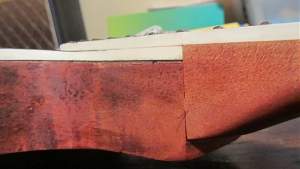
    Finally got back home - Ok, here's the images of the neck set into the body, and around it's pocket.

    Click image for larger version. 

Name:	DSC_4061.JPG 
Views:	228 
Size:	676.7 KB 
ID:	14039

    Click image for larger version. 

Name:	DSC_4062.JPG 
Views:	212 
Size:	655.7 KB 
ID:	14040

    Click image for larger version. 

Name:	DSC_4063.JPG 
Views:	197 
Size:	695.7 KB 
ID:	14041

    Click image for larger version. 

Name:	DSC_4064.JPG 
Views:	225 
Size:	681.0 KB 
ID:	14042

    Click image for larger version. 

Name:	DSC_4065.JPG 
Views:	222 
Size:	700.5 KB 
ID:	14043

    As mentioned, neck is sitting at an angle that's insane - I don't think I'll ever have a secure bridge with an angle this much.

    Hope someone can shed some light on this...

  2. #32
    Member
    Join Date
    Aug 2016
    Location
    Melbourne, AUS
    Posts
    134
    Quote Originally Posted by depictedminds View Post
    Finally got back home - Ok, here's the images of the neck set into the body, and around it's pocket.


    As mentioned, neck is sitting at an angle that's insane - I don't think I'll ever have a secure bridge with an angle this much.

    Hope someone can shed some light on this...
    Hi Bro, see attached photos of a Les Paul Set neck kit build. I did this last year and it set up fine and perfect and played great...But I am re finishing this guitar as we speak under Hammer of the Gods build diary..I posted the photos trying to copy yours is so you can get confidence on the neck angle....I think your problem is the neck heel needs to be planed down so the fret board sits on the body..Yours is too high but angle correct.

    You need to carefully 'Lower" the neck but keep angle the same and ENSURE the heel is dead flat for maximum contact between body and heel...At least thats my 2 cents worth.But I am fairly confident it will solve the problem.Click image for larger version. 

Name:	IMG_3331.JPG 
Views:	194 
Size:	325.9 KB 
ID:	14044

    Click image for larger version. 

Name:	IMG_3333.JPG 
Views:	196 
Size:	326.7 KB 
ID:	14045

    Click image for larger version. 

Name:	IMG_3334.JPG 
Views:	200 
Size:	443.5 KB 
ID:	14046

    Click image for larger version. 

Name:	IMG_3337.JPG 
Views:	198 
Size:	284.5 KB 
ID:	14047

    Click image for larger version. 

Name:	IMG_3339.JPG 
Views:	203 
Size:	337.8 KB 
ID:	14048
    Current Builds.

    TL Quited Maple.

  3. #33
    RIGHT!

    Everything is looking heaps better now - so ONWARDS and UPWARDS!

    Sanding time - Sand Sand Sand Sand. Im not going to sand too much on the Face of the guitar, cause I need that ash for the finish Im going for...

    If you're wondering what Im shooting for, Im going for the classy Black opaque face, Solid black back, and some interesting ideas for the hardware:

    Blackwood or Rosewood Pickup Rings
    Blackwood or Rosewood Switch plate
    Solid Black headstock face, with a custom decal
    natural oiled fast matt neck
    No scratch plate on this one.

    Im also talking to my uncle in melb, who's a master woodworker, to see what he might be able to do for me with some opal for the pickup rings. If I can get it done, then I'll go some opal on the pickup rings.

    Something similar to this, but obviously a different feel on the front due to the different wood:

    Click image for larger version. 

Name:	esp les paul.png 
Views:	198 
Size:	400.0 KB 
ID:	14052

    Im honestly not sure if the dingo tone will get me that colour - has anyone tried the black DT and have any results to show?
    Last edited by depictedminds; 23-09-2016 at 11:07 PM.

  4. #34
    Overlord of Music Andy40's Avatar
    Join Date
    Oct 2015
    Posts
    3,913
    Hi DM,

    Looks like the neck is sitting higher on the cutaway side, I remember mine did when i first got it as well because the binding was sitting high in the cutaway. if that's the reason just sand the binding down, otherwise i agree with HB.

    I used DT black stump in my burst. Thats about how dark it goes on a maple neck (a can't remember how many coats). I expect it may get a bit darker on Ash but still show the grain.
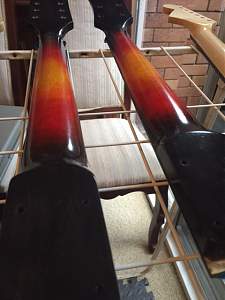
    Click image for larger version. 

Name:	IMG_7384.JPG 
Views:	178 
Size:	106.7 KB 
ID:	14053
    Build #1 - ST-1 - Completed
    Build #2 - LP-1SS - Completed
    Build #3 - TLA-1R - Completed
    Build #4 - SGD-612 - Completed
    Build #5 - ES-1G - Completed
    Build #6 - STA-1HT | Completed
    Build #7 - ST1JR - Completed
    Current Build #8 - JBA-4
    Build #9 - Semi-scratch build Tele x 2 - Completed
    Current Build #10 - PRS-1H
    Current Build #11 - AGJR-1 - Completed
    Current Build #12 - ATL-1SB
    Current Build #13 - GST-1
    Current Build #14 - FBM-1

  5. #35
    headstock - nothing fancy or over the top, but I was happy with the dremel work here... slow and steady....

    Click image for larger version. 

Name:	20160924_211928.jpg 
Views:	195 
Size:	267.2 KB 
ID:	14063

  6. #36
    Headstock painting day (number 1)

    This is going to be a solid black headstock face, natural wood side and back, white pinstriping on the face, with a opal decal.

    So - step 1 - Face painting. After getting this smooth as a bub's backside, Super nice masking, and a blast of white. Following this will be another blast of white, and then the pinstriping begins.

    Click image for larger version. 

Name:	20160925_141531.jpg 
Views:	178 
Size:	244.3 KB 
ID:	14089

    By the way - thanks to everyone that helped me out with the whole neck thing - After reading over and over again, It started to become a little trivial that the neck heel was going to be a shade larger IN ALL THREE DIMENSIONS (.. duh) cause smaller would be just outrageous. It's pretty much spot on perfect now - but im not touching the body yet until my dingotone comes

    More soon!

  7. #37
    Pinstriped done...

    Click image for larger version. 

Name:	20160925_174636.jpg 
Views:	204 
Size:	313.3 KB 
ID:	14094

    Top coat done...

    Click image for larger version. 

Name:	20160925_180024.jpg 
Views:	194 
Size:	295.7 KB 
ID:	14095

  8. #38
    And striped - time to let this cure...

    Click image for larger version. 

Name:	JPEG_20160925_182319_1372499782.jpg 
Views:	196 
Size:	265.7 KB 
ID:	14104

    I'll get the tape off it in about an hours time, so I dont get too much residue on the neck...

  9. #39
    Overlord of Music Dedman's Avatar
    Join Date
    Mar 2016
    Location
    The "Fabulous" Gold Coast
    Posts
    3,566
    neatly done !
    Build 19 PSH-1 Kustom
    Build 18 HB-4S Kustom
    Build 17 WL-1 Kustom
    Build 16 TL-1TB Kustom
    Build 15 PBG-2-
    Build 14 FTD-1
    Build 13 RD-1 Kustom
    Build 12 DM-1S
    Build 11 MKA-2 -
    Build 10 Basic strat
    Build 9 JM Kustom
    Build 8 FV-1G
    Build 7 ES-2V
    Build 6- Community prototype
    Build 5 LP-1LQ
    Build 4 ES-5V
    Build 3 JR-1
    Build 2 GD-1
    Build 1 TLA-1

  10. #40
    YAYAY! Delivery day!

    Bone nut...

    Click image for larger version. 

Name:	14509144_1529453150416169_620555921_n.jpg 
Views:	182 
Size:	16.4 KB 
ID:	14146

    Grovers!!

    Click image for larger version. 

Name:	14518395_1529453470416137_1395970640_n.jpg 
Views:	196 
Size:	22.2 KB 
ID:	14147

    YAYAY!

Page 4 of 10 FirstFirst ... 2 3 4 5 6 ... LastLast

Posting Permissions

  • You may not post new threads
  • You may not post replies
  • You may not post attachments
  • You may not edit your posts
  •