
YAYAYAYAY! It's arrived!
I'll be doing a mock build shortly, but (crappy photos aside) here's the general body before starting..
(Pictures courtesy of my wife, whilst Im at work)


YAYAYAYAY! It's arrived!
I'll be doing a mock build shortly, but (crappy photos aside) here's the general body before starting..
(Pictures courtesy of my wife, whilst Im at work)
Last edited by depictedminds; 21-09-2016 at 04:13 PM.

Noice. Do a damp cloth wipe down on that front before you start. It'll highlight any potential glue issues and it should give you an idea how the grain will look. Plus if it sets up nice you'll give everyone the grain envies when you post the photos.
Sweet looking kit mate, what are your plans?
FrankenLab:
Turning tone wood into expensive sawdust since 2016!

Ohhhh gorgeous grain on that ash.
Build #1 - ST-1 - Completed
Build #2 - LP-1SS - Completed
Build #3 - TLA-1R - Completed
Build #4 - SGD-612 - Completed
Build #5 - ES-1G - Completed
Build #6 - STA-1HT | Completed
Build #7 - ST1JR - Completed
Current Build #8 - JBA-4
Build #9 - Semi-scratch build Tele x 2 - Completed
Current Build #10 - PRS-1H
Current Build #11 - AGJR-1 - Completed
Current Build #12 - ATL-1SB
Current Build #13 - GST-1
Current Build #14 - FBM-1
I know, its crazy right?! Good kit score on that one.Originally Posted by Andy40

FrankenLab:
Turning tone wood into expensive sawdust since 2016!
So I am doing my mock build (After getting into adam's ear, I was pointed in the right direction) and I've got a question about the neck angle.
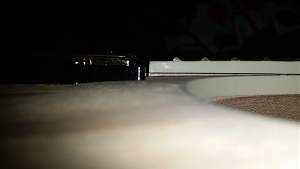
After looking at the guitar for quite some time, Im wondering about this neck angle / space - Neck is tighter than a nun's credentials, but when it's in the guitar, I get about this much space between the body and the fretboard (see Image).
Before I go sanding the puppy down and smoothing the face / removing the glue spots, can someone please tell me if this is going to be an issue? Should I be doing anything particular regarding this space?
(See image)
Thanks in advance
Doesn't look too bad, is the back end of the neck sitting flush on the bottom of the pocket?
You really need to run the e strings down it and see if every thing lines up and that your neck angle is within cooee, if those are good and your scale length is okay and you don't have a funny string break angle, then you should be good to go and that gap essentially becomes cosmetic. This is where the mock build, with neck clamped and strings run is helpful.
FrankenLab:
Turning tone wood into expensive sawdust since 2016!

I don't think that little gap looks bad either, the way I see it, that gap will probably get filled up with the glue you use to glue the neck to the body anyway, the best glue to use is Titebond since it is stronger than the standard PVA Wood Glue, you can order Titebond from Dingobass.
Thanks for the awesome info so far.
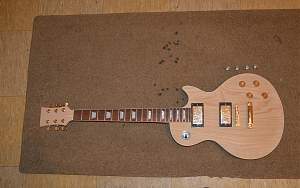
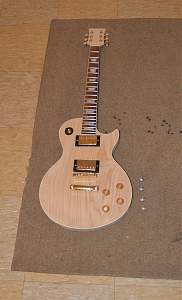
So - The mockup that I've done (Pics below).
One question that I have regarding some of the suggestions to clamp the neck and run strings - Im assuming I should be right to punch the bridge / saddle pegs into the guitar before I start staining, or really even sanding? I understand that I won't be putting tuning tension on the strings or the neck, but in order to have the string run at least "straight" I'd assume I'd have some basic tension on the string, and to gauge the height of the bridge correctly would involve me putting the pegs into the guitar - is that a fair statement?
If that's the case, I'll get right into running the 1 and 6 strings and getting some alignment measurements. Honestly, Im pretty sure I should be good to go with this.
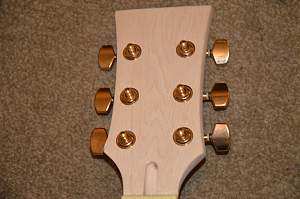
Here's some happy Mockup snaps (including slightly higher res shots of what I thougt was a slightly crazy neck angle - opinions pls):

I'd probably leave installing the bridge pegs till after you've done all the initial finishing work on the body and neck, reason for that is because you're most likely going to have to give the body and neck a sanding-down before doing the staining, and the bridge-pegs may interfere with the sanding, you can however do your mock-build to check that everything is going to fit properly, and the strings will be correctly align, you might need to drill some mounting-screw holes, which is probably best done before the finishing work so that you don't end up ruining a good finish.
The neck angle looks similar to the neck angle on my Gibson USA LP Studio.
OK! Thankyou Dr! I wanted to make sure I followed all the instructions and made sure I asked questions before going ahead and starting to dress the body or neck with any Papers.
The neck, now that it and I have made friends a little more, is at least a VERY good, tight fit into the guitar. The wood and overall feel of the neck is great - the fretboard is VERY good, and there's some minor rocking on the frets - no dramas there though, I've dressed both of my current ladies boards, and have said tools to do so on this one.
Once I get some time today, I'll put up some details on the alignment. Then it's time to get this one dressed!
 Posting Permissions

 Reply With Quote