
I've found that I can apply Dingotone and Tru oil when its raining...but nothing else.....
Great decal by the way.


I've found that I can apply Dingotone and Tru oil when its raining...but nothing else.....
Great decal by the way.
Build #1 - ST-1 - Completed
Build #2 - LP-1SS - Completed
Build #3 - TLA-1R - Completed
Build #4 - SGD-612 - Completed
Build #5 - ES-1G - Completed
Build #6 - STA-1HT | Completed
Build #7 - ST1JR - Completed
Current Build #8 - JBA-4
Build #9 - Semi-scratch build Tele x 2 - Completed
Current Build #10 - PRS-1H
Current Build #11 - AGJR-1 - Completed
Current Build #12 - ATL-1SB
Current Build #13 - GST-1
Current Build #14 - FBM-1

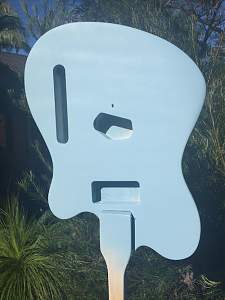
With the return to sunny skies I've started on the colour coats. All looks good so far but I just wanted to check the general consensus on sanding the colour coat back before you start on the gloss coats. I've seen advice for and against on the forum so just wanted to see if I'm missing anything...
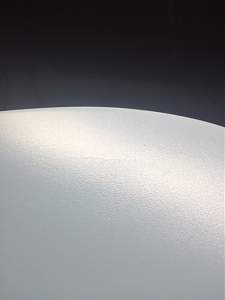
The colour looks pretty solid at this point (I'm using MTN94) but the surface looks a little like 1200 sandpaper - smooth but with a very fine texture. Now I'm guessing that the gloss will "fill" the texture and you'll never notice once it's all done, but I'm not sure!
There are also a couple of spots on the body where a bit of dust has settled, and I feel like I want to sand them but simply not sure! Edit: Just had a closer look and I was able to wipe the dust away so now it's all okay.
Any advice greatly appreciated!!
Last edited by Chuck; 27-08-2016 at 12:35 PM.
Completed Builds: #1 TL-1 "Telemaster" (GOTM Oct 2016); #2 The "Maplecaster" scratch build; #3 JB-4 "Bass IV" (co-winner GOTM Jan 2017); #4 ST-1M "Surfcaster" (GOTM Apr 2017), #5 JZA-1 "EC Deluxe"

I usually sand the last colour coat to about 800, you don't want it too smooth, it needs some tooth for the clear to stick to
Build 19 PSH-1 Kustom
Build 18 HB-4S Kustom
Build 17 WL-1 Kustom
Build 16 TL-1TB Kustom
Build 15 PBG-2-
Build 14 FTD-1
Build 13 RD-1 Kustom
Build 12 DM-1S
Build 11 MKA-2 -
Build 10 Basic strat
Build 9 JM Kustom
Build 8 FV-1G
Build 7 ES-2V
Build 6- Community prototype
Build 5 LP-1LQ
Build 4 ES-5V
Build 3 JR-1
Build 2 GD-1
Build 1 TLA-1
So this morning I go back to view my handywork and I'm a little disappointed. There was a very subtle "striping" across the body as a result of the way I'd sprayed. As I mentioned I'm using the MTN94 cans. When I ordered them I did notice they sold different "heads" for them, including one with a rotating nozzle - but no, I didn't get one. Instead I was spraying with the standard nozzle which meant quite a narrow flow of paint. After two colour coats I did think I was done, but I couldn't live with the "striping" so I did another colour coat this morning and it seems to have pretty much fixed the problem - certainly something to be aware of in future.
Later this afternoon I very gently used some 800 to flatten off the colour coats (thanks Dedman) and started with a fine gloss mist, and then a more substantial gloss coat half an hour later. Hopefully I'll get the chance to get a few more on during the week, but it's a nice feeling to be on he home straight in the finishing department.
Knowing I'm going to be heading into the curing phase before long I've already started thinking about my next kit, or more to the point how I'll go about modding my next kit!
Completed Builds: #1 TL-1 "Telemaster" (GOTM Oct 2016); #2 The "Maplecaster" scratch build; #3 JB-4 "Bass IV" (co-winner GOTM Jan 2017); #4 ST-1M "Surfcaster" (GOTM Apr 2017), #5 JZA-1 "EC Deluxe"
A bit of advice please!
My latest potential problem has occurred with my gloss coats. I've got four coats on but there are a couple of "ridges" on the body. I'm thinking it may have happened as it was quite cold when I was painting (yep, impatient!) and my overlapping got a bit out of whack.
My question is what to do? Should I wet sand them back with say 1200? Should I do the whole body or just the ridges? How long should I wait before doing this (the last coat was on Monday morning before work)? Or do I leave them and assume they will come out when I do my final wet sand before buffing?

Completed Builds: #1 TL-1 "Telemaster" (GOTM Oct 2016); #2 The "Maplecaster" scratch build; #3 JB-4 "Bass IV" (co-winner GOTM Jan 2017); #4 ST-1M "Surfcaster" (GOTM Apr 2017), #5 JZA-1 "EC Deluxe"
yup, just wet sand them out before you clear coat, the same as you would do with any runs. Make sure its really dry. some runs and ridges can hide a wet core inside them
Build 19 PSH-1 Kustom
Build 18 HB-4S Kustom
Build 17 WL-1 Kustom
Build 16 TL-1TB Kustom
Build 15 PBG-2-
Build 14 FTD-1
Build 13 RD-1 Kustom
Build 12 DM-1S
Build 11 MKA-2 -
Build 10 Basic strat
Build 9 JM Kustom
Build 8 FV-1G
Build 7 ES-2V
Build 6- Community prototype
Build 5 LP-1LQ
Build 4 ES-5V
Build 3 JR-1
Build 2 GD-1
Build 1 TLA-1
Great, thanks for that Dedman. The coats have been pretty light and by this evening it'll have been 36 hours plus since the last one. Do you think that's enough time to dry? Is there a way of telling other than carefully trying and pulling the pin the second you find anything remotely tacky?Originally Posted by Dedman

Completed Builds: #1 TL-1 "Telemaster" (GOTM Oct 2016); #2 The "Maplecaster" scratch build; #3 JB-4 "Bass IV" (co-winner GOTM Jan 2017); #4 ST-1M "Surfcaster" (GOTM Apr 2017), #5 JZA-1 "EC Deluxe"

Hi Chuck, usually 36 hours should be enough between gloss coats but depends how cool and wet the weather has been. Also as Dedman says runs and ridges can take longer to fully cure. I'd carefully wet sand the body starting with the ridges and if there is any hint that the paint hasn't cured then you will have to wait longer.
If its cool when you are painting it helps to put the paint can in warm water before spraying and shake the can for at least 2 minutes
Current Builds and status
scratch end grain pine tele - first clear coat on !
JBA-4 - assembled - final tweaks
Telemonster double scale tele - finish tobacco burst on body and sand neck
Completed builds
scratch oak.rose gum Jazzmaster - assembled needs setup
MK-2 Mosrite - assembled - play in
Ash tele with Baritone neck - neck pup wiring tweaks and play in

what you got there is shrink back is caused by the primer coat swelling from the reducer if you got it in a color coat just let it dry off for a hour or so and sand back it with 600 and lightly respray it, if you are getting it in the clear coat you need to spay it lighter and try to be consistent with your coats leave it longer between coats 30min what type paint are you using acrylic or nitro ? they both have petty much the same thing and work the same way. when your using clear over a solid color not metallic or pearls straight clear looks better with about 10 to 15% of the color mixed in to the clear will give a way better shine and just looks better. If your using spray cans that's not really an option, when you spray anything whether or not your using a gun or a can, spay whats call double header coats that means you spray the 1st coat horizontal and 2nd then vertical you do that all at the same time then leave to flash off remember don't spray to dry or it will look terrible you do that to lay the paint even and flat the secret to glass shine is keep it flat and even,
Its a bit hard to show some one new to painting how to cram 20 years in to a single post once you get a good technique you will spay a good looking thing every time. if you need any advice just ask :-)
almots for got to say there is a limit to how many coats you use before you get the thing too soft so don't keep putting to many coats and you'll have nightmares about how soft the paint is and wont harden up properly
Last edited by phrozin; 31-08-2016 at 02:10 AM.

@ Phrozin, that's some good information mate. I haven't sprayed any guitar bodies yet, but I just did another project for she who must be obeyed that gave me some trouble in the same vein as the above. Good to know and thanks for posting!
FrankenLab:
Turning tone wood into expensive sawdust since 2016!
 Posting Permissions

 Reply With Quote