
I like.. shaping up nicely


I like.. shaping up nicely
Current Projects
#Planning 5 String Bass

Yep ... I've shaped the neck pocket, but I think it needs a bit more work to make it right.
One small detail to fix is the spot where I put the dowel ... thinking that I'll take a bit of the timber when I fit the battery box and make a plug to insert and hide the spot.


Shape looks good Rob but I'd take off all the pocket curved part. Looks like there is still more basswood to remove where you can see the dowel
Current Builds and status
scratch end grain pine tele - first clear coat on !
JBA-4 - assembled - final tweaks
Telemonster double scale tele - finish tobacco burst on body and sand neck
Completed builds
scratch oak.rose gum Jazzmaster - assembled needs setup
MK-2 Mosrite - assembled - play in
Ash tele with Baritone neck - neck pup wiring tweaks and play in

Yep, like Wokka Said, remove that corner with your dowel fill and take the profile in a line following your Neck Plate edge about where that shadow falls, then blend it in towards the curve of the lower horn. I guess it depends on how much work you want to do, you can put a bigger radius on that corner and fill the end of the dowel hole to achieve a similar effect without having to take off a lot of wood.Originally Posted by ThreeBbass

FrankenLab:
Turning tone wood into expensive sawdust since 2016!

Nice looking kit and keen to see how it all comes together.
# 1 - EX-5 https://goo.gl/fQJMqh
# 2 - EX-1 https://goo.gl/KSY9W9
# 3 - Non PBG Tele https://goo.gl/W14G5g
# 4 - Non PBG J Bass https://goo.gl/FbBaFy
# 5 - TL-1AR GOTM Aug 2017 https://goo.gl/sUh14s
# 6 - MMB-4 Runner-up GOTM Oct 2018https://goo.gl/gvrPkp
# 7 - ES-1 Runner-up GOTM Aug 2018https://goo.gl/T9BEY8
Hi team,
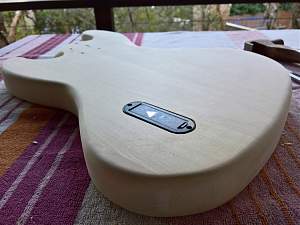
thanks for the advice about the neck pocket. I've decided to plug the problem spot and shape the body around the new neckplate.
So far so good!
I also spent this afternoon cutting a hole in the body to fit the battery holder ...
Hoping for a Dremel for father's day ... but that's next week.
Couldn't wait so I just used a Stanley knife, a new chisel and a hammer and took it slow ...
... came out pretty good!

Nice work ThreeB, I love seeing guys using handtools and getting great results like that!
Acoustics:
1995 Maton EM725C - Solid 'A' Spruce Top, QLD Walnut B&S, AP5 Pickup
2015 Ibanez AEL108MD-NT - Laminated Spruce top, Laminated Mahogany B&S, Fishman Sonicore Pickup
Electrics:
Pitbull LP-1S - http://www.buildyourownguitar.com.au...ead.php?t=5745
Carsen Superstrat Rebuild - http://www.buildyourownguitar.com.au...ead.php?t=6284
Builds in Progress:
Silent Guitar Semi-Scratch Build - http://www.buildyourownguitar.com.au...ead.php?t=6809
Thanks Zandit ... there's something great about wrestling with the wood with your bare hands!

After I did the first build on the bass I found that the action still appeared to be high after I'd done some adjustment to the truss rod and bridge. It looked like the height at the nut was probably too high. I did some investigating on the web about string height at the nut for fretless bass. Looks like there's an element of "personal taste" out there, but the general consensus seems to be that the strings should be about the thickness of a business card above the neck.
The nut that came on the neck in the kit had the strings set pretty high (about 2mm) and needed to be lowered, so I figured that I'd need to do something about it.
Attachment 13806
I own another bass that has a height adjustable nut and thought that it might be good to see if I could find one and fit it to my project. That'd give me the ability to play around with the action and work out what I thought was good.
Once I got the part I looked online for some advice about how to get the existing nut off ... the advice was to get a block of timber, put it against the nut and tap gently ... it should just pop out! Actual result was a little different, the nut broke off in one section, but I wasn't too worried, as I wasn't planning on keeping it.
Next step was to make space for the new nut using a fine saw, a chisel and some small files.
Pretty happy with the result ... still need to do a little tweaking to get it right ...


Last edited by ThreeBbass; 10-09-2016 at 08:28 AM.
nice job 3bass that nut looks cool. Are those allen key screws to adjust the height ?
Current Builds and status
scratch end grain pine tele - first clear coat on !
JBA-4 - assembled - final tweaks
Telemonster double scale tele - finish tobacco burst on body and sand neck
Completed builds
scratch oak.rose gum Jazzmaster - assembled needs setup
MK-2 Mosrite - assembled - play in
Ash tele with Baritone neck - neck pup wiring tweaks and play in
 Posting Permissions

 Reply With Quote
