
Can't wait to see how this comes out, and video logs are great.


Can't wait to see how this comes out, and video logs are great.
Thanks for the tip! I thought of that once I had it done. I'll definitely be sanding it off before assembly. The headstock shape started out as two points (which you'll see in the next video) but I thought it looked too aggressive so I sanded them down into humps instead.
Finally finished up editing the second video.
https://youtu.be/CoILpzrpsx8
Quickly learning that I'm not much for video production. Editing the video is taking longer than the actual guitar work!
Working on the finish on the body now and mostly done that. Hoping to have the next video ready this weekend!

cool, it's lookin good
Build 19 PSH-1 Kustom
Build 18 HB-4S Kustom
Build 17 WL-1 Kustom
Build 16 TL-1TB Kustom
Build 15 PBG-2-
Build 14 FTD-1
Build 13 RD-1 Kustom
Build 12 DM-1S
Build 11 MKA-2 -
Build 10 Basic strat
Build 9 JM Kustom
Build 8 FV-1G
Build 7 ES-2V
Build 6- Community prototype
Build 5 LP-1LQ
Build 4 ES-5V
Build 3 JR-1
Build 2 GD-1
Build 1 TLA-1

I do like that head stock shape Brewhook, like you said leaving them pointy didn't seem quite right for the LP. Great work so far!
FrankenLab:
Turning tone wood into expensive sawdust since 2016!

cool video again Brewhook, the neck is looking good. A tip you should pour your stain and poly into a small container so you don't contaminate the whole tin of stain and poly. Also you should be wearing gloves be best not to get poly and the stain on your fingers/hands.
Look forward to seeing the body stained ! Will the body be stained the same colour ?
Current Builds and status
scratch end grain pine tele - first clear coat on !
JBA-4 - assembled - final tweaks
Telemonster double scale tele - finish tobacco burst on body and sand neck
Completed builds
scratch oak.rose gum Jazzmaster - assembled needs setup
MK-2 Mosrite - assembled - play in
Ash tele with Baritone neck - neck pup wiring tweaks and play in
That's a good point about using separate containers, I'll definitely be doing that from now on. I meant to mention in my voiceover about gloves as well. I usually wear them but I'm out and didn't want to wait until I could get to the store! The body is a different colour, a deep burgundy. I have the body stained and I'm doing the poly on it now!Originally Posted by wokkaboy

ok no worries Brewhook, it's a bit difficult to pour from the tins into a container so I usually make a temporary spout with masking tape. Have a read on the poly tin it probably says avoid skin contact so if it does you should make getting gloves a priority. Resident luthier DB has drilled that into my brain !
Look forward to seeing the burgundy body !
Current Builds and status
scratch end grain pine tele - first clear coat on !
JBA-4 - assembled - final tweaks
Telemonster double scale tele - finish tobacco burst on body and sand neck
Completed builds
scratch oak.rose gum Jazzmaster - assembled needs setup
MK-2 Mosrite - assembled - play in
Ash tele with Baritone neck - neck pup wiring tweaks and play in
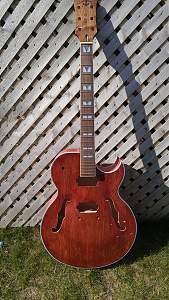
Here's a little preview with the neck dry fitted into place. Still have some more poly to do, but very close to being done with the finish

Man I gotta build one of these sometime. lookin good Brewhook.
Build #1 - ST-1 - Completed
Build #2 - LP-1SS - Completed
Build #3 - TLA-1R - Completed
Build #4 - SGD-612 - Completed
Build #5 - ES-1G - Completed
Build #6 - STA-1HT | Completed
Build #7 - ST1JR - Completed
Current Build #8 - JBA-4
Build #9 - Semi-scratch build Tele x 2 - Completed
Current Build #10 - PRS-1H
Current Build #11 - AGJR-1 - Completed
Current Build #12 - ATL-1SB
Current Build #13 - GST-1
Current Build #14 - FBM-1
 Posting Permissions

 Reply With Quote