
Looking seriously epic already Grant. This is going to be yet another sensational build. Cant wait to see the final product!
Cheers,
Gav.


Looking seriously epic already Grant. This is going to be yet another sensational build. Cant wait to see the final product!
Cheers,
Gav.
--
Build #01: BC-1
Build #02: ST-1
Build #03: JR-1DC
Build #04: ES-2V
Build #05: ESB-4 (GOTM July 2014)
Build #06: RC-1
Build #07: MK-2
Build #08: TLA-1
Build #09: JR-1DC
Build #0A: LPA-1
Build #0B: STA-1 (GOTM April 2015)
Build #0C: MKA-2
Build #0D: LP-1M
Build #0E: JB-1
Build #0F: FS-1
Find me:
https://www.facebook.com/firescreek.guitars/
http://www.guitarkitbuilder.blogspot.com.au/
Thanks for the positivity guys.
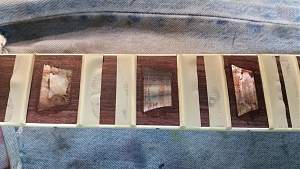
While I was waiting for the body to be ready to sand, had the bright idea of replacing the fretboard inlays and dots with black MOP.
Ordered a set of crown inlays and side dots from Aus. MOP Supplies.
Side dots were easy enough to drill out and replace, although one or two I drilled slightly off perpendicular and there are small gaps but I think they will fill up by the time the finish is on. Removed the plastic inlays partly by drilling a hole and digging them out and then saw Tweaky's trick of using a soldering iron to soften the glue underneath to get them out. Couldn't get them out in one piece but had pieces big enough to measure the thickness. They ranged from around 2.4mm to 2.75mm, quite a bit thicker than the pearl replacements. The top three were about the same size, 12 and 15 were smaller than the stock ones and the lower ones were slightly longer than the cavities. Carefully made the cavities larger and cleaned up the glue residue.
After some head scratching I figured the simplest way to make sure the new inlays were at the right height in the middle of the fingerboard was to glue some veneer pieces to the back of the inlays with CA glue. In this case, two pieces were pretty much spot on.
Then mixed up some epoxy to glue them in. Filed and sanded them to match the radius of the fingerboard.
I read a way to fill the gaps is to mix wood dust with white glue and apply that. I had a broken rosewood bridge base that I could sacrifice for the cause and that met the business end of the belt sander to give me the dust I needed. Mixed up small batches of titebond and wood dust and started filling the gaps. Need to wait for that to dry, sand and refill the bits I've missed and where it shrinks in the larger gaps.
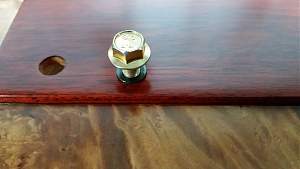
The body has been grain filled with Jarrah timbermate and sanded with 320 grit. Mixed up a colour with colortone stains and applied that to the body. Ended up darker than intended but it's on there now. The colour itself is quite good - vintage amber, cherry red and medium brown - but not sure if it's too dark for the veneers. Pics are with one coat of poly on all.
Good thing about it being dark is that it makes the area on the side I sanded through and the neck hole plugs hard to notice.
In the pics the veneer looks lighter than it really is, so the contrast between the stain and veneer is a bit exaggerated. Telling myself it should look fine once the hardware is on and all together.
Grant
Looks awesome Grant. I like the colour - the dark contrast really pops the burl veneer. Sweet!!
cheers,
Gav.
--
Build #01: BC-1
Build #02: ST-1
Build #03: JR-1DC
Build #04: ES-2V
Build #05: ESB-4 (GOTM July 2014)
Build #06: RC-1
Build #07: MK-2
Build #08: TLA-1
Build #09: JR-1DC
Build #0A: LPA-1
Build #0B: STA-1 (GOTM April 2015)
Build #0C: MKA-2
Build #0D: LP-1M
Build #0E: JB-1
Build #0F: FS-1
Find me:
https://www.facebook.com/firescreek.guitars/
http://www.guitarkitbuilder.blogspot.com.au/

Looking grrrreat. Now I want to build an FB!
Build #1 - ST-1 - Completed
Build #2 - LP-1SS - Completed
Build #3 - TLA-1R - Completed
Build #4 - SGD-612 - Completed
Build #5 - ES-1G - Completed
Build #6 - STA-1HT | Completed
Build #7 - ST1JR - Completed
Current Build #8 - JBA-4
Build #9 - Semi-scratch build Tele x 2 - Completed
Current Build #10 - PRS-1H
Current Build #11 - AGJR-1 - Completed
Current Build #12 - ATL-1SB
Current Build #13 - GST-1
Current Build #14 - FBM-1
Thanks Gav and Andy.
Have finished putting the poly coats on, seven in total all told. Initially thought I could get away with three but must have pulled a lot of the grain fill out when rubbing on the stain, so needed to apply extra coats and sand back to fill the pores. There are still some pores here and there but they can stay.
Went to install the bushes for bridge and tailpiece and they dropped in the holes with no effort at all, not good. I bought Gotoh pieces and only checked they fit by using pvc tubing in place of the bushes, but didn't think to try the actual bushes in the drilled holes. With all the finish coats on it was a bit late to plug up and redrill holes but managed to dodge a bullet by using unused bushes from previous builds. Sanded the chrome and painted the shoulder with some charcoal left over from the esp build. New hardware is cosmo black and the charcoal doesn't quite match but is close. Threaded a M8 bolt into the bushes when knocking them in to avoid chipping the paint off.
Also have the wiring started. Thanks to Fretty for posting a link to Gib wiring schemes a while ago, followed the Firebird V scheme. I'm using P90s and have read to use 300K pots with them, after some more reading have found you can make your own from a 500k pot with a 1M resistor soldered across the outside lugs. Works out to about 330K, and added treble bleed circuits as well.
Anyone using Bourns pots, as I am, if you need extra nuts and washers you can get them from Jaycar, their duratec brand in a pack of 12, fit perfectly.
Decided to use braided wire for the run to the switch which meant I needed to chisel out a small channel for the thicker wires to fit in the neck pup cavity under the pup itself. Will try to make wood spacers for the height setting of the pups, that may take a bit of fiddling to get right.
Little unsure what to do with covering the switch cavity that doesn't hide the veneer. Clear pickguard with a blackout around the switch is the current thought.
Grant

That's come up a treat mate! The clear pick guard sounds like a great idea, maybe use a thin vinyl under it to hide the switch cavity?
FrankenLab:
Turning tone wood into expensive sawdust since 2016!
Looking very nice. How about just a black disc a little bigger than the hole as a switch cover, forget the rest of the pickguard.
'As long as there's, you know, sex and drugs, I can do without the rock and roll.'

This looks amazing.
Similar to Pabs a timber disc stained the same as your body colour.
Tony
 Posting Permissions

 Reply With Quote