Page 6 of 13 FirstFirst ... 4 5 6 7 8 ... LastLast
Results 51 to 60 of 123

Thread: Wazkelly's EX-1

  1. #51
    Banned
    Join Date
    Dec 2015
    Posts
    1,171
    haha cool stuff, nice work, your catching up to me, your going to need some serious help before you know it.

  2. #52
    GAStronomist wazkelly's Avatar
    Join Date
    Aug 2015
    Location
    Caloundra West, Sunshine Coast Qld
    Posts
    6,631
    I will try and keep it to just 4 builds on the go at once and when finished see how the minister for war & peace feels about it. Seriously addictive This GAS and could easily end like Woks who has probably built more than 100 as far as I can reckon.

  3. #53
    GAStronomist wazkelly's Avatar
    Join Date
    Aug 2015
    Location
    Caloundra West, Sunshine Coast Qld
    Posts
    6,631
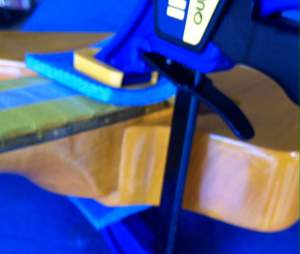
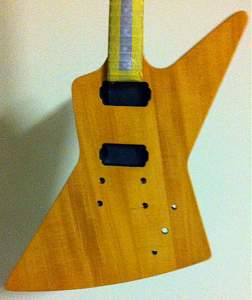
    Had Friday off work so thought it was about time to glue the set neck on this build.
    Click image for larger version. 

Name:	photo 1.JPG 
Views:	314 
Size:	371.5 KB 
ID:	8850Click image for larger version. 

Name:	photo 2.JPG 
Views:	283 
Size:	377.7 KB 
ID:	8851Click image for larger version. 

Name:	photo 3.JPG 
Views:	293 
Size:	376.7 KB 
ID:	8852Click image for larger version. 

Name:	photo 4.JPG 
Views:	304 
Size:	317.5 KB 
ID:	8853Click image for larger version. 

Name:	photo 5.JPG 
Views:	302 
Size:	216.3 KB 
ID:	8854
    Last edited by wazkelly; 21-02-2016 at 12:09 PM. Reason: add pictures

  4. #54
    GAStronomist wazkelly's Avatar
    Join Date
    Aug 2015
    Location
    Caloundra West, Sunshine Coast Qld
    Posts
    6,631
    Tape came off OK, no stain leaching....suppose all good to go.
    Click image for larger version. 

Name:	photo neck glued in.jpg 
Views:	291 
Size:	111.9 KB 
ID:	8855Click image for larger version. 

Name:	photo neck glued in 2.jpg 
Views:	295 
Size:	127.5 KB 
ID:	8856Click image for larger version. 

Name:	photo neck glued in 3.jpg 
Views:	307 
Size:	162.3 KB 
ID:	8857Click image for larger version. 

Name:	photo neck glued in 4.jpg 
Views:	299 
Size:	116.9 KB 
ID:	8858

  5. #55
    GAStronomist wazkelly's Avatar
    Join Date
    Aug 2015
    Location
    Caloundra West, Sunshine Coast Qld
    Posts
    6,631
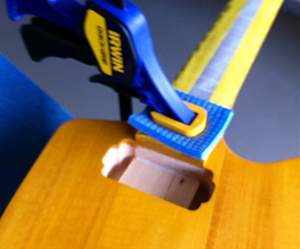
    Couple more shots...
    Click image for larger version. 

Name:	photo neck glued in 5.jpg 
Views:	317 
Size:	146.5 KB 
ID:	8859Click image for larger version. 

Name:	photo neck glued in 6.jpg 
Views:	306 
Size:	107.9 KB 
ID:	8860

  6. #56
    GAStronomist FrankenWashie's Avatar
    Join Date
    Jan 2016
    Location
    Glebe, NSW
    Posts
    5,666
    Looking sick Waz! I watch on with great interest!

  7. #57
    Banned
    Join Date
    Dec 2015
    Posts
    1,171
    Looking good mate, coming along nicely..

  8. #58
    Member Swanny's Avatar
    Join Date
    Sep 2015
    Location
    Morayfield, Qld
    Posts
    482
    As long as you check everything at least 20 times, you can breathe easy.

    I'm assuming you've used Titebond, does it dry clear like a PVA glue?
    1st build - Blue ES-12G ->-Build Diary-<-

    2nd build - Father/Son collaboration MB-1 ->-Build Diary-<-

    3rd build - GR-SF1 ->-Build Diary-<-

    4th build - FS-1 ->-Build Diary-<-

  9. #59
    GAStronomist wazkelly's Avatar
    Join Date
    Aug 2015
    Location
    Caloundra West, Sunshine Coast Qld
    Posts
    6,631
    Hi Swanny, used DB's Luthier Glue that was ordered via PBG site. Presume it is titebond and it has dried clear. Was a bit creamier and stickier than PVA when applying it and a small amount went a long way plus didn't want too much oozing out through the joints.

    @Frankenwashie.....can't wait to set it up and hear the tone rider's sing. Got push/pull bourns pots and was originally going to do series/parallel plus coil split but will most likely take the easy option with coil split only for each PUP.

    @tonyw.....thanks for the encouragement.

  10. #60
    GAStronomist wazkelly's Avatar
    Join Date
    Aug 2015
    Location
    Caloundra West, Sunshine Coast Qld
    Posts
    6,631
    Progress has been slow since finishing the EX-5. Damaged some of the top coat when installing cavity shield paint and gradually bringing it back to where it was a few weeks ago. Maybe a week or so more and then ready to fit hardware and wire it up. Not in a hurry for GOTM this month as the standard of entries is insane.
    Click image for larger version. 

Name:	photo 5.JPG 
Views:	312 
Size:	520.7 KB 
ID:	9745

Page 6 of 13 FirstFirst ... 4 5 6 7 8 ... LastLast

Posting Permissions

  • You may not post new threads
  • You may not post replies
  • You may not post attachments
  • You may not edit your posts
  •