
Woww, it looks pretty much heavy build with this neck joint mod and fretboard...i love it!!


Woww, it looks pretty much heavy build with this neck joint mod and fretboard...i love it!!
sometimes you eat the bear....and sometimes the bear eats you

Originally Posted by FrankenWashie

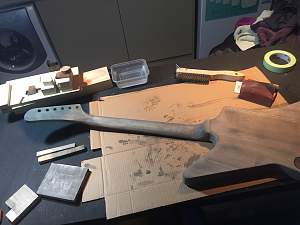
Hey FrankeWashie, looking at this photo it would appear we have both done the same thing when gluing the set neck as there is now no room for neck PUP surround. Mind you, yours looks like there is a bit of finger board overhang which mine didn't so that may just make all the difference on your build.
I spent so much time checking scale length across each bridge saddle that I failed to notice that around 2-3mm gap/extra length would have been required to accommodate the neck PUP surround. Now need to figure out a work around and removing the neck to go again just seems too hard and may create intonation problems. Will probably have to cut a bit out of the surround where it meets end of the neck. Not ideal but how it sounds and plays is more important than how it looks, unless it just remains hanging on a wall somewhere.
Last edited by wazkelly; 23-02-2016 at 08:04 PM. Reason: wrong photo

@Wazkelly, when I de-clamped and started examining I had that exact "Oh S**T!" moment. I have bought Gibson original PUP rings which are a great fit on the EMG units, but also very slim on the front of the neck ring. It JUST fits without having to distort it or remove wood. I still have a little dressing to do at the back end of the fretboard, so I will probably still do some tidy up there which will help that fit, but it was a very close thing.
@Sansan, thanks mate, it's been a really interesting exercise.
Okay so i've not done a lot just lately mainly due to time constraints, such is working for a living.
The Beta batch of 1/2 strength DT Black Stump turned up about a week ago, i hadn't done anything with it and was going to but then remembered the warnings of a few others that there may be a huge disparity in colour between body and neck as neck was naked white Maple and the body a more earthy toned Ash.
With this in mind, I set about mixing up a series of varying light washes of india ink and water. (From the Bottom, Straight, 75%, 50% and then roughly 25%)
AT this point I began to wonder if it was such a good idea, but i didn't want to end up with the neck and body being completely disparate in colour so I persisted, it ended up being a fairly loose ratio of 1 drop india ink to 2Mls water)
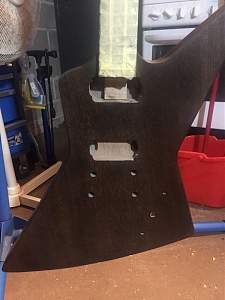
What i have ended up with is a fairly close base grey colour across both the neck& head which more or less matches the timber mated body. Hopefully this gives me enough of a match to let the DT appear even across the whole unit.
.
There are a couple of little glue spot issues to fix but on the whole, reasonably satisfied. At least until I get the DT on it and see what happens next!

looks good Franken, bring the build to the naughty warehouse when you arrive !
Current Builds and status
scratch end grain pine tele - first clear coat on !
JBA-4 - assembled - final tweaks
Telemonster double scale tele - finish tobacco burst on body and sand neck
Completed builds
scratch oak.rose gum Jazzmaster - assembled needs setup
MK-2 Mosrite - assembled - play in
Ash tele with Baritone neck - neck pup wiring tweaks and play in
Sweet as bro, I shall need a large amp stack, some remedial guitar lessons, a single plum floating in brandy served in a man's bowler hat and all six of the infinity stones. (I can make it all work with Five of them at a push)

Hey FW , have you got an off cut of the maple neck to try the black stump on? maybe from when you cut the headstock. I heard one of the plusses about DT is that it takes to the rock maple quite well. I was going to experiment on the off cut of my TL-1A neck as against the ash body but I'm not finished sanding as yet.
Build #1 - ST-1 - Completed
Build #2 - LP-1SS - Completed
Build #3 - TLA-1R - Completed
Build #4 - SGD-612 - Completed
Build #5 - ES-1G - Completed
Build #6 - STA-1HT | Completed
Build #7 - ST1JR - Completed
Current Build #8 - JBA-4
Build #9 - Semi-scratch build Tele x 2 - Completed
Current Build #10 - PRS-1H
Current Build #11 - AGJR-1 - Completed
Current Build #12 - ATL-1SB
Current Build #13 - GST-1
Current Build #14 - FBM-1
Might have a couple of bits left over.....
Couple of metres is an off cut right?
I had more spare than I thought, i may have to build another guitar to get rid of it.
Last edited by FrankenWashie; 18-03-2016 at 12:26 PM.

Great progress, nice blending job
Stan's LP Build for my Sister: http://www.buildyourownguitar.com.au...ead.php?t=3146
Benson Pickup Strat mod: http://www.buildyourownguitar.com.au...ead.php?t=5229
Epiphone LP headstock fix: http://www.buildyourownguitar.com.au...ead.php?t=3410
Martin Backpacker Repair: http://www.buildyourownguitar.com.au...?t=5038&page=3
'57 Harmony Jazz guitar project: http://www.buildyourownguitar.com.au...ead.php?t=2972
Okey dokey, so because I've been so busy being a smart arse on every other thread, there hasn't been a whole heap of progress on the Explorer project. Also probably because i'm waiting for the DT to cure.
I started the staining with the Black stump, though I juggled the bottles and before i'd thought to check id done the first coat with the intensifier. Ah snot.
SO after a quick consultation with DB, he advised that I could either sand back and start again or continue with out stain for a transparent finish, which is what I'd intended. So thats what I decided to do!
(DB wavered for a moment on my alternate suggestion, which was to douse it with lighter Fluid, Hendrix it, curl up in the fetal position and rock slowly for a while, then find my testicles, tuck tail between legs and order a new kit from Adam, I think he actually wants to see a result!)
There's a couple of odd bits I thought i'd dealt with:
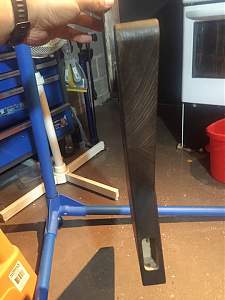
- the Glue line on the back, nope says mr DT.
- the colour difference between maple neck and ash body, but i will hit the neck again to see if this will darken up some more.
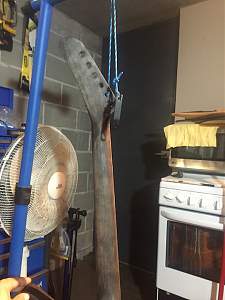
So I'm just letting it hang to dry out. The weather in Sydney town is not ideal but so far, so good. When i have left it the 3-4 days between coats, there are no sticky patches and not damp spots it all feels dry to touch, there are a couple of almost "Fuzzy" patches that i am guessing could use some 0000 steel wool attention, but other than that, reasonably happy with the DT. Just gotta let it dry properly and then look for a low humidity day for the first finish coat.
Still tossing up whether to go with a spray acrylic, but I figure i'll probably stay the course with the DT for the experience.
But what to do with myself while waiting out the drying/curing time........

 Reply With Quote
