
looks great Arzi, you are doing an awesome job


looks great Arzi, you are doing an awesome job
Stan's LP Build for my Sister: http://www.buildyourownguitar.com.au...ead.php?t=3146
Benson Pickup Strat mod: http://www.buildyourownguitar.com.au...ead.php?t=5229
Epiphone LP headstock fix: http://www.buildyourownguitar.com.au...ead.php?t=3410
Martin Backpacker Repair: http://www.buildyourownguitar.com.au...?t=5038&page=3
'57 Harmony Jazz guitar project: http://www.buildyourownguitar.com.au...ead.php?t=2972

Hi
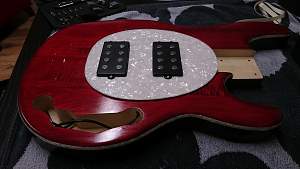
Didn´t have the opportunity to do any TO today ( so much work on this left) so I went and placed the pickups and shaped the scratchplate. At this point just so that the pickup holes are in place and the general shape is ready. After I get the neck placed in the future - then the final shape and fitting will take place.
Had to take a photo to take a sneak peek...
Low lighting and some plastic particles on the top (my bad...) but still looks nice.

This is going to be an absolute beast! Great job Arzi this bass looks already phenomenal!
Is the stain the Keda dye red?

looks excellent Arzi, so you just have to cut out the neck heel shape in the pickguard ? The pearloid guard really matches the binding nicely
Current Builds and status
scratch end grain pine tele - first clear coat on !
JBA-4 - assembled - final tweaks
Telemonster double scale tele - finish tobacco burst on body and sand neck
Completed builds
scratch oak.rose gum Jazzmaster - assembled needs setup
MK-2 Mosrite - assembled - play in
Ash tele with Baritone neck - neck pup wiring tweaks and play in
Thanks guys. The color is Bolger's red dye from UK (ebay) mixed with a hint of keda black. I'll shape it for the neck when I'll get to assembly phase and do the angle on sides as well. The black seemed to settle well in the grain while also darkening the basic red all together. First I was gonna use this mix to pop the grain before putting on the basic color but it turned out great by itself so three coats of the mix did the job.
Arzi you did well with the colour, I'd call it a slightly deeper cherry red. More naughty oil and it will look the biz !
Current Builds and status
scratch end grain pine tele - first clear coat on !
JBA-4 - assembled - final tweaks
Telemonster double scale tele - finish tobacco burst on body and sand neck
Completed builds
scratch oak.rose gum Jazzmaster - assembled needs setup
MK-2 Mosrite - assembled - play in
Ash tele with Baritone neck - neck pup wiring tweaks and play in
Ok...
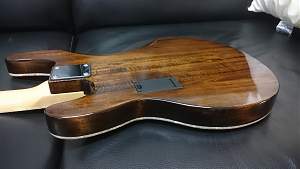
Long time since I´ve done an update. So far I´ve attached the neck to the body, polished the surface, attached the pickups, finished the scratchplate, attached the tuners, attached the bridge... alot of attaching....
Anyway - here it is. A huge step back with the headstock - as you can see it has a crack... DAMN! I put on the ferrules as before, screwed the tuners on an when I flipped the neck - bam... there it was. It´s not all the way cracked but I´m wondering if it will stand the 50kg pressure of the strings... will see. I don´t know what caused this as the ferrules were just as tight as before - almost could push them in with my fingers.
The headstock is exactly the same color as the top - lighting just does some tricks with my phone camera.
I put on golden screws to bring some additional bling to it. I like it - some might not.
I´m waiting for stereo jack to begin the soldering job as the preamp needs it. When that is done - truss rod cover and stringing it up if electronics work. If the jack is not in the post by tomorrow - I´ll get one from a local shop. Can´t wait to finish this.
Sorry about the poor quality pics - dirty lens and dirty surface but I´m kind of in the middle of something here... at work...
Forgot to mention - leveled and polished the frets and filed the fret ends too...
That looks great Arzi. bummer about the crack is it the finish or the wood?
Hi Dekka
The wood... I wouldn't mind the finish so much. Now I'm a bit afraid if the headstock can take the string tension without breaking totally...
We'll see in a couple of weeks. Right now it doesn't seem like GOTM material anyway...
 Posting Permissions

 Reply With Quote
