
First, thanks guys for your help and info!!
I do have some dingotone neck top coat, looks like I need to place an order for for some wax as well!


First, thanks guys for your help and info!!
I do have some dingotone neck top coat, looks like I need to place an order for for some wax as well!
OK, DT acacia neck kit and dingowax ordered, just waiting on replacement kit to arrive before we do take 2, which will take a while as after tomorrow I do 9 days straight, 1 off then another 7 on
The replacement kit arrived on Friday, WOOT!!
so today Ill commence head shaping and some sanding.
Newbie question for you DB, you mentioned needing to grain fill an ash body, I'm going for DT outback sunset,
What would you recommend I use? and could you run me through the basic steps please
Last edited by soundguy4033; 30-08-2015 at 03:38 PM.

Hey Soundguy.Originally Posted by soundguy4033

If you want to Pop the figure, mix some Timbermate with water and a little black ink until you get a thick cream consistency.
If you just want a flat surface with the filler, there are some tinted versions of Timbermate. Get one as close to the timber colour and use that.
Then with a rubber scraper work the filler across the grain.
Let that dry off and sand back with 320 grit sandpaper. Check that all the pores have been filled and repeat if needed.
Give it at least two days to completly dry and set before starting on the DT stain
Last edited by dingobass; 30-08-2015 at 08:22 AM.
There is always a workaround for glitches, mistakes and other Guitar building gremlins.....
Excellent DB!! thanks heaps

I used ebony Timbermate on a build I am doing right now and when sanded back it looks absolutely stunning!

out of interest, is it worth timbermating basswood bodies or is it more for the ash bodies? will it do much to accentuate basswood visually? (I know its not usually as figured)
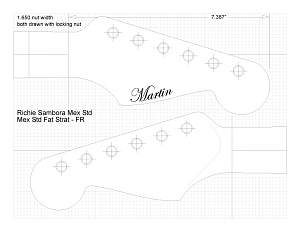
Finished shaping the headstock.
Neck has had its first sand, its very close to getting its finish applied
Last edited by soundguy4033; 30-08-2015 at 03:37 PM.

Even on basswood I find that filling with timbermate will accentuate the grain a little, but more importantly will make the surface beautiful and smooth. When the clear coats go on you'll get a much nicer finish. Just my 2 cents!
cheers,
Gav.
--
Build #01: BC-1
Build #02: ST-1
Build #03: JR-1DC
Build #04: ES-2V
Build #05: ESB-4 (GOTM July 2014)
Build #06: RC-1
Build #07: MK-2
Build #08: TLA-1
Build #09: JR-1DC
Build #0A: LPA-1
Build #0B: STA-1 (GOTM April 2015)
Build #0C: MKA-2
Build #0D: LP-1M
Build #0E: JB-1
Build #0F: FS-1
Find me:
https://www.facebook.com/firescreek.guitars/
http://www.guitarkitbuilder.blogspot.com.au/
I did a Bunnings run today, Timbermate sorted, and Im going to make either a decal or a stencil for a headstock logo, or a I may get totally carried away, get a Dremil tool and carve a logo out of brass sheet
Last edited by soundguy4033; 30-08-2015 at 06:56 PM.
 Posting Permissions

 Reply With Quote
![[url=https://www.facebook.com/kellysgutiars]](image.php?u=1285&type=sigpic&dateline=1444110346)