Page 4 of 8 FirstFirst ... 2 3 4 5 6 ... LastLast
Results 31 to 40 of 75

Thread: TL-1TB Build

  1. #31
    Member
    Join Date
    Jun 2023
    Location
    Townsville
    Posts
    31
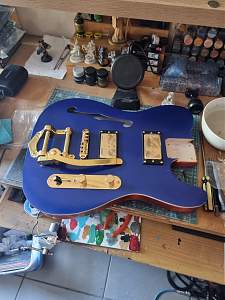
    Having completed the setup of hardware on the body I shifted to the neck, proceeded with a thorough clean and oil before drilling out the holes for the tunners. This was the first issue, should have drilled from both sides of the head stock instead of one pass down, broken splinters on the raw side means filling and gluing. The next issue was fitting the tunners, proceed to start pre drilling the holes for the screw at the back went alright, but fitting the nut on the front was a different matter. Alot of them where really tight to start off, backing out and trying again only had the same effect, forcing one on I snapped the nut right off the shaft. So have to wait till the new tunners show up before strings, nut and other fine tunning begins.
    Click image for larger version. 

Name:	20230819_090729.jpg 
Views:	616 
Size:	433.4 KB 
ID:	44730
    Last edited by Pendragon; 19-08-2023 at 03:16 PM.

  2. #32
    Member
    Join Date
    Jun 2023
    Location
    Townsville
    Posts
    31
    Well I'm out, the neck is too low it's over 10mm at the base to the string, tried sanding down the nut only changed a few mm, not game to lower it anymore. Not sure how to correct, shim it to angle back or raise the whole thing to correct the action?

  3. #33
    GAStronomist Simon Barden's Avatar
    Join Date
    Oct 2016
    Location
    Reading, UK
    Posts
    10,547
    Shim. From the sound of it you'll need a 2-2.5mm shim at the body end of the pocket. Otherwise you'll need an 8-9mm thick piece of flat maple if you raise the whole neck up. You could glue a piece onto the neck heel and finish it so that it becomes part of the neck, but it's a lot of work. And you'll need to get some longer fixing screws as well. But then the neck pickup will need to sit 8mm or so higher as well.

    A Tele isn't naturally designed to have a Bigsby and a tune-o-matic bridge fitted. The standard Fender bridges are maybe 5-6mm high when set to their lowest, whilst a T-O-M bridge is always going to be in the region of 11-12mm high as a minimum, and the roller bridge you've chosen appears to be at least 13mm high (you could compare it against the kit bridge to see if it's any taller).

    The Bigsby-equipped guitars made by Fender normally have a Jazzmaster-style bridge on, which sits lower than a T-O-M style. At its highest, it sits about 9mm off the body. So they may use a thin shim to help, but it does depend on the neck depth chosen. Some necks do have deeper heels than others.

    T-O-Ms and Bigsbys are really designed to be fitted to guitars with a neck angle of a few degrees, to give more clearance for the bridge, whilst almost all bolt-on-necks like on Fenders have a flat angle with respect to the body, though they will generally sit higher off the body than an angled set-neck guitar neck to give clearance for pickups.

    So I'd try a shim as its quick and easy. Use something hard that's not going to compress over time. Old credit cards are a favourite, as are pieces of a hardwood veneer like maple. Stick a few layers together if necessary. I cut a thin rectangular shape with the ends rounded off so it fits at the end of the pocket behind the body-end screw positions.

  4. Liked by: Pendragon

  5. #34
    Moderator Trevor Davies's Avatar
    Join Date
    May 2020
    Location
    Perth
    Posts
    1,755
    My TL1-TB neck is definitely angled back from the body by about 2 degrees. While my TLA-1 is flat to the top.

    I cannot recall adding a shim - but probably did!

    I agree with Simon about giving it a go with layers of veneer or plastic. It will be quick to check that it has worked, and easy to adjust if it hasn't.
    PitBull Builds: FVB-4, LP-1SS, FBM-1, AG-2, TB-4, SSCM-1, TLA-1,TL-1TB, STA-1HT, DSCM-1 Truckster, ST-1, STA-1, MBM-1, MBM custom, GHR-1 (Resonator), FH-5V (Acoustic).

    Scratch Builds: Pine Explorer, Axe Bass, Mr Scary, Scratchy Tele's.

    The little voices in my head keep telling me "build more guitars"

  6. #35
    Member
    Join Date
    Jun 2023
    Location
    Townsville
    Posts
    31
    Adding material to the neck to compensate the bridge height is the simple solution, testing with the supplied bridge shows that the strings are hitting the fret board so bought another the same style as it, double checked measurement so that it's the same. Re drill post holes and all that jazz once it arrives.

  7. #36
    Moderator Trevor Davies's Avatar
    Join Date
    May 2020
    Location
    Perth
    Posts
    1,755
    Quote Originally Posted by Pendragon View Post
    Adding material to the neck to compensate the bridge height is the simple solution, testing with the supplied bridge shows that the strings are hitting the fret board so bought another the same style as it, double checked measurement so that it's the same. Re drill post holes and all that jazz once it arrives.
    Sounds like the shim is too high - if the strings were 10 mm above the fretboard before, and are now touching the fretboard. Can you try a smaller shim?

    Can you include a picture of your shim, and another of the string action?
    PitBull Builds: FVB-4, LP-1SS, FBM-1, AG-2, TB-4, SSCM-1, TLA-1,TL-1TB, STA-1HT, DSCM-1 Truckster, ST-1, STA-1, MBM-1, MBM custom, GHR-1 (Resonator), FH-5V (Acoustic).

    Scratch Builds: Pine Explorer, Axe Bass, Mr Scary, Scratchy Tele's.

    The little voices in my head keep telling me "build more guitars"

  8. #37
    GAStronomist Simon Barden's Avatar
    Join Date
    Oct 2016
    Location
    Reading, UK
    Posts
    10,547
    I think that Pendragon means that the kit bridge is lower than the replacement roller bridge, so when set as low as possible, the strings are now on the fretboard. So the bridge height can then be raised to achieve a low action. And there’s a new roller bridge on the way that is the same height as the original.

    With a Bigsby you don’t want too shallow a string break angle down from the bridge to the roller bar, so having the bridge raised up a bit isn’t a bad thing. But you don’t want it up too high above the body as the generous tolerances in the post threads means the bridge can move forwards and backwards more and more as its height increases. So if you’ve added a shim, then I’d adjust its height once the replacement bridge arrives so the gap between the bridge and the body is no more than 5mm with the action to your liking.

    If the bridge posts can move in the inserts with no string tension applied, I wrap a few turns of PTFE plumber’s tape around the threads until they stop moving. It does help with tuning stability.

  9. #38
    Member
    Join Date
    Mar 2016
    Location
    Wyndham Vale
    Posts
    140
    I have a non PBG Tele thinline with a cheap Bigsby. It worked out of the box but I replaced the normal bridge with a roller bridge as I have done on all my guitars that use Tune-O-Matics. I find it just makes tuning a little bit more reliable as well as consistent as I could never understand why anyone would use wound strings over a sharp edge that could potentially interfere with the string moving while tuning the guitar or using any form of a trem. It's a Personal choice as it made more sense to me.

    I have seen a few people say about the threads moving in the inserts due to thread tolerances being a little on the slack side but after over 40 years working with all style of threads it seemed a little bit strange this would happen. I say this because of how the forces are applied to the roller bridge. The original design Tune-O-Matics I thought would move as the string moved as the wound strings could catch on the sharp edge but by using a roller bridge the string catching is virtually impossible so I feel the notion of the threads moving seem to be a personal feeling rather than a fact, said with no disrespect.

    When the strings are over the roller they exert a force down towards the body and towards the neck due to the break angle so all the load is on one side of the thread and the only way to move said bridge back would be to overcome the existing forces with a counter force greater than both of the forces already exerted on the roller. To me that is virtually impossible due to the force exerted by the break angle, it could definitely happen if the break angle was removed and the string was parallel to the body. The only way it may happen is as said the number of threads contacting the insert was so little due to the height of the bridge. But seeing as the problem is the neck is too flat and needs a slight angle to allow for the thicker bridge I don't see this being a problem.

    Seeing as I was a little bit hesitant to agree with the threads moving in the inserts I had to find out definitely if this was possible on my guitar. Firstly my bridge has about 3mm under it so it has a good number of threads making contact with the insert and has whatever the break angle was from the factory but it seems about the same as my Les Paul copy. I clamped a dial indicator onto the body and made sure there was no movement so it didn't give me an incorrect reading. I then moved the Bigsby arm towards the body and away to the full extent so there was no doubt about my findings and the bridge moved less than 0.02mm. Seeing as this is less than 1/5 of the thickness of a human hair I would say Myth Busted.

    As for the way to adjust the neck angle to allow for the different bridge there are a number of ways I have used to accomplish this.

    1. You can glue in an insert the right thickness under the neck that just lifts the bridge up parallel to the body. I checked my guitar and the depth of the pocket is less than my normal Tele by about 3-4mm and on my guitar with the Bigsby the neck is virtually parallel to the body.

    2. I used a series of packers to find out how much of a shim I needed in a SG copy at the very end of the neck nearest the bridge and glued in a piece of maple plywood that I made to the right thickness on one end, cut the end off a hacksaw blade and then cut a series of slots that just touched the front and back of the neck pocket to give me witness marks to make the right angle. I then used wood chisels, files and a sanding block to shape shim to the right angle. You could also buy a set of shims from Stewmac that does the same thing but I like doing somethings myself.

    3. I have changed the angle on the bottom of the neck that contacts the body so as it gives me the angle I need. This one was the most nerve racking but it come out fine and if necessary I would do again before using any form of shim. Before doing this though make sure there is enough material to allow it being removed without weakening the neck.

    4. Drill a hole that will be covered by the neck plate in between the 2 screws closest to the bridge and put in a thread insert from inside the neck pocket. Either recess or just glue a metal plate to the underside of the neck and use a grub screw to adjust the required angle. You could also screw in a wood screw and file the head down so as its a flat surface for the grub screw to push against. I think Fender has used this on some of their guitars to allow people to fine tune the action.

    One thing I haven't done but have seen it done by others is to recess the bridge down into the body. It works fine but if you are not confident with using either hand or power tools then forget this one.
    Builds :
    # 1 - Non PBG ES-335
    # 2 - Non PBG Tele Thin line
    # 3 - Non PBG LP
    # 4 - Non PBG SG
    # 5 - RC-1
    # 6 - TL-1
    # 7 - ST-1 Custom
    # 8 - SGB-30 + Non PBG SG
    # 9 - Custom JRM-1DC 12 String
    #10 - Custom ST-1 with P90's
    #11 - Custom TL-1 with 27" Bari Neck
    #12 - Custom JZ-6 Jazzmaster
    #13 - AG-1 Factory Second
    #14 - Custom JZ-6 Bass vi
    #15 - EX-1R Factory Second
    #16 - AGM-1
    #17 - EXA-7

  10. #39
    GAStronomist Simon Barden's Avatar
    Join Date
    Oct 2016
    Location
    Reading, UK
    Posts
    10,547
    You may well be right about personal preference, Dickybee, but as it takes seconds to do if you have the strings off and can't do any harm, then I will continue to do it if I feel a bridge (or the stop tailpiece) is particularly sloppy with no strings on. I certainly don't do it as a matter of course, but only if there's what I feel is excessive movement.

    Whilst I'm not disagreeing with anything you say, you'd certainly need more than measuring the movement on a single example to definitively state whether I was wasting my time. And from my experience, I don't think I am.

    I'm assuming that bridge and stop piece threads are deliberately quite loose compared to a standard nut and bolt arrangement, to allow for slight misplacement of the post holes when drilling. I've certainly come across quite a few guitars where the posts are just too close or too far apart or at a slight angle to each other to get a bridge or stop tailpiece at the right height without some sanding or filing. Some slight deviation from the ideal probably helps reduce sloppiness as you'll get the bridge or stop tailpiece pulling in or pushing out on the threads against the sides from the top and taking up some of the slack (in addition to the downward string pressure).

    But having the post holes the ideal distance apart does allow the posts to move the most as there's no extra force applied when fitting the bridge/tailpiece.

    As you mentioned, bridge height does come into play. The higher the bridge sits off the body, the less threads there are in the inserts and the more the posts can move backwards and forwards. And the higher the top of the post is from the body, the greater the distance it will be able to move.

    On a bolt-on neck, you can adjust the neck angle, but with a fixed, neck guitar, you have to work with what you've got.

    Maybe 10-15 years ago, Gibson increased the neck angle on their Les Pauls (and maybe some others) and you ended up with a bridge that sat way above the body. About this time I set up a LP for a friend that required the bridge to be roughly 15mm off the body (and that was with the lowest action I could get), and the strings had to be run over the top of the stop tail just so that the strings didn't pull down against the rear of the bridge as otherwise the stop tail would have sat up even higher from the body than the bridge did, and with very few threads indeed in the post holes. PTFE was certainly necessary here.

    The tape can certainly make the whole bridge feel very rigid. TonePros (amongst others) make quite a feature of locking the bridge and stop tailpiece to the posts for rigidity and more stable tuning. If you buy into that, then having the posts as rigid as possible must also be of benefit.

    I bought a used Gibson Flying V that had had a roller bridge and short Maestro Vibrola fitted to it (like Andy Powell of Wishbone Ash's guitar). It wasn't staying in tune very well. Despite having a roller bridge, I could see the bridge rocking backwards and forwards when the trem was used. And the string retainer bar just slotted onto the vibrato spring, and that could move sideways a bit with a bit of pressure from the palm of your hand. So I epoxied the two bits of the vibrola together and put PTFE tape on the bridge posts and now it stays in tune really well, certainly better than most Strat trems do.

    I know quite a few luthiers don't like roller bridges, primarily (IIRC) because they often stop rolling due to general dirt and gunk build-up, and you can then get some rolling and some not, which is the worst of both worlds. So if you do have a roller bridge, then you need to keep it clean and make sure the rollers do roll.

    They also aren't frictionless (as some descriptions on the web seem to indicate), and it does take a certain amount of initial force to overcome the static friction between the roller and the axle they roll around (once moving, dynamic friction is far less than static friction so they keep moving). To apply that force, there has to also be friction between the string and the roller. If the string simply glided across the roller, then the roller would never turn. Roller diameter and moments come into play here, and a bigger roller would be better and require less string to roller force before the roller to axle friction was overcome and the roller started moving, but you can't make the bridge too tall or too wide, so the rollers tend to be of a small diameter. So that can certainly reduce resistance to string movement, but not remove it completely.

  11. #40
    Member
    Join Date
    Mar 2016
    Location
    Wyndham Vale
    Posts
    140
    While all the stories show your experience with various guitars I don't really know how any of them are relative to helping this builder. The stories about fixed necks has little or no relevance to this builders guitar problem but if you feel you need to use these to show your point then you do you.

    My guitar is exactly the same as the one in this build except it isn't made by Pitbull and my settings are probably closer to his than a Gibson whose bridge is 15mm above the deck. Which probably could have been fixed with custom made inserts or longer thread on the bridge screws or using a locknut on the screw that was used to lift the bridge. If it was such a problem why not reset the neck as obviously it wasn't right in the first place but if it was a Gibson their quality isn't as high as their prices.

    As for the problems with roller bridges I guess it comes down to if you don't like something you just make up stuff to justify your bias. If the roller stops rolling due to dirt and grime obviously its the rollers fault and not your lack of house keeping skills. Any problem with the roller not working is fixable and any one here on this forum has the skills to rectify such problems. If its dirty then clean and lube said item. I have on occasion taken the rollers and polished the pin so it would turn freely as the finish and roundness wasn't what I would say is up to my standard. I even made up a pin that was used to polish the seat where the roller sat thus reducing the friction between the roller and its housing.

    But then I thought does it really need to spin freely and the answer is no as the shape in the roller is better than the sharp edges on a Tune-O-Matic. Having it roll would be nice but not essential but most can be made to roll with a little bit of lube and polish. If the friction against the roller isn't sufficient to make the roller roll then the string will glide over the round surface of the roller much easier than the sharp edge of the TOM. Also remember it is better to use a round slot for the string in the nut rather than using a sharp vee as it aids with the string movement while tuning, same applies to the bridge. Guitar strings moves more over the nut than the bridge while tuning a guitar.

    One part of your story that bothers me is the amount you worry about the movement in the stop tail guitar. Obviously it didn't have a trem so all the load would have been in the one direction towards the tuners so all the load would have been on one side of the threads. Actually it would be on the front side at the top and on the rear side at the bottom due to the threads taking up the difference between the nut and screw diameters. The only way to make the bridge move backwards towards the nut would be to loosen the strings. This cannot be done as the only action that changes the length of the string to move the bridge would be when you bend the string which applies more pull towards the nut and seeing as the threads already have a pretension applied due to the strings being in tune then in reality nothing should move in the bridge as there is no difference in the tension which holds the screw in place before the bend. If that makes sense.
    Builds :
    # 1 - Non PBG ES-335
    # 2 - Non PBG Tele Thin line
    # 3 - Non PBG LP
    # 4 - Non PBG SG
    # 5 - RC-1
    # 6 - TL-1
    # 7 - ST-1 Custom
    # 8 - SGB-30 + Non PBG SG
    # 9 - Custom JRM-1DC 12 String
    #10 - Custom ST-1 with P90's
    #11 - Custom TL-1 with 27" Bari Neck
    #12 - Custom JZ-6 Jazzmaster
    #13 - AG-1 Factory Second
    #14 - Custom JZ-6 Bass vi
    #15 - EX-1R Factory Second
    #16 - AGM-1
    #17 - EXA-7

Page 4 of 8 FirstFirst ... 2 3 4 5 6 ... LastLast

Posting Permissions

  • You may not post new threads
  • You may not post replies
  • You may not post attachments
  • You may not edit your posts
  •