
headstock looks good Ponch. We got the same drill press, for the price its great. Only problem it's not big enough to drill string through holes or bridge posts.


headstock looks good Ponch. We got the same drill press, for the price its great. Only problem it's not big enough to drill string through holes or bridge posts.
Current Builds and status
scratch end grain pine tele - first clear coat on !
JBA-4 - assembled - final tweaks
Telemonster double scale tele - finish tobacco burst on body and sand neck
Completed builds
scratch oak.rose gum Jazzmaster - assembled needs setup
MK-2 Mosrite - assembled - play in
Ash tele with Baritone neck - neck pup wiring tweaks and play in

Cheers OS. Build should progress a bit faster now! I source veneer from flea-bay, for exampleOriginally Posted by OliSam

http://www.ebay.com.au/itm/3pcs-Mapl...MAAOSwmLlX2Rew
but I'm sure there are local suppliers (maybe guitaraust?)
Current Projects
#Planning 5 String Bass
Cheers Woks, yes good value drill press. I've got this mod lined up..... should help
http://www.routerforums.com/tools-wo...ification.html
Current Projects
#Planning 5 String Bass
wow great idea Ponch, might look at doing that mod to our drill press. There are metal fabricators at work could help me mod the stand and the resting plate.
Current Builds and status
scratch end grain pine tele - first clear coat on !
JBA-4 - assembled - final tweaks
Telemonster double scale tele - finish tobacco burst on body and sand neck
Completed builds
scratch oak.rose gum Jazzmaster - assembled needs setup
MK-2 Mosrite - assembled - play in
Ash tele with Baritone neck - neck pup wiring tweaks and play in

NOw that's some clever vyving, GLAYVEN!
FrankenLab:
Turning tone wood into expensive sawdust since 2016!
Worth looking at mobs like this:
http://www.topveneer.com.au/
They also do a mixed box that will give you a heap of bits of veneer that are big enough for headstocks and similar jobs
http://www.topveneer.com.au/marquetry-mix-07kg-long-cut
Current:
JBA-4 done! http://www.buildyourownguitar.com.au...ead.php?t=6865
TBird GOTM November 2017 http://www.buildyourownguitar.com.au...ead.php?t=7064
JB-4 with mods - underway http://www.buildyourownguitar.com.au...ead.php?t=8014
Started on the headstock shaping tonight. Rough cut using a rasp - looks a bit wonky but will fine tune when sanded.
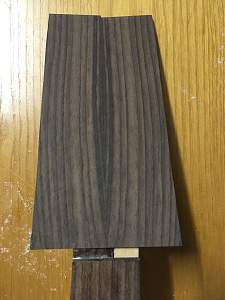
And also found a piece of rosewood veneer stashed away in my workshop.Could be useful dyed with some japan black....
Brains trust - is it simply a case of gluing this to the headstock and cutting to shape or visa-versa? I'm thinking less chance of splitting it if I glue onto the headstock face first (but harder to work with)?
And my-oh-my, I must have been on some fermented beverage looking at the old wonky holes again..........
Last edited by andrewdosborne; 31-05-2017 at 08:25 PM.
Current Projects
#Planning 5 String Bass
Oooh that last picture is naughty! That will look sick with the inward curve of the headstock shape and the outward curve of the grain in the veneer.
Everything I've seen, is either rough shape and adhere or no shape and adhere. Give the grain pattern, i'd think you might want to concentrate on getting that centerline dead on and worry about the shaping later? i mean how thick is the veneer?
Scribe with a marking knife first, then a fine saw blade? rough out with a scroll saw or small coping saw and then sand to final profile?
Theres a range of options.
FrankenLab:
Turning tone wood into expensive sawdust since 2016!
So what could possibly go wrong in putting a veneer on the headstock?
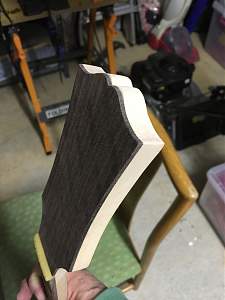
1. Attempt number 1. I discovered veneer is very brittle...the hard way...and it split length ways in the wrong place.
2. Attempt number 2. I discovered that once veneer is placed on headstock it moves around ALOT. Unclamping the next day revealed this characteristic
3. Attempt number 3. All good, not perfect but considering the steep learning curve ok. And the botched holes are covered....Nut in place to help position the veneer. Picked up some extra small clamps (you need loads of them). Tomorrow evening the nut is to be removed, the truss rod access hole dremelled out and machine head holes drilled.
Clamps on
And its in position

Last edited by andrewdosborne; 05-06-2017 at 08:07 PM.
Current Projects
#Planning 5 String Bass
I then shaped the veneer to the headstock with some files, finishing off with 80 grit sanding. Once machine head and truss rod holes are drilled I'll take a bit of then veneer off depth wise (1/2mm or so) then stain with some diluted FW Brown Japan. So tempted now to try my hand @ inlay.....
And, I now have great respect for the luthiery skill of veneering, It's a toughy
Last edited by andrewdosborne; 05-06-2017 at 08:09 PM.
Current Projects
#Planning 5 String Bass


 Reply With Quote