
That looks great Greg!


That looks great Greg!
Build 19 PSH-1 Kustom
Build 18 HB-4S Kustom
Build 17 WL-1 Kustom
Build 16 TL-1TB Kustom
Build 15 PBG-2-
Build 14 FTD-1
Build 13 RD-1 Kustom
Build 12 DM-1S
Build 11 MKA-2 -
Build 10 Basic strat
Build 9 JM Kustom
Build 8 FV-1G
Build 7 ES-2V
Build 6- Community prototype
Build 5 LP-1LQ
Build 4 ES-5V
Build 3 JR-1
Build 2 GD-1
Build 1 TLA-1

ooooooooo SHINY!Originally Posted by GregLane

FrankenLab
Hand crafting guitars, because Death Rays are expensive.

Looks really nice Greg. And BTW, you really need to update your signature as you've definitely started your LP-1MQ!

Oh my lord that looks unreal. Good save and recovery.
TO also comes in a bigger bottle that does work out more economical if you have several jobs to do but once opened it can go off, particularly at about the 6 months since opened point in time. I reckon the bigger one would be plenty to cover a large piece of furniture.
# 1 - EX-5 https://goo.gl/fQJMqh
# 2 - EX-1 https://goo.gl/KSY9W9
# 3 - Non PBG Tele https://goo.gl/W14G5g
# 4 - Non PBG J Bass https://goo.gl/FbBaFy
# 5 - TL-1AR GOTM Aug 2017 https://goo.gl/sUh14s
# 6 - MMB-4 Runner-up GOTM Oct 2018https://goo.gl/gvrPkp
# 7 - ES-1 Runner-up GOTM Aug 2018https://goo.gl/T9BEY8

Been rolling along quietly and carefully. The body and neck head are now ready for the colouring stage. However there will be a delay for a week or so delivering Xmas presents between here and Geelong.
I am very impressed with the Tru-Oil finish. It is very easy and forgiving to use. Final 50% coat brings up a tremendous shine. I don't think I want to polish it as it is shiny enough but will it scratch more easily?
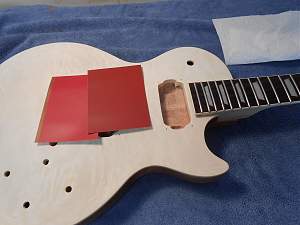
I hope to get something between these two colour chits for the cap and headstock. I am using Colortone's Mahogany Red brightened with Cherry Red. Test have been successful so now for the real thing. I will try gavinturner's advise and wipe on and off a couple of times to try to make the quilted top pop. I dare not sand as usual(see previous).
Guitars:
Build #4 - Scratch SG - Qld Mahogany - In Progress
PBG#3- - ES-1F - kit electronics (Dec 2020)- upgrade if I can do it justice
PBG#2- - STA-1 Ash w black upgrades GOTM June 2020
PBG#1- LP-1MQ http://www.buildyourownguitar.com.au...ead.php?t=6378
Acoustics -Washburn WD18SW
- Maton Australian EA80C
Electric - Magnum pseudo Stratocaster - upgraded with PitBull bits - 2020
Looking good Greg.
Reckon start with the lighter more reddish colour as you can always darken but not so easy to go the other way plus the one on the right has much more brown than red tones and not sure that is what you wanted to achieve?
# 1 - EX-5 https://goo.gl/fQJMqh
# 2 - EX-1 https://goo.gl/KSY9W9
# 3 - Non PBG Tele https://goo.gl/W14G5g
# 4 - Non PBG J Bass https://goo.gl/FbBaFy
# 5 - TL-1AR GOTM Aug 2017 https://goo.gl/sUh14s
# 6 - MMB-4 Runner-up GOTM Oct 2018https://goo.gl/gvrPkp
# 7 - ES-1 Runner-up GOTM Aug 2018https://goo.gl/T9BEY8
Thanks Was
I am brightening a darker colour (Mahogany Red) with a lighter one (Cherry Red). And it does not take much CR to brighten the MR because there is already quite a bit of red in it. I was thinking of doing the wipe on/off coat in the MR based in the same principle that the quilt it generally popped with black or a darker colour the sanded (hopefully wiped) off. If the wipe off is not too successful and leaves to much MR there is a lot of margin to add more red to the subsequent coats.
The CT is mixed with metho and not water because of the previous veneer problems. So I don't know whether that will effect the wipe off. All part of the experience.
Guitars:
Build #4 - Scratch SG - Qld Mahogany - In Progress
PBG#3- - ES-1F - kit electronics (Dec 2020)- upgrade if I can do it justice
PBG#2- - STA-1 Ash w black upgrades GOTM June 2020
PBG#1- LP-1MQ http://www.buildyourownguitar.com.au...ead.php?t=6378
Acoustics -Washburn WD18SW
- Maton Australian EA80C
Electric - Magnum pseudo Stratocaster - upgraded with PitBull bits - 2020
Metho's going to evaporate quicker than water so you could have issues and leave tide marks as a result. Have a look at Nitroburner's build diary here, where he mixed metho and turps together to thin some poly finish out. The same 50:50 mixture of metho and turps should work with your powdered dyes, and allow you to work the stain more like a water-based dye. Using slightly more turps than metho should give you a longer working time and allow you to apply with a slightly dryer rag. But as always, test on some scrap wood first.

Back looks great Greg. Very keen to see how the front comes up, love a good red.
Wow! That HS shape is wild Greg, really different. That must have been a painstaking cut and sand process to get to there?
FrankenLab
Hand crafting guitars, because Death Rays are expensive.
 Posting Permissions

 Reply With Quote