looking good Dedman


looking good Dedman
Current Builds and status
scratch end grain pine tele - first clear coat on !
JBA-4 - assembled - final tweaks
Telemonster double scale tele - finish tobacco burst on body and sand neck
Completed builds
scratch oak.rose gum Jazzmaster - assembled needs setup
MK-2 Mosrite - assembled - play in
Ash tele with Baritone neck - neck pup wiring tweaks and play in

If that stain is oil based be careful of the neck pocket, when it comes to setting the neck the glue may not appreciate it.
Scott.

Thanks Weirdy,,it's going to need a slight sand as the neck is a very tight fit.
Holes getting drilled tomorrow Fretty, in fact all holes for cavity covers and pup frames as well. will stick toothpicks in them so they don't fill with crap.
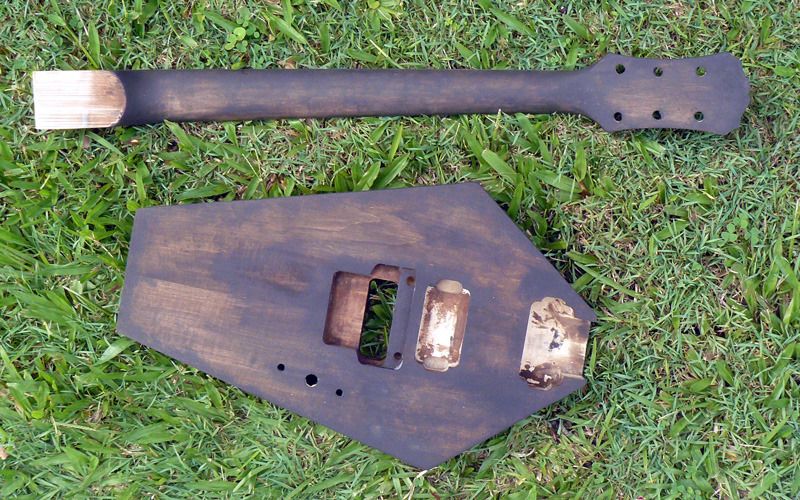
I found some sheet copper while rummaging for something else, I think I might make new switch and trem cavity covers from it.
Build 19 PSH-1 Kustom
Build 18 HB-4S Kustom
Build 17 WL-1 Kustom
Build 16 TL-1TB Kustom
Build 15 PBG-2-
Build 14 FTD-1
Build 13 RD-1 Kustom
Build 12 DM-1S
Build 11 MKA-2 -
Build 10 Basic strat
Build 9 JM Kustom
Build 8 FV-1G
Build 7 ES-2V
Build 6- Community prototype
Build 5 LP-1LQ
Build 4 ES-5V
Build 3 JR-1
Build 2 GD-1
Build 1 TLA-1
sounds good Dedman, copper control cavity cover will look cool and won't need copper shielding !
Current Builds and status
scratch end grain pine tele - first clear coat on !
JBA-4 - assembled - final tweaks
Telemonster double scale tele - finish tobacco burst on body and sand neck
Completed builds
scratch oak.rose gum Jazzmaster - assembled needs setup
MK-2 Mosrite - assembled - play in
Ash tele with Baritone neck - neck pup wiring tweaks and play in

Bit late on the thread Ron/Dedman and really dig the overall concept, it's a real killer.
The rear control cavity looks the same size as on my EX-1 where I also used 2 x 500k Bourns push pull pots and a Grover 3 way switch with the switch located in the middle which leaves plenty of room to fiddle with knobs and switches. Also managed to fit a Sprague Orange drop 0.047 capacitor in that cavity too.
Today......started the aging process..........
and annealed the copper sheet to make it pliable, then life demanded I do some paying work
Build 19 PSH-1 Kustom
Build 18 HB-4S Kustom
Build 17 WL-1 Kustom
Build 16 TL-1TB Kustom
Build 15 PBG-2-
Build 14 FTD-1
Build 13 RD-1 Kustom
Build 12 DM-1S
Build 11 MKA-2 -
Build 10 Basic strat
Build 9 JM Kustom
Build 8 FV-1G
Build 7 ES-2V
Build 6- Community prototype
Build 5 LP-1LQ
Build 4 ES-5V
Build 3 JR-1
Build 2 GD-1
Build 1 TLA-1
looks good Dedman, what are you doing for the aging process ?
Current Builds and status
scratch end grain pine tele - first clear coat on !
JBA-4 - assembled - final tweaks
Telemonster double scale tele - finish tobacco burst on body and sand neck
Completed builds
scratch oak.rose gum Jazzmaster - assembled needs setup
MK-2 Mosrite - assembled - play in
Ash tele with Baritone neck - neck pup wiring tweaks and play in
I made up a mix of flat black water based paint, about 50paint/50water then sponged it (dab it lightly after getting most of the mix off on some scrap) around the edges and the routs and over the couple of glue spots. Then, just as it's nearly dry I make another wash up thats about 70% water, dip a rag in it then wipe it over everything. Because the previous layer isn't quite dry the new wash will smear it just lightly. Tomorrow I'll do another light wash and fix a couple of areas that need a bit more black. Then I'll get another sponge and put some feint greeny mould around the rout openings.
I'll do a full tute on sponging when I get to doing my JR-1 as it will be mostly sponging but without the over washes, there was also no one else home this morning and you can't really stop to take pics once you start and have paint all over your hands. The trick today was not to let the first sponging dry too much that the wash wouldn't effect it. I use a sponge with big open pores, I save the old car wash ones when they are falling apart and no good for washing the car anymore, they are perfect for this at that point. When you use them with car acrylics you do get tiny bits coming off and sticking to the work but they are easily knocked off with some fine wet and dry.
Last edited by Dedman; 11-05-2016 at 11:03 AM.
Build 19 PSH-1 Kustom
Build 18 HB-4S Kustom
Build 17 WL-1 Kustom
Build 16 TL-1TB Kustom
Build 15 PBG-2-
Build 14 FTD-1
Build 13 RD-1 Kustom
Build 12 DM-1S
Build 11 MKA-2 -
Build 10 Basic strat
Build 9 JM Kustom
Build 8 FV-1G
Build 7 ES-2V
Build 6- Community prototype
Build 5 LP-1LQ
Build 4 ES-5V
Build 3 JR-1
Build 2 GD-1
Build 1 TLA-1
interesting technique Dedman, for a minute I thought you might actually bury the body and neck (guitar I mean) ahhaha
Current Builds and status
scratch end grain pine tele - first clear coat on !
JBA-4 - assembled - final tweaks
Telemonster double scale tele - finish tobacco burst on body and sand neck
Completed builds
scratch oak.rose gum Jazzmaster - assembled needs setup
MK-2 Mosrite - assembled - play in
Ash tele with Baritone neck - neck pup wiring tweaks and play in
I was a model maker/ props make on a few film, learned heaps of tricks with paint. We built the interior walls of a space ship with foam meat trays from Wollies and lots of sponging once
Build 19 PSH-1 Kustom
Build 18 HB-4S Kustom
Build 17 WL-1 Kustom
Build 16 TL-1TB Kustom
Build 15 PBG-2-
Build 14 FTD-1
Build 13 RD-1 Kustom
Build 12 DM-1S
Build 11 MKA-2 -
Build 10 Basic strat
Build 9 JM Kustom
Build 8 FV-1G
Build 7 ES-2V
Build 6- Community prototype
Build 5 LP-1LQ
Build 4 ES-5V
Build 3 JR-1
Build 2 GD-1
Build 1 TLA-1
 Posting Permissions


 Reply With Quote