Page 1 of 2 1 2 LastLast
Results 1 to 10 of 15

Thread: Roly's ES12G

  1. #1

    Roly's ES12G

    Well i did say I was starting after Christmas - but I didn't say which one...LOL.

    Looking back, I said hello in December 16 and finally I have started. I have thought lots about changing and upgrading hardware but have decided to build it with the supplied gear and if it is worthy after completion, I will spend some cash on better pickups and other upgrades then.

    I tidied up our back room last weekend and looked in the box and decided it was time to start. I had previously sanded the body and so gave it another run over and had a close look at everything to re-acquaint myself with the kit.

    My previous experiments didn't really produce the colour results I had in mind. I have since watched a lot of finish applications on YouTube so figured I would give it a go.

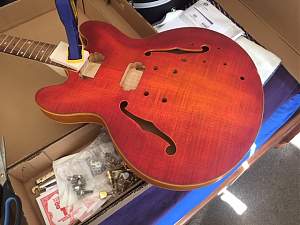
    I started with a diluted black stain to highlight the grain. Once dry, I sanded well. I then applied a coat of Vintage Amber Colortone, sanded and re-applied. Did this three times. Then I gave the whole top a couple of coats of lemon yellow, sanding in between each time. Then I applied the Cherry Red to the outer edges, blending as I went with the Lemon Yellow to remove the defined edge. More sanding in between coats and re-applying till I was happy with how it looked. Hopefully I will be happy once the clear goes on...time will tell.

    I have checked scale lengths on the neck and also center line alignment. I was happy with these and so now the neck and body are one. I will do the frets and neck setup once finished and assembled.

    I started staining the back and neck tonight and will post a couple picks when I am happy with the colour. Here are a couple pics of the progress so far. Neck to body fit was pretty good. I transitioned it with a very small amount of filler. It will be Cherry Red at the join so lack of grain because of the filler should not be obvious.

    Click image for larger version. 

Name:	IMG_7213.JPG 
Views:	343 
Size:	92.5 KB 
ID:	28838

    Click image for larger version. 

Name:	IMG_7222.JPG 
Views:	340 
Size:	127.6 KB 
ID:	28839

  2. #2
    Colour is looking good!
    #001 (LP-1S) [finished - co-runner up Nov 2018 GOTM]
    #002 (WL-1)
    #003 (MPL Megacaster - semi scratch build) [finished]
    #004 (ST-1 JR - Arachnoid Superhero build) [finished]
    #005 (LP jr)
    #006 (TL-1A)

    Junk shop acoustic refurbs (various)
    'The TGS Special'

  3. #3
    GAStronomist wazkelly's Avatar
    Join Date
    Aug 2015
    Location
    Caloundra West, Sunshine Coast Qld
    Posts
    6,631
    Interesting how the grain texture looks more vertical directly below bridge and tail stop positions through to end pin location.
    # 1 - EX-5 https://goo.gl/fQJMqh
    # 2 - EX-1 https://goo.gl/KSY9W9
    # 3 - Non PBG Tele https://goo.gl/W14G5g
    # 4 - Non PBG J Bass https://goo.gl/FbBaFy
    # 5 - TL-1AR GOTM Aug 2017 https://goo.gl/sUh14s
    # 6 - MMB-4 Runner-up GOTM Oct 2018https://goo.gl/gvrPkp
    # 7 - ES-1 Runner-up GOTM Aug 2018https://goo.gl/T9BEY8

  4. #4
    GAStronomist FrankenWashie's Avatar
    Join Date
    Jan 2016
    Location
    Glebe, NSW
    Posts
    5,666
    Thats some nice grain and some wonderful colour coming through Roly.
    FrankenLab
    Hand crafting guitars, because Death Rays are expensive.


  5. #5
    A couple of pics from the first lot of stain applications last night. It dries pretty quickly so I got a couple of layers on. I will sand it and continue tonight. I am unsure whether or not to add black to the outside edges yet.
    Click image for larger version. 

Name:	IMG_7230.JPG 
Views:	336 
Size:	74.1 KB 
ID:	28842

    Click image for larger version. 

Name:	IMG_7229.JPG 
Views:	334 
Size:	86.1 KB 
ID:	28843

    Click image for larger version. 

Name:	IMG_7227 - Copy.JPG 
Views:	341 
Size:	60.4 KB 
ID:	28844

    Click image for larger version. 

Name:	IMG_7228.JPG 
Views:	340 
Size:	68.6 KB 
ID:	28845

  6. #6
    Mentor DarkMark's Avatar
    Join Date
    Sep 2017
    Location
    Perth, WA
    Posts
    1,570
    Looking good.

  7. #7
    Member ILRGuitars's Avatar
    Join Date
    Nov 2016
    Location
    Sydney
    Posts
    385
    I reckon adding the black would set off the black on the neck and headstock nicely. Just don't add too much.
    A thin line would be all you need. Here's the back of mine:
    Click image for larger version. 

Name:	IMG_0820.JPG 
Views:	330 
Size:	668.0 KB 
ID:	28849

    From: Non Pitbull ES330 Tribute.

  8. #8
    Looks good ILRGuitars but I think I am not going with the black.

    This is getting pretty close I think. Tried to catch the last of the natural light.

    Click image for larger version. 

Name:	IMG_7233.JPG 
Views:	340 
Size:	199.2 KB 
ID:	28853

    Click image for larger version. 

Name:	IMG_7234.JPG 
Views:	356 
Size:	194.9 KB 
ID:	28854

  9. #9
    I am considering some MOP inlays for the neck and headstock. While applying the stain the nut dislodged. Is MOP suitable for a nut or should I stick with bone?
    Cheers

  10. #10
    Member ILRGuitars's Avatar
    Join Date
    Nov 2016
    Location
    Sydney
    Posts
    385
    Bone for tone!

Page 1 of 2 1 2 LastLast

Posting Permissions

  • You may not post new threads
  • You may not post replies
  • You may not post attachments
  • You may not edit your posts
  •