Results 1 to 5 of 5

Thread: ES-3 pickup question

  1. #1
    Member peterh's Avatar
    Join Date
    Jan 2016
    Location
    Peterborough, ON. Canada
    Posts
    136

    ES-3 pickup question

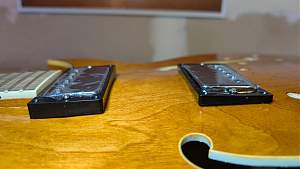
    After years of my build hanging in my basement, I'm finally getting around to doing the wiring but I'm not sure which pickup goes in the bridge and which in the neck holes. The two pickups that came with the kit appear to have exterior plastic cases that are of different depths and are deeper on one side than the other.
    Am I correct in assuming that the pickup with the deeper casing (red wire attached) goes in the neck hole since the fretboard is higher up from the body surface? Assuming that's correct, which way around does the bridge pickup go since the casing is deeper on one side than the other? Does the thicker end go towards the neck or towards the bridge?
    I should mention that the wiring diagram I got shows the pickup with the red wire (and thicker casing) being the bridge pickup and yellow wired PU as the neck, so maybe my thinking is incorrect?

    Click image for larger version. 

Name:	PXL_20260215_222952613.jpg 
Views:	3 
Size:	261.0 KB 
ID:	45983
    Last edited by peterh; Yesterday at 07:05 AM.

  2. #2
    Moderator Trevor Davies's Avatar
    Join Date
    May 2020
    Location
    Perth
    Posts
    1,915
    Hi peterh
    The pickup surrounds (cases) sometimes are a bit weird on an archtop or curved top guitar! Probably, it is easiest to think about them on a flat-top guitar (where the strings get higher off the top of the body as they get closer to the bridge) - so the deeper surround is for the bridge pickup, the shallower one for the neck. The higher sides of the surround will be closer to the bridge.

    Also/or, the pickup with the red wire will be the bridge pickup, the other will have a yellow wire. I'm sure the yellow wire is longer (??). The wires also leave the pickups on the bottom side of the pickup.

    Also, the (Screw) pole pieces for the pickups are on the neck side for the neck pickup, and the bridge side of the bridge pickup.

    I hope this helps.
    Attached Thumbnails Attached Thumbnails Click image for larger version. 

Name:	IMG_1200.jpg 
Views:	5 
Size:	172.3 KB 
ID:	45984  
    Last edited by Trevor Davies; Yesterday at 07:07 AM.
    PitBull Builds: FVB-4, LP-1SS, FBM-1, AG-2, TB-4, SSCM-1, TLA-1,TL-1TB, STA-1HT, DSCM-1 Truckster, ST-1, STA-1, MBM-1, MBM custom, GHR-1 (Resonator), FH-5V (Acoustic), DMS-1 (Mustang).

    Scratch Builds: Pine Explorer, Axe Bass, Mr Scary, Scratchy Tele's.

    The little voices in my head keep telling me "build more guitars"

  3. #3
    Member peterh's Avatar
    Join Date
    Jan 2016
    Location
    Peterborough, ON. Canada
    Posts
    136
    Awesome! That really helps, Trevor. My thinking was all backwards, LOL.
    Hopefully I'll have some success to report soon!

  4. #4
    Member peterh's Avatar
    Join Date
    Jan 2016
    Location
    Peterborough, ON. Canada
    Posts
    136
    One other question, if you don't mind, Trevor.
    The kit came with a bunch of color coded wires and some braided push-back shielded wire (a 4" piece of 4 conductor wire, a 12" piece of grey wire, a 24" piece of 4 conductor wire, a 24" piece of b/w 2 conductor wire and quite a length of the push back shielded wire). I don't see anything in the diagrams or any posts I could find that specify what each should be used for.
    Given the placement of the switch, far away from the pots and jack, I'm guessing the b/w wire would go from switch to neck/bridge volume pots? The 4" pieces go between the 4 pots and the remaining wire is used for switch to jack and ground to bridge and ground to jack? And what about the braided push back wire - do I need that?
    Last edited by peterh; Today at 02:15 AM.

  5. #5
    Moderator fender3x's Avatar
    Join Date
    Jan 2016
    Location
    Miami, FL, USA
    Posts
    2,932
    I would test the pickups at least for their ohms reading if you have a multimeter. The one with the higher resistance (ohms) is a little hotter and goes closer to the bridge. If the pickups give about the same ohms reading, it doesn't really matter which way they go.

    As to the wires...they really gave you a lot of wire!. The way you have suggested for the wiring sounds like it would work. The one thing I would think about is maybe just using shielded wire everywhere except to ground the bridge. Since you can't shield the cavity in an ES style guitar, next best thing would be to shield the wires.

    Click image for larger version. 

Name:	es335diagram.jpg 
Views:	0 
Size:	65.8 KB 
ID:	45986

    An advantage to this that you only have one wire running to the lower two pots...and it leaves the F-hole free of dangling wires (something I usually screw up ;-)

Tags for this Thread

Posting Permissions

  • You may not post new threads
  • You may not post replies
  • You may not post attachments
  • You may not edit your posts
  •