Page 1 of 7 1 2 3 ... LastLast
Results 1 to 10 of 69

Thread: James ST-1

  1. #1
    This will be the build thread for my ST-1 build.

    I'm keen to leverage the good advice that this community can offer. I also plan on doing some vids to add to the good stuff already on the site.

    My plan is to build it stock, then upgrade later.

    My initial thoughts for finish are to do an Amber Wudtone, something like this. I also like solid finishes like a classic red or white/cream.

    I guess my first question is what prep can I make before the kit arrives? What tools at a minimum? Anything I should prepare myself for?

  2. #2
    Moderator dingobass's Avatar
    Join Date
    Sep 2012
    Location
    Perth
    Posts
    4,491
    OK,
    Tools needed are:
    Drill and 2.5, 3mm bits
    screw drivers
    Irwin Quickgrip clamps, or any good quality g type clamp with neoprene protectors
    Sand paper... NOT the rubbish from Bun....Bunnn.., you know the one, the big green shed full of crap...
    A good quality steel straight edge- 600mm
    Soldering iron

    Prepare your self for a whole butt load of sanding... Brendan now holds the record of the most time spent sanding, around 10 hours worth!

    The more care you take with the sanding, the better your finish will be.

    DB's mantra is Sand, sand, sand again. When you think you have sanded enough, sand it some more

    There is always a workaround for glitches, mistakes and other Guitar building gremlins.....

  3. #3
    Moderator Brendan's Avatar
    Join Date
    Apr 2013
    Location
    Perth, WA
    Posts
    3,444
    Good plan for stock then upgrade.
    Basic tools:
    Sand paper - people here don't like the stuff from Bunnings - irregular grains and doesn't last long - then again, some have got good results from it... The PitBull guys sell a pack that's pretty good - have used it myself.
    You may want to order some copper shielding from StewMac or eBay - seems like shielding the pickups and controls is a key thing to do. There's some posts around with where you can get good stuff from and it shouldn't be too expensive - though it should be easier to do it before you wire everything up.
    Straight edge - handy for checking out the straighness of the neck - needed for intonation and also if you want to dress frets.
    Screwdrivers, etc...
    Personally I went out and spent an outrageous $4 on an offcut foam block from Clark Rubber - I've used it to set up and sand the body and neck - and has been great.

    Recommeded:
    Couple of quick clamps - e.g., Irwin Quick Grips - DB has done a post on the build diary for my PB-4 that shows two medium grips and two spring clips - having tried to do what he's done with just the two mediums and some tape, then with the two spring clips the next day, it's a whole lot simpler with the right kit.
    You may need a soldering iron - I didn't with the P Bass out of the box - I will only need it for upgrades. Don't know if it will be needed for the ST-1.

    Optional:
    Then you could look to how you want to improve it - radiussed sanding board to dress the frets (though there are ways to do it with less tools), files / rulers to build your own nut / take down any sharp edges on frets. Given that your shipping costs seem to have a flat base and then increase incrementally, you may want to almost bulk order things that you'll need / want down the line.

    Finally:
    To save costs, there are ways to build your own tools - DB has done a notched straight edge for checking fretboard straightness, WeirdBits has done a tute on DIY radius gauges, Robin has made some fret tools himself, etc.


  4. #4
    Moderator Brendan's Avatar
    Join Date
    Apr 2013
    Location
    Perth, WA
    Posts
    3,444
    Oh and forgot to say - to prep - give yourself somewhere comfortable to work - something you can spend some time in - if you want tunes, etc, get them ready. Make sure you also have some room to work with - I'm using pretty much all of a 1.8m long desk to do my bass with a couple of drawers for all the bits and bobs I'm not using right now.

    The bodys of the basswood guitars seem to take very little to damage when they are fully sanded, so you want somewhere to keep them safe, but that is also clean and padded in some way so as to stop any knocks and dents (see Glen's thread on the Red Menace - a fingernail can leave dents in the wood)...

  5. #5
    10 hours sanding! Sounds fun.

    I think I have those tools covered. I'm in no hurry, with a young family, this is not going to be a nightly project for me.

    Any tips on finish? I don't have a suitable spraying area, so I'm looking at Wudtone or similar. Are there any colours you'd avoid considering the basswood and the fact it's my first build?

  6. #6
    Moderator Brendan's Avatar
    Join Date
    Apr 2013
    Location
    Perth, WA
    Posts
    3,444
    Hasn't been the full 10 hours - probably 5-6 so far... that and a little dreaming...

  7. #7
    Ok, spent an hour or two sanding today and things looking good so far.

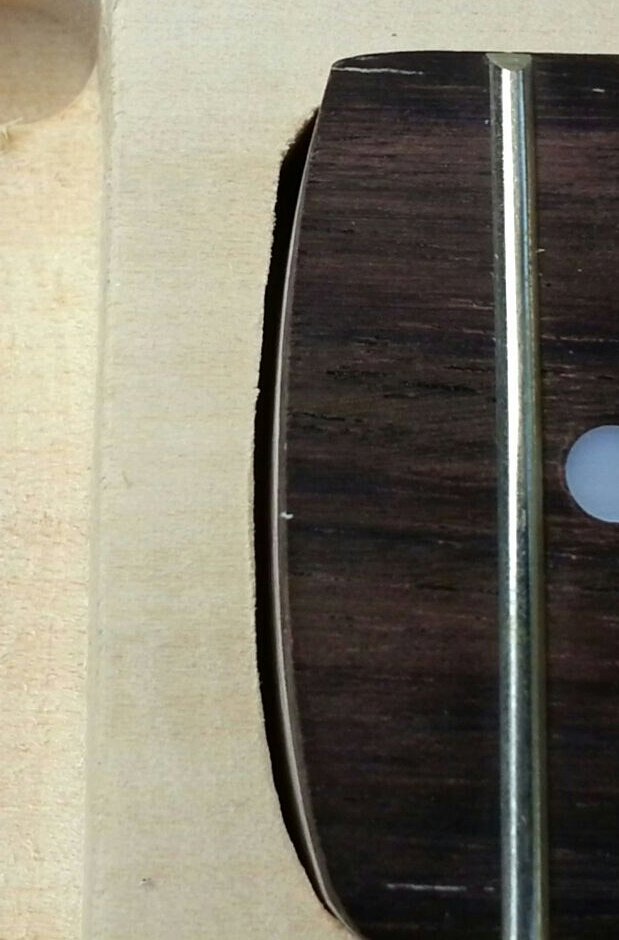
    Have a question about the picture below. When I mocked the kit up to check everything, I could see a small gap in the neck pocket. I've pushed the neck all the way in and whilst it's a snug fit, there is a clear gap of about 1mm.

    I'd like to file the corners out a bit so it's perfect. Anyone think this isn't a good idea? It's the sort of thing that will annoy me.

  8. #8
    Overlord of Music WeirdBits's Avatar
    Join Date
    Jan 2013
    Posts
    2,731
    You should first do a test fit with the pickguard and bridge in place and check your scale measurements, and see how the neck sits in relation to everything else. Then, and only then, will you be in a position to even consider making adjustments that could impact the scale length. Just my opinion.
    Scott.

  9. #9
    Moderator dingobass's Avatar
    Join Date
    Sep 2012
    Location
    Perth
    Posts
    4,491
    Before you break out the files, it is a good idea to check the scale length as you don't want to shorten it and end up with a funky axe that never sounds quite right!
    Also, you should find that the pick guard will cover that gap so no real need to worry about it.
    the gap wont affect the sound, sustain or structural integrity of the guitar.

    There is always a workaround for glitches, mistakes and other Guitar building gremlins.....

  10. #10
    Moderator dingobass's Avatar
    Join Date
    Sep 2012
    Location
    Perth
    Posts
    4,491
    Dammit Weirdy.... you type too fast!

    There is always a workaround for glitches, mistakes and other Guitar building gremlins.....

Page 1 of 7 1 2 3 ... LastLast

Posting Permissions

  • You may not post new threads
  • You may not post replies
  • You may not post attachments
  • You may not edit your posts
  •