Page 1 of 7 1 2 3 ... LastLast
Results 1 to 10 of 65

Thread: Revitalising a 1979 Gibson "The SG"

  1. #1
    GAStronomist Simon Barden's Avatar
    Join Date
    Oct 2016
    Location
    Reading, UK
    Posts
    10,547

    Revitalising a 1979 Gibson "The SG"

    Following on from Sonic's '77 Ibanez SG, and as it’s quite an interesting guitar, I thought I’d describe working on my friend Steve Harris' 1979 Gibson “The SG”. The idea was to bring this rather battered an neglected guitar up to a state where his son, Matthew, could take it off to University with him instead of his 2017 Firebird.

    This set out as a simple set-up and electronics upgrade, but it threw a few curveballs along the way that made it quite challenging. As such I didn’t take as many photos as I should have done, especially of the initial state of the guitar. But hopefully you’ll get an idea of what went on.


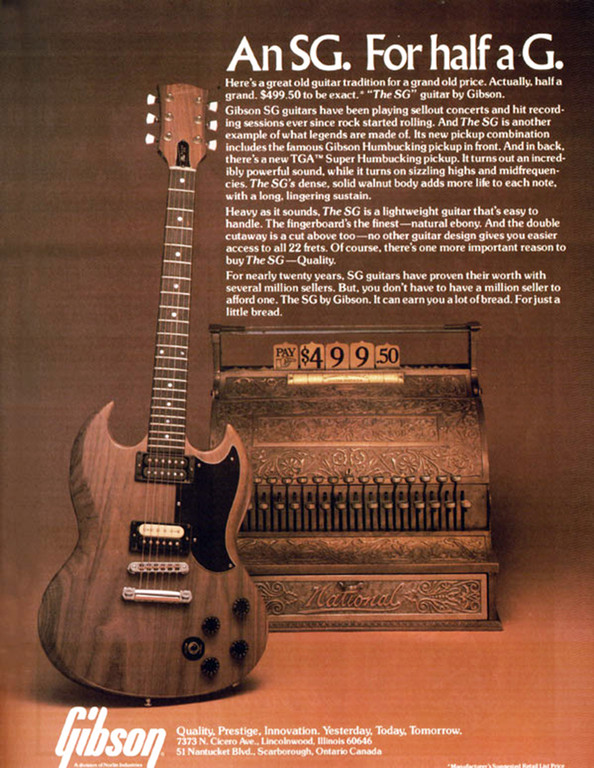
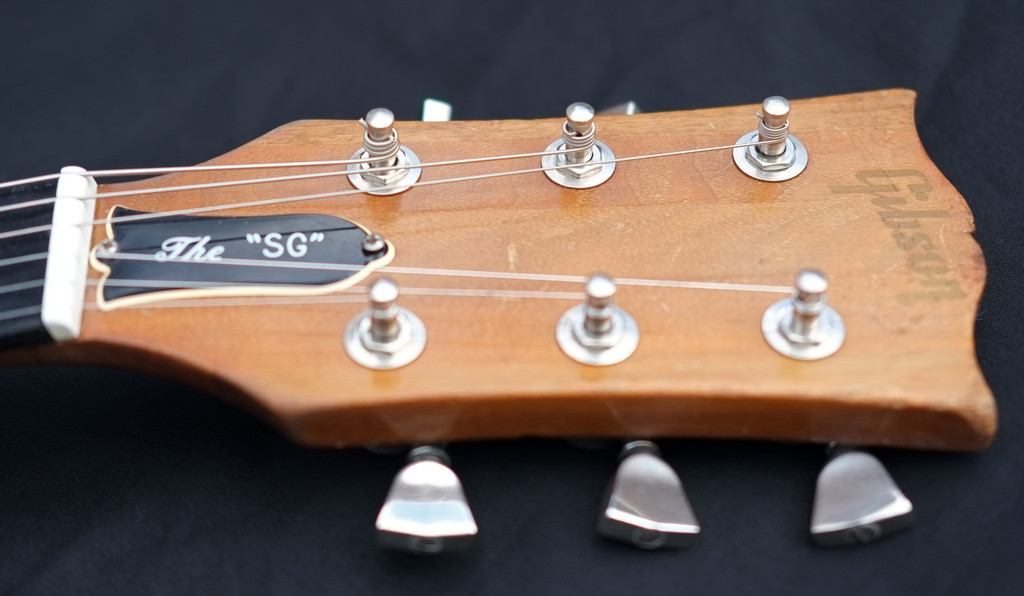
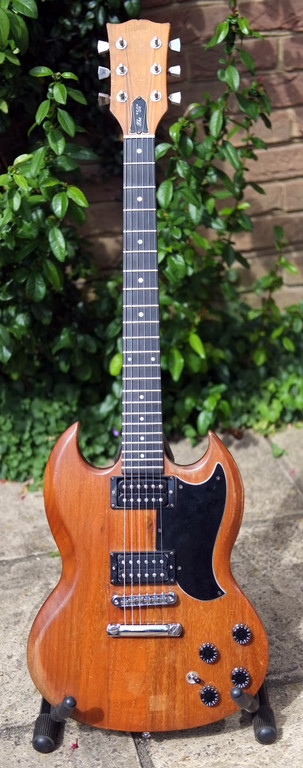
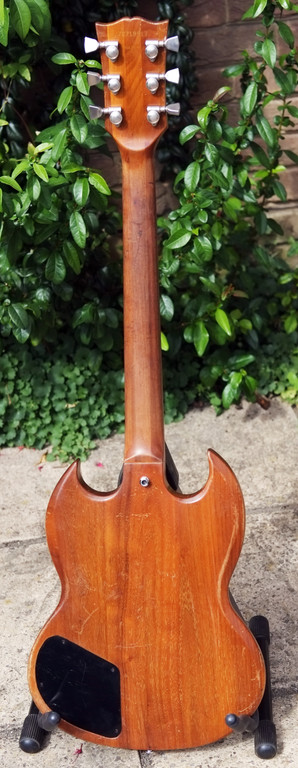
    The Gibson “The SG” followed on in 1979 from 1978’s “The Paul”. These were both lower cost ‘entry-level’ versions of the SG and Les Paul, featuring natural walnut bodies and three-piece walnut necks, ebony fingerboards and a clear satin finish. Both had Grover ‘milk bottle’ tuners with metal tulip buttons. The next year, 1980, the “The SG” transformed into the SG "Firebrand” (as did “The Paul” become a Firebrand), with a branded/burnt-on Gibson logo on the headstock instead of the gold Gibson transfer that this has. There was also some patchy light scorching on the body of the Firebrands.

    Headstock detail showing the gold Gibson decal. Very hard to read against the walnut background at most angles. What were Gibson thinking? Obviously saving money by not having to veneer and paint the headstock face black:


    Despite being advertised as coming with a more powerful bridge pickup, the perceived web knowledge seems to indicate that most of “The SG” models came out of the factory with the standard “T-top” humbuckers of the period. The neck pickup is generally deemed fine, but the bridge pickup was always perceived as weak sounding. It probably didn’t help that this was the period when Gibson were fitting 300k volume and 100k tone pots to LPs and SGs, instead of 500k pots for both positions as previously and currently used.

    Steve, the owner, describes getting the guitar:

    I spotted this one in the second-hand section in Musical Exchanges in Birmingham and bought it because I wasn’t getting on with a (second hand) Ibanez Alan Holdsworth (wish I still had that one). I installed a GK2 and it became my main guitar for the Ark album ’Spiritual Physics’ and the extensive touring we did in a dilapidated converted 50 seat Bedford coach. Right at the height of the controversy with New Age Travellers.

    The guitar was loaned to the son of a very good friend of mine for about five years, who learned to play guitar on it on the basis that it would have a re-fret some time during the loan. The original frets were much more traditional Gibson fret wire AFAIR
    ”.

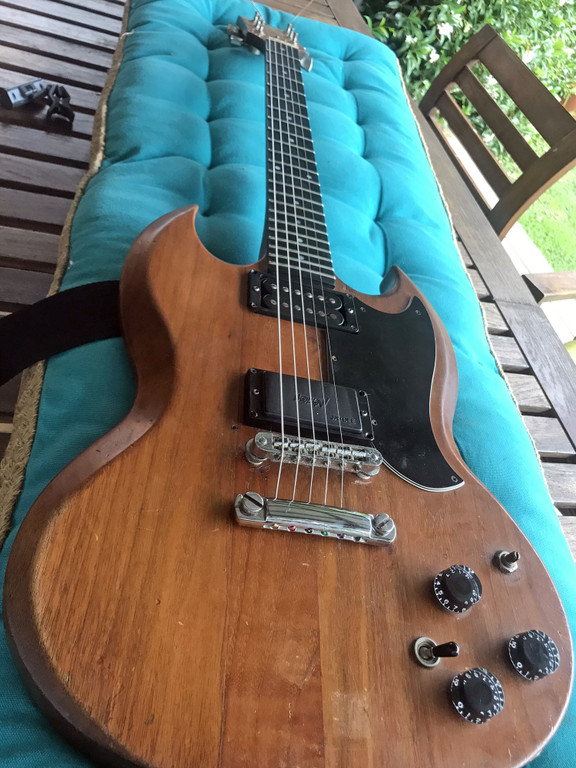
    The SG as it came to me:


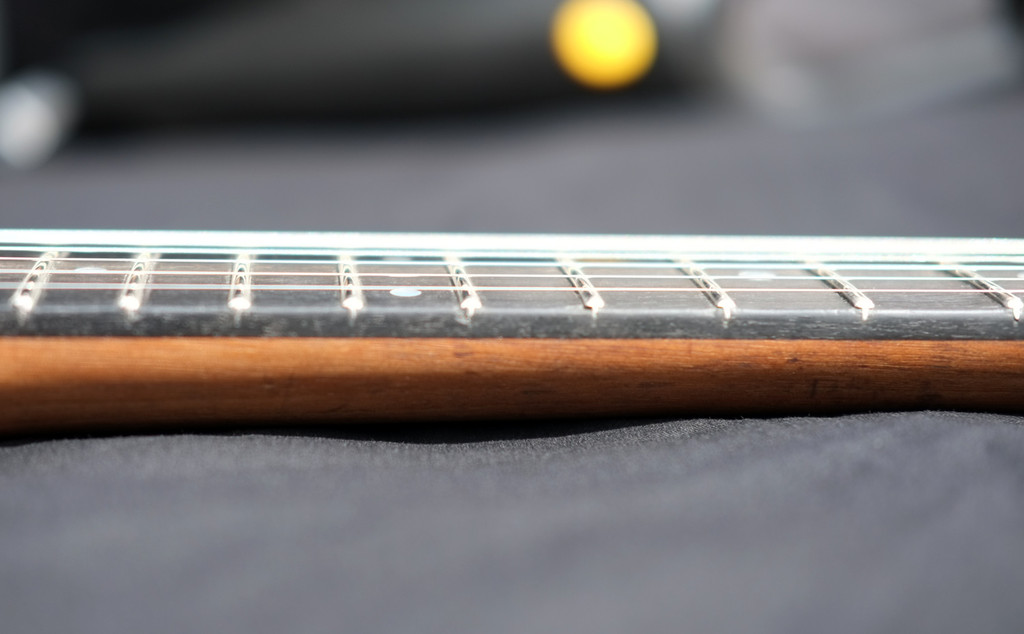
    The new frets were much wider and higher than the original Gibson frets, they were also stainless steel (something I didn’t find out about until later). But even so, there was still some light fret wear on the first few frets. The neck isn’t the normal thin SG, style. In fact, it’s pretty solid and chunky with substantial shoulders to it, making it more of a D than a C profile. No detuning by shaking the neck around on this guitar.

    The headstock is the very-wide, almost spade-like, headstock of that era. At 91.7mm across the tips. My 1998 Les Paul JP model has the narrowest tip-width of my Gibsons at 76.5mm, which is just narrower than the 77mm of my 1965 Country Western. My 2018 Les Paul Goldtop's headstock is somewhere in the middle at 81.3mm (which I presume went wider because of the need for more space when they started fitting robot tuners).

    So overall the '79 SG's headstock is around 15.2mm wider than the ‘50s/’60s headstocks. Presumably Gibson went the bigger headstock route because Fender did.

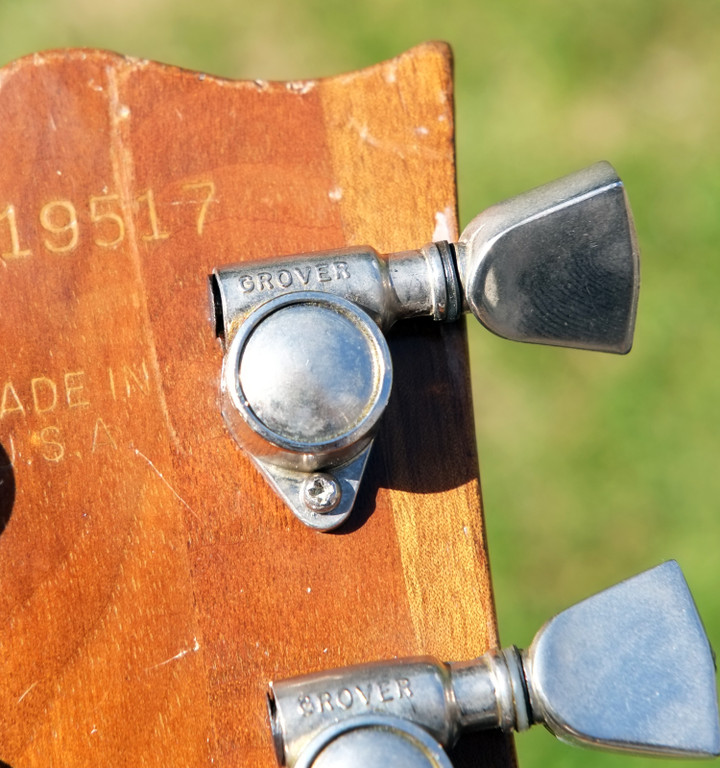
    The original Grover "milk bottle" tuners, so-called because of their shape where they narrow towards the button:


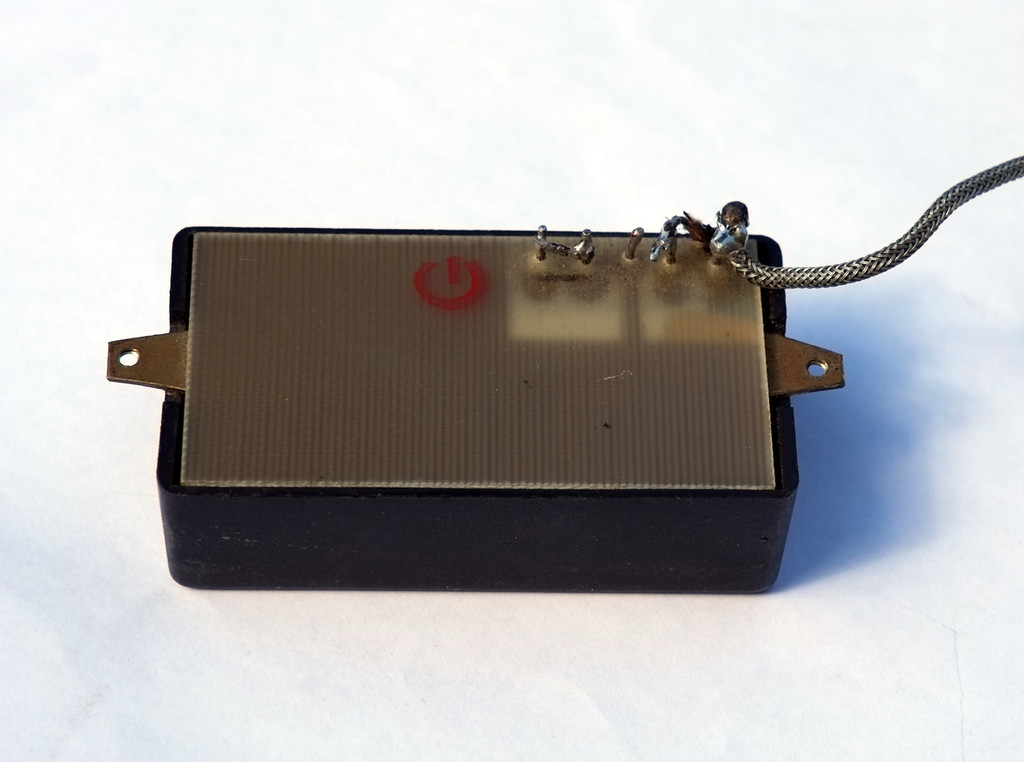
    Sometime in the mid/late ‘80s, Steve fitted a Jaydee ‘Hooligan’ pickup in the bridge position (as he too thought the bridge pickup was weak sounding). His band’s bass player worked at Jaydee, so got him the pickup. You may have guessed from the name that this is a high output pickup. I measured the pickup DCR at 24k, but I have no idea of the wire gauge used. The pickup has a black plastic cover and a PCB style base:


    There were some marks on the body where there was a Roland GK2 MIDI pickup installed, including a couple of screw holes near the bridge.

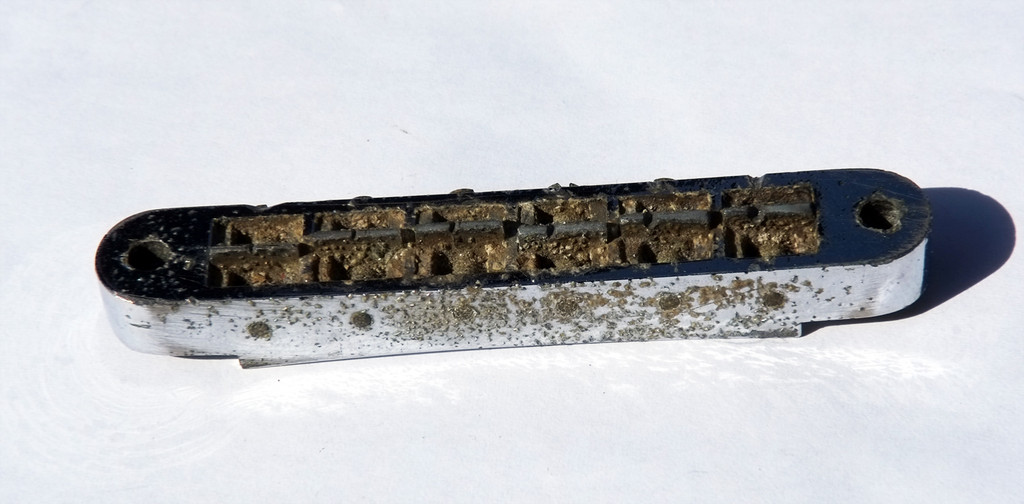
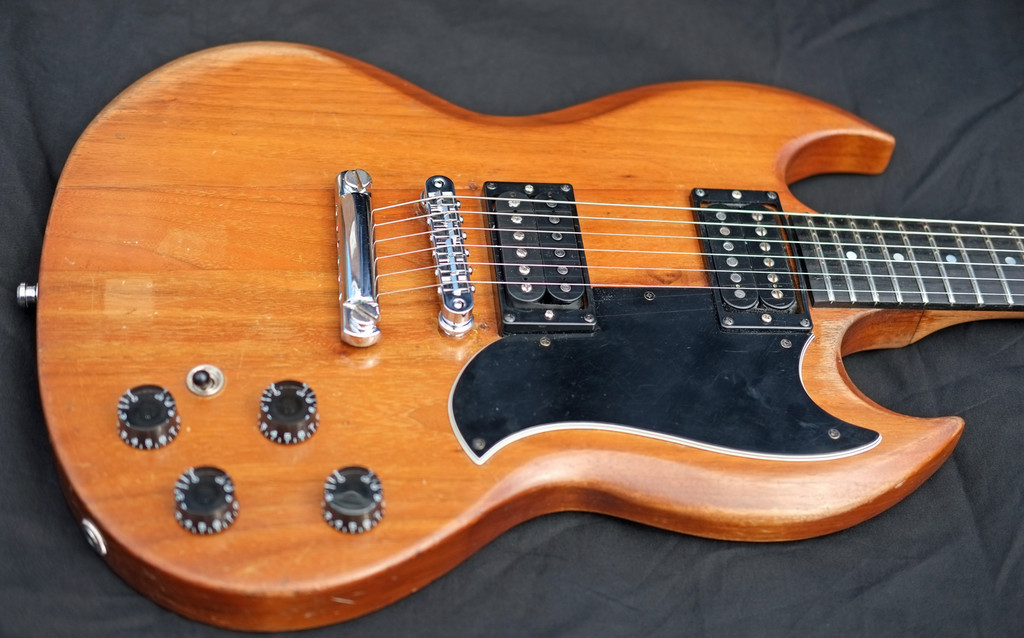
    Otherwise, apart from Schaller straplocks, the guitar was stock, if rather worn. There was a year when Steve was playing three gigs a week with it. And Steve is one of those players who sweats a lot, plus his sweat is pretty corrosive. There weren’t many areas that his sweat hadn’t reached, so there were corroded screws, corroded pots, and probably most impressive, a very corroded bridge! There's relic level and then there's this. Several previously unknown lifeforms were discovered living in the grunge:


    You can also see on the last picture how the strings have eaten away into the metal at the back of the bridge as a result of having the tailpiece set too low. This is not a good thing and the strings should never be allowed to touch the rear of this type of bridge.

    One of the pickup rings was missing a corner, the other had a fixing screw missing that had rusted through and broken off at body level.

    So there was a fair amount to repair. The plan was to replace all the pickup rings, the pots, the selector switch and the (barrel type) output jack and make a new harness. The Jaydee bridge pickup was a bit too much of a battering ram for Matthew’s purposes, so after some discussion. Steve settled on an Iron Gear Dirty Torque (a SD JB style pickup).

    We did talk about maybe fitting some extra switching options, but we didn’t want to drill extra holes in the guitar and the shallow body of the SG precluded fitting switching pots. The control cavity is only 24mm deep, and unfortunately the shallowest switching pot out there is just over 25mm.

    Steve ordered up all the new bits and then delivered the guitar to me along with the parts.

    The first step was to strip all the parts off the guitar. I started with the tuners and found the anti-rotation screws were all loose in their holes, so they got filled with cocktail sticks for later re-drilling.

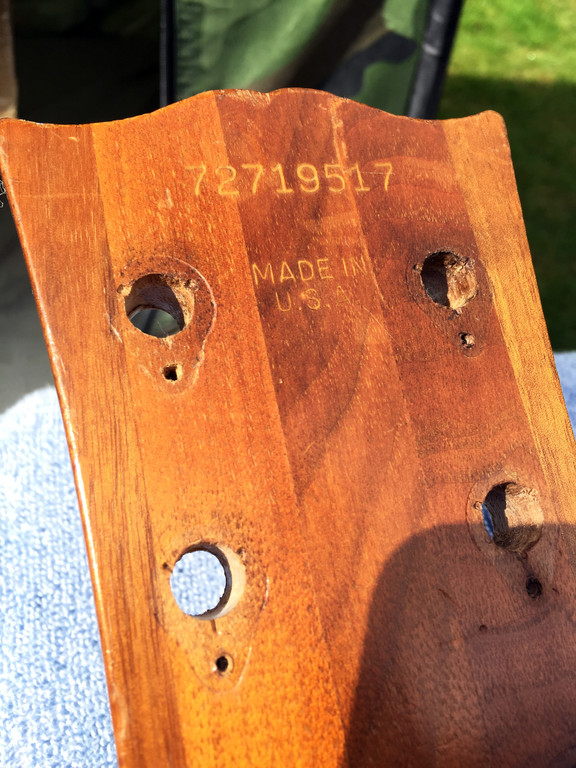
    Here you can see the headstock is clearly made up from the three pieces of neck walnut, plus two more for the wings. And you can see the widened screw holes, presumably from the tuners being knocked about a fair bit:


    Then off with the bridge and tailpiece. The original bridge, a Nashville type, was being replaced with a locking TonePros unit. The existing tailpiece was being reused after a good clean and polish.

    The tailpiece bushes remained in place, but one of the bridge body bushings simply came out when I pulled on the height adjustment post, so I decided to use the new bushings that came with the TonePros bridge and so pulled the other existing bushing out as well.

    Then out came the electric bits. The barrel jack was quite hard to remove as the locking nut had rusted up, and was also pulled into the body, so there was very little of the nut available to get a spanner on. WD40 to the rescue!

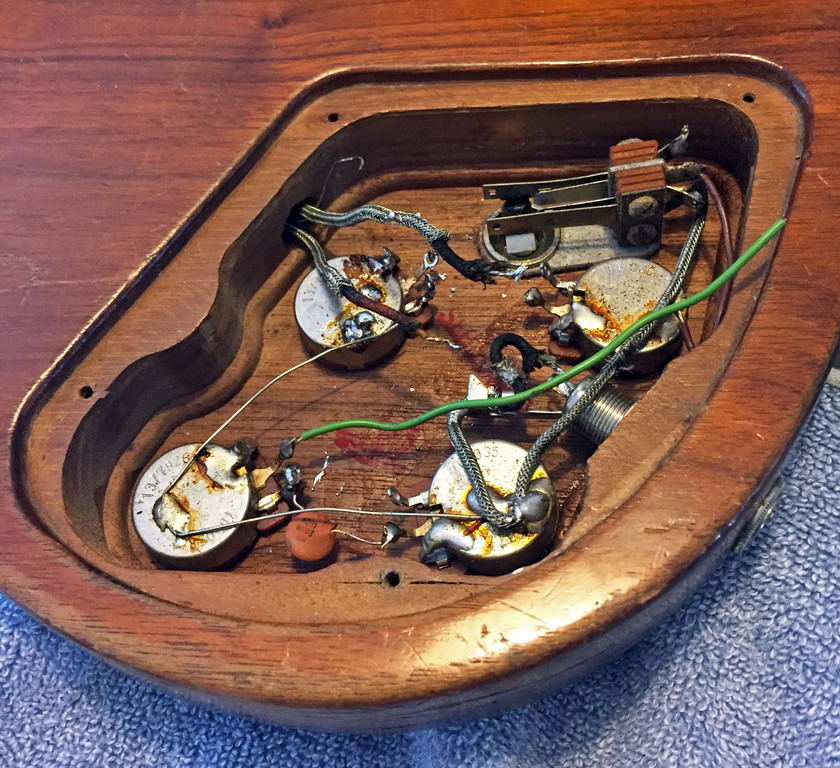
    The original control cavity wiring:


    I hit a snag when it came to the scratchplate, as two of the screws were so sweat corroded and rusty that a screwdriver couldn't get a grip to turn them at all. So, it was 'drill the heads off' time. This got the scratchplate off but left two screw studs protruding. One came out when turned with pliers, but the other was so rusty that it broke off at body level when I set the pliers on it. That left a total of two screw holes with broken studs left in them to deal with.

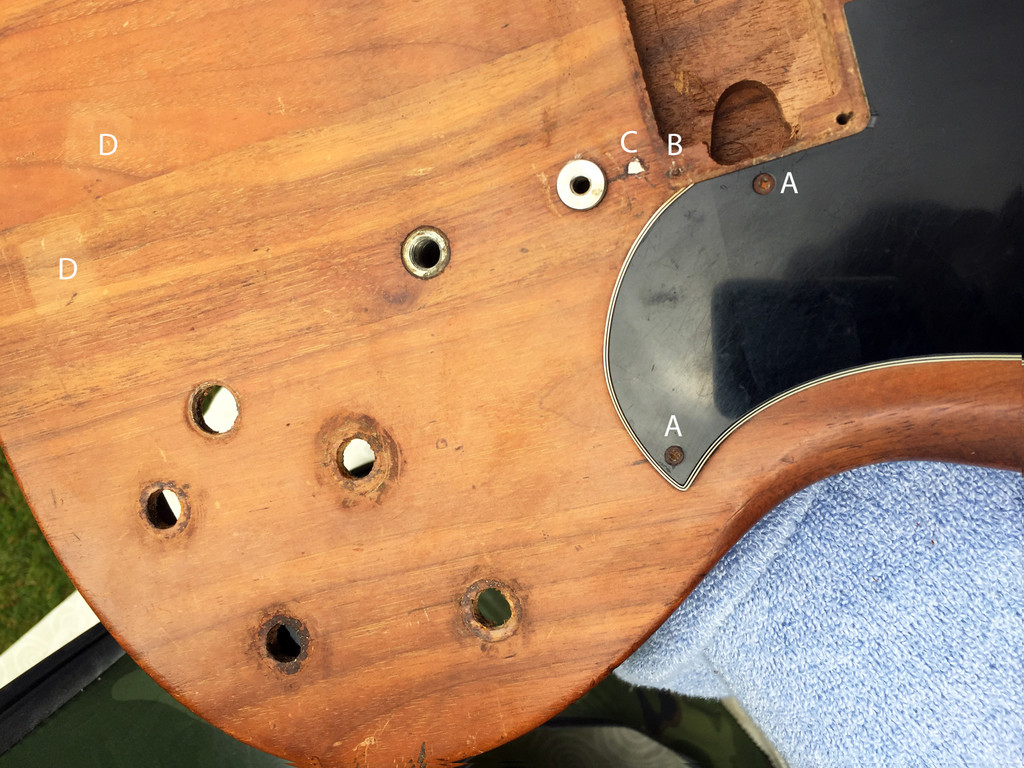
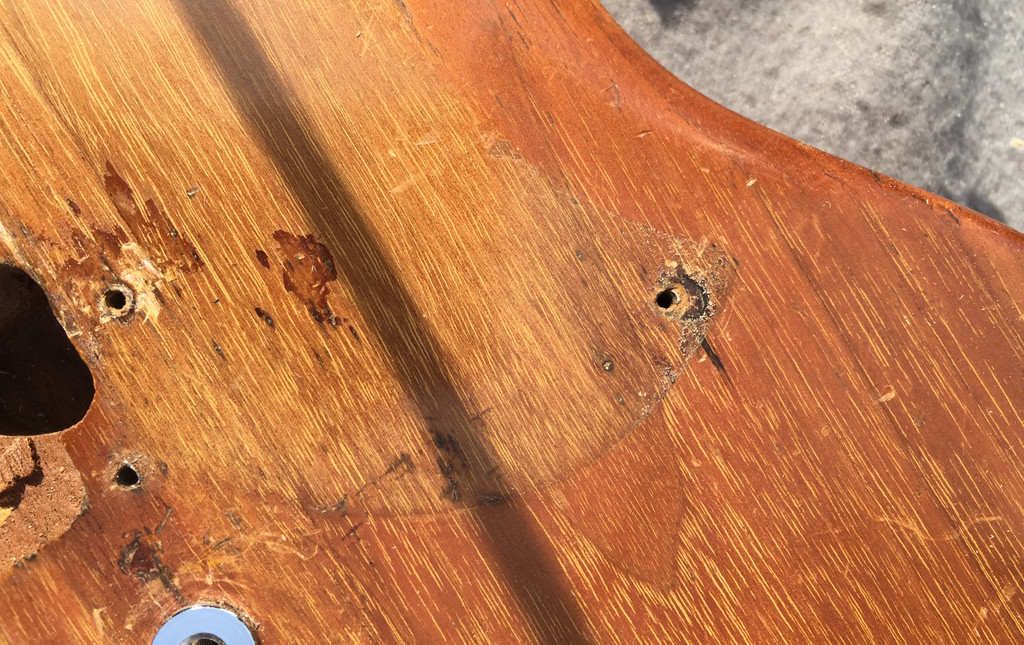
    This picture shows (A) the rusted pickguard screws before removal, (B) the broken off pickup-ring screw, (C) a GK2 pickup screw hole after filling but before colouring and (D), lighter areas where the GK2 controller used to sit. You can also see areas around the pot shaft holes where the rusty washers left marks on the lacquer:


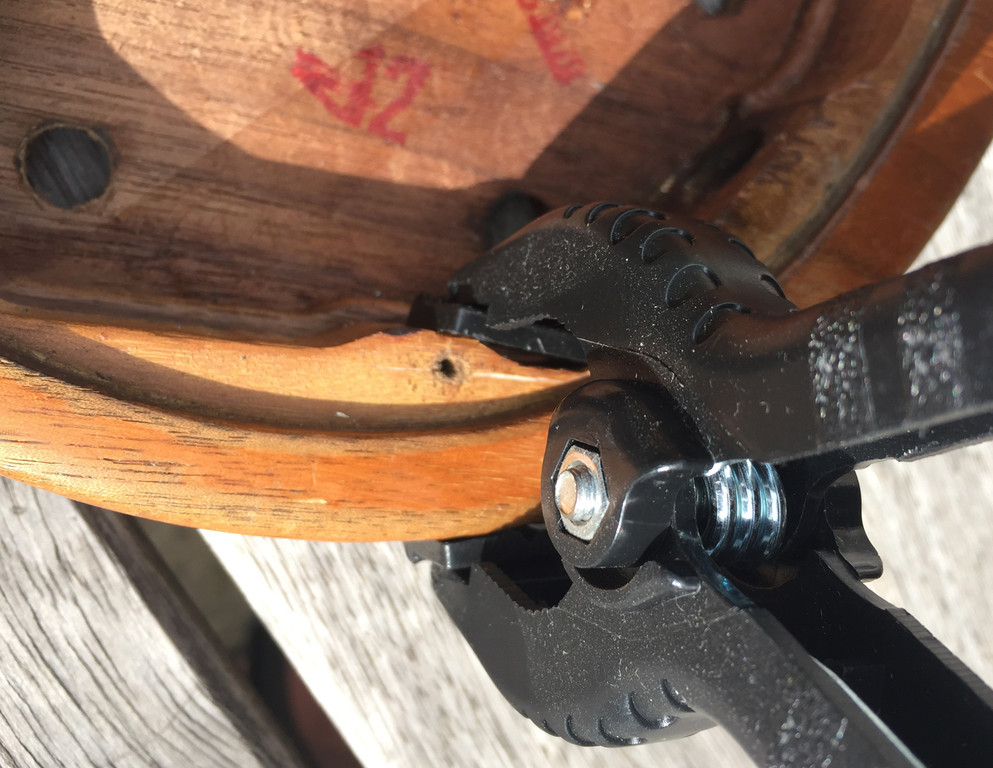
    There was a spilt in the wood around a control cavity cover plate screw hole, so I glued that back together:


    With all the old parts off the body, it was time to give it a clean and an initial polish. The back of the neck was very rough, partly through ridges where the three pieces of neck were glued together, and partly through accumulated dirt and old skin stuck to it. So, the neck was sanded until the dirt and ridges were off, but there was still finish on the neck, and then polished up with increasingly fine grades of Micromesh until it was smooth feeling. The back of the neck still has a couple of slight dents in it, but you can’t fell them when playing.

    Cont....

  2. #2
    GAStronomist Simon Barden's Avatar
    Join Date
    Oct 2016
    Location
    Reading, UK
    Posts
    10,547
    ...Cont.

    The body then got a clean with soapy water followed by a rub over with some T-Cut to restore some shine to the finish. It’s a 40-year old guitar that had been heavily used, so has a fair amount of wear and tear on the finish. It was never going to come up like a brand-new shiny guitar, but it took the dull edge off it and added a semi-gloss look to it.

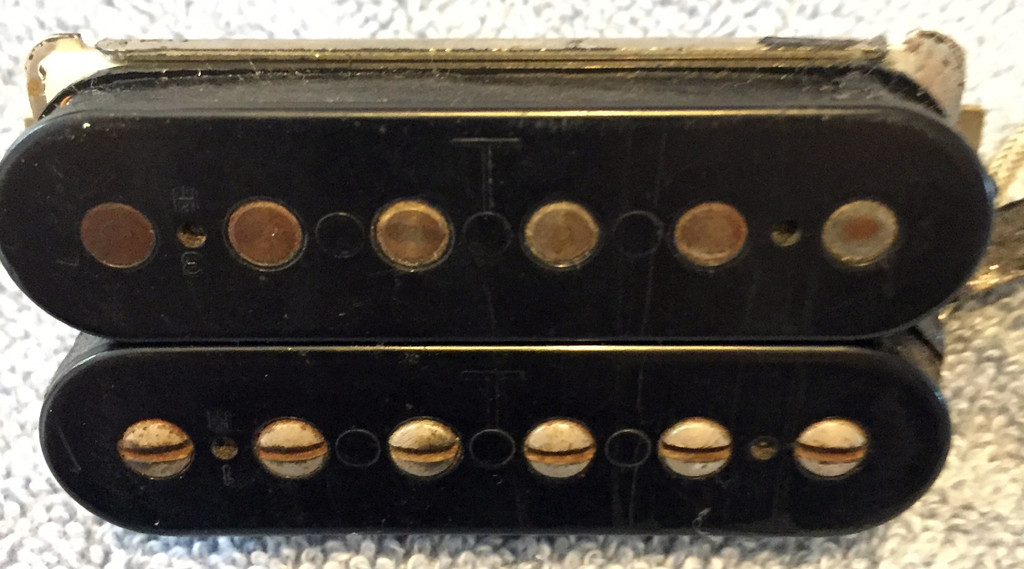
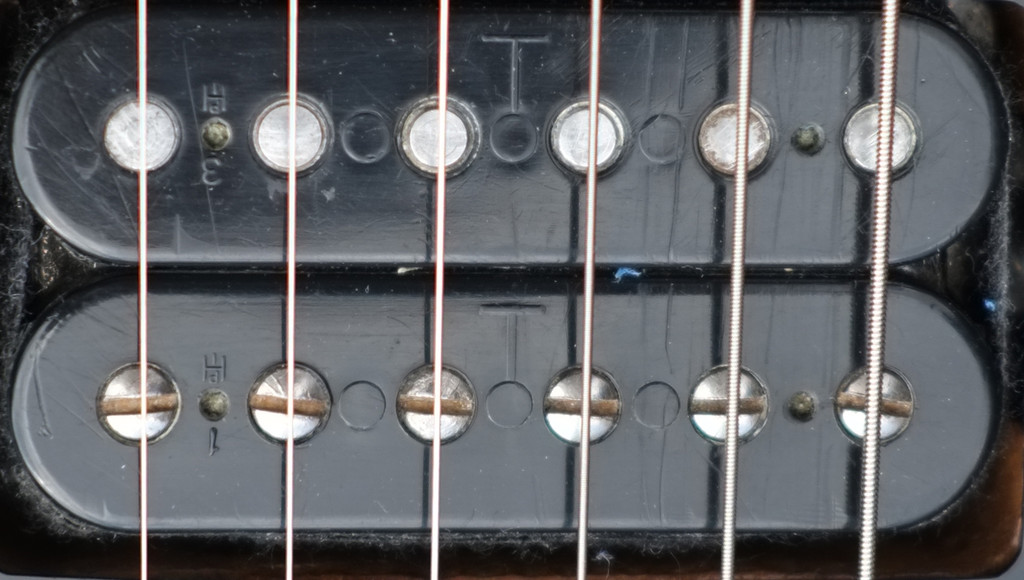
    The hardware also got a good clean and polish to get the worst of the tarnish off it. Here are before and after pictures of the T-top pickup after a good clean. You can clearly see the 'T' embossed into the top of each coil, designed to help the less-skilled workers Gibson now employed to orientate the two coils in the correct direction:


    I filled the two old GK2 screw holes with filler, coloured it with my secret colouring technique, then put a couple of coats of clear over the top of those areas for protection.

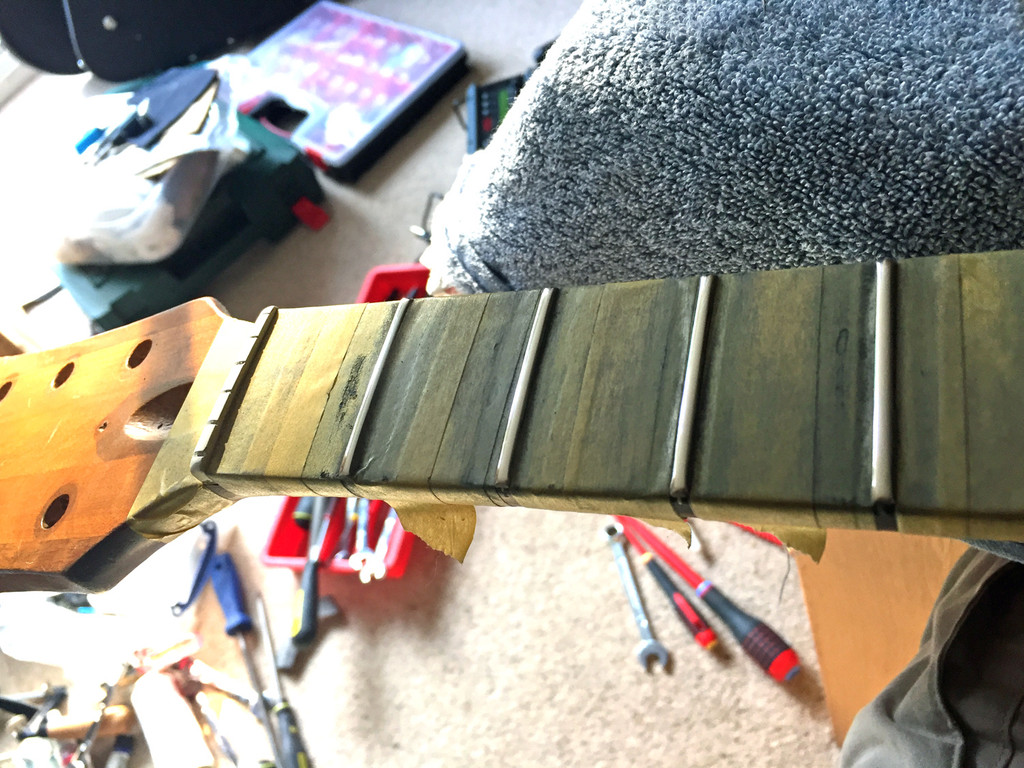
    My next step was to work on the frets. There were those wear marks and investigation had showed that there were a few slightly high frets that prevented setting a decent action. The neck was first straightened using the truss rod and a notched straight edge. It wasn’t the flattest fingerboard that I’d ever seen, and I couldn't get rid of all the small gaps under the notched edge, so I just got it as flat as I could.

    The tops of the frets were then marked with a black Sharpie and the fret file run along the frets until the black marks had all gone from the very top of the frets, plus until all the dents on the lower frets were gone.


    The frets were then re-profiled and polished. Re-profiling and polishing took a very long time, and it was only then that I suspected that the frets were stainless steel and not standard ones. The fact that the frets were pretty shiny when the rest of the guitar was so dull should have alerted me. I really hate working on stainless steel frets because they take so long to do!

    The ebony board was then cleaned and lemon oiled. Non-figured ebony is so dark that it doesn’t look dry, but the board soaked up three generous applications of oil. The board had been chipped in a few places when the replacement frets were installed, but all the chips were right near the fret slots, so you couldn't feel the indents, and so not worth trying to fill with black superglue.

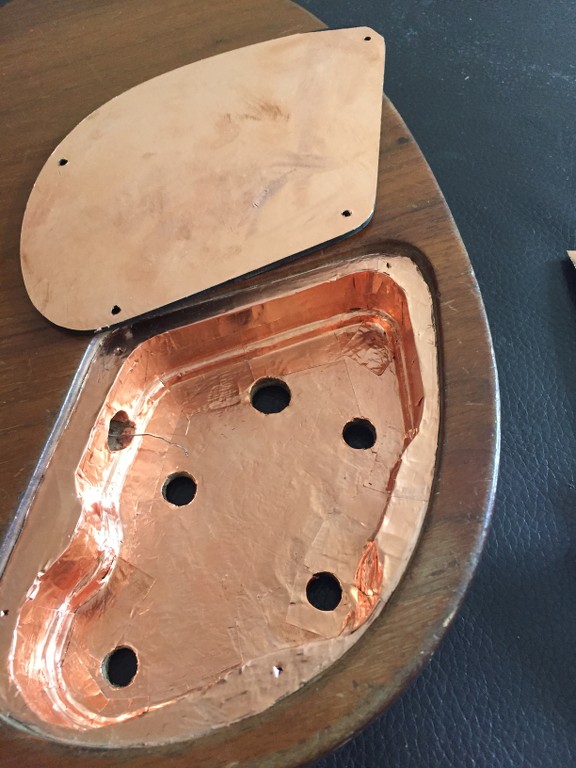
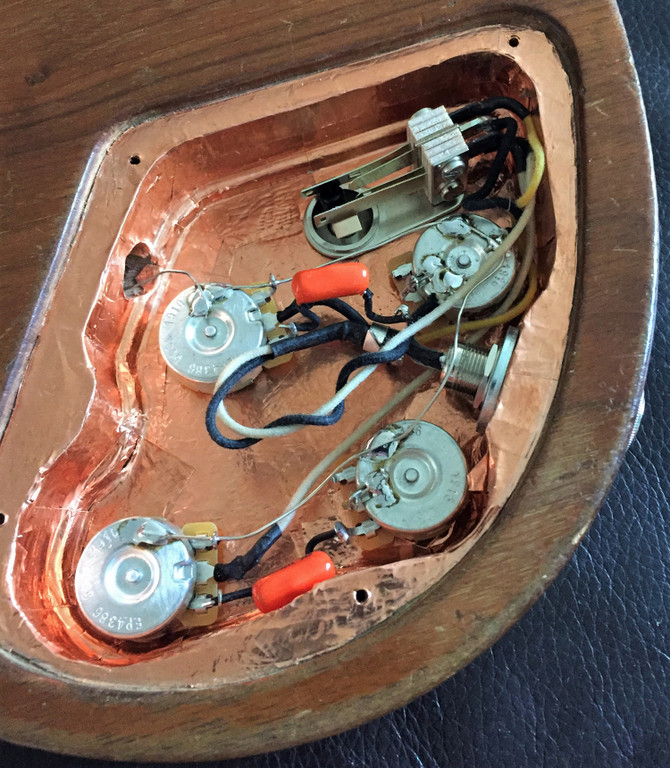
    The control cavity and underside of the control cover were then copper foil screened:


    I now had to deal with those two broken screws – something new for me. I had a look around on Amazon for something that could help me to drill them out and came across drill bits for drilling cabinet hinge screw holes, with a retractable outer metal sheath that held the drill central in the hinge holes. This endures that the pilot holes are all properly centred, and you don’t get Wonky® hinges.

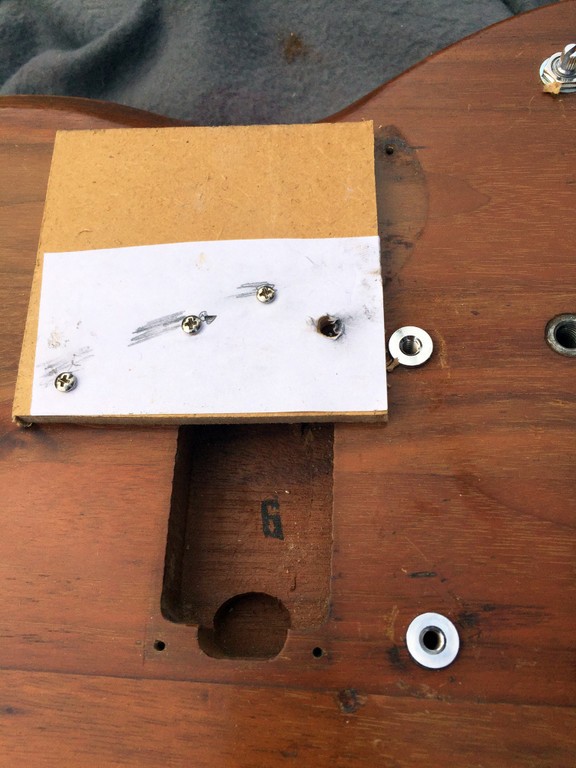
    So, I made a two quick MDF templates up, marking on the position of the screw holes near to the errant screw stubs plus the stub position on paper, then sticking that on the MDF:


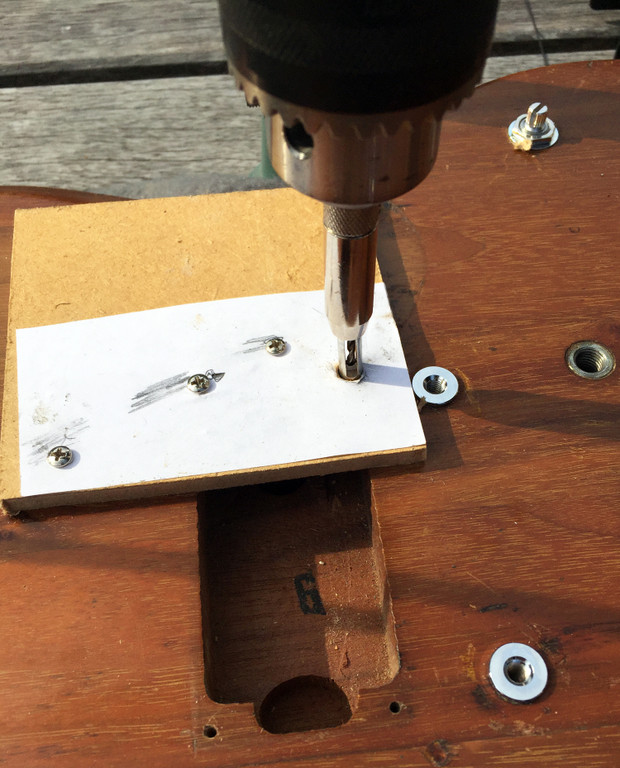
    I then drilled holes for locating screws and a larger hole that the centralising drill bit would fit into snugly, and screwed the template on and using a drill stand to keep things as vertical as possible, drilled out the two stubs:


    I amazed myself as it worked almost perfectly, with just the merest sliver of old screw remaining that I prized out with a scalpel blade in each case. You can just see the screw slivers in this picture:


    The holes were then plugged ready for re-drilling. All the pickup ring mounting holes were on the wide side and the mounting screws not grabbing tightly, so they all got plugged as well.

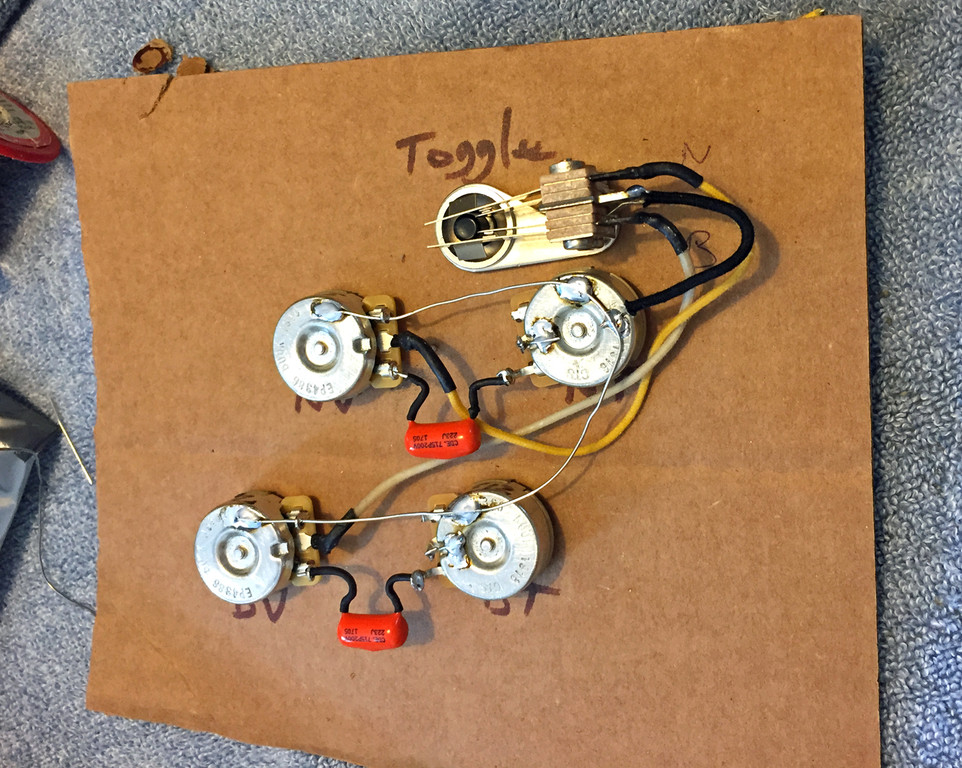
    Then it was time to do the wiring. A cardboard template was first made up with holes for the pots and selector switch on, in order to wire the basic components together outside the body.


    I pre-wired the barrel jack and to make it easier to fix back in the body, I fitted a large washer over the barrel that I had filed most of one edge off, as the jack was located very close to the bottom of the control cavity (when looking down from the rear) and a full sized-washer wouldn’t fit. This stopped the locking nut from pulling itself into the wood when tightened. The wiring harness then went in.


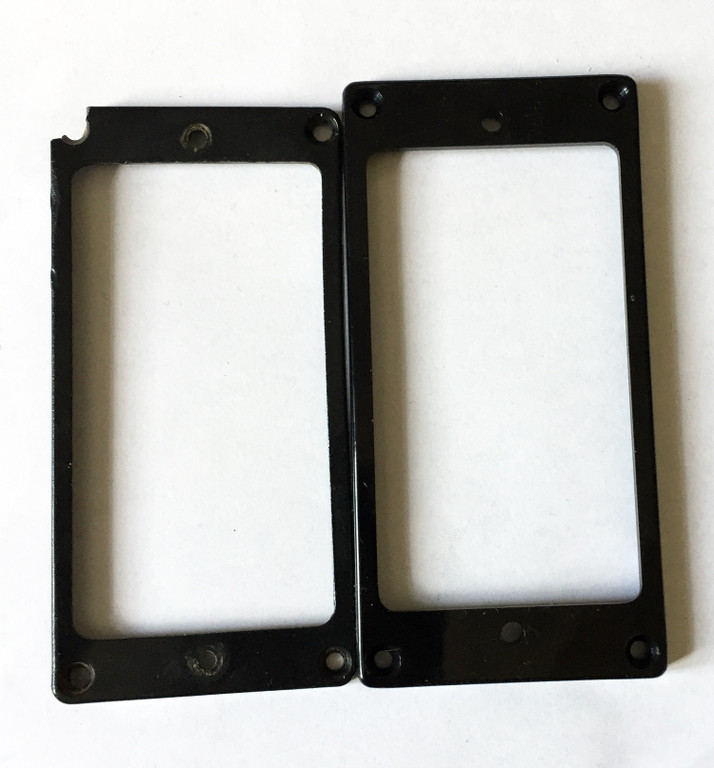
    It was then time to fit the pickups, so I first went to fit the mounting rings and discovered that the pickup rings supplied were longer than the originals (92mm vs 89mm). As the pickguard abutted the rings, it wasn’t just a case of drilling new mounting holes, it was a case of finding some original sized pickup rings otherwise the pickups themselves would be offset from centre.

    And this was where I found that most replacement pickup rings sold are 92mm and not 89mm. Of course, Gibson do sell pickup rings, but a web search didn’t show up any angled, black, flat-bottomed pickup ring sets. I found a neck one, but not a suitable matching higher bridge one. So, it was back to a detailed search of parts supplier sites. Northwest Guitars had both 89mm and 92mm rings available, so I ordered a set of the 89mm ones. Except that when they came, they were 92mm ones in 89mm labelled bags. It took over a week to sort out that their supplier had changed things without telling them, so they no longer supply 89mm rings.

    Original 89mm ring vs new 92mm ring:


    So, I eventually tracked some down at Allparts, and they arrived and luckily turned out to be a perfect match. So, they were fitted, then the pickups (original T-top neck, Iron Gear Dirty Torque bridge) got fitted and wired. The tuners got re-fitted and the anti-rotation screws hole re-drilled. It was useful to find out that the tuners also had three protruding ridges on the underside that also acted as anti-rotation devices, so it was easy to put them back on in exactly the same position as they came off.

    The strings got put on and I began to set up the guitar. I struggled here, and although I could get a playable action, it wasn’t a great action, with the bottom E being the string that buzzed the most if I tried to lower it. It was better than when it came, especially as I’d lowered the nut slots which were quite high. But it was not a lot better.

    And I’d also discovered that the Iron Gear pickup was reverse phase to the Gibson pickup, so the mid-position was out-of-phase. A nice sound to be told, but not as useable as the normal combination, so I had to swap the ground and signal wires on the Iron Gear. (I also found this situation when I installed one Iron Gear P90 in a guitar with an old SD P90 in, so maybe that’s the case for all their pickups). Luckily the Dirty Torque has 4-conductor wiring (unlike the T-top), so it was an easy job to swap the wires around.

    The Dirty Torque had a very new and shiny look to it, so I toned that down to be more like the T-top by rubbing the bobbin top and screws with 6000 grit Micromesh, just to take the edge off the shine.

    As I have a 12” radius block, I decided to have another go on the frets using that. So, I stuck some P240 grit wet and dry paper to it. Then I pulled it off and stuck the paper to it the right way up this time (d’oh!). Black marker on the fret tops, a quick scrape, and it was immediately obvious that the frets hadn’t been properly radiused to match the board when originally fitted as I was taking a lot off the edges and nothing in the middle. After about an hour (stainless steel frets, grrr!), I had them the proper radius and definitely all relatively level. It really does help when setting up for a low action that the fret radius matches the bridge saddle radius, especially when you have non-height adjustable saddles as on a tune-o-matic bridge (both ABR and Nashville versions).

    Now it was time to re-profile the frets again. I have diamond profiling fret files but even these took ages to get the right profile on each fret. (I probably need to get some replacements). It didn’t help that the fret edges had so much off that the edges were almost rectangular and took a lot of filing to get them rounded, with no black marker showing along the top of each one.

    In desperation, after doing just 12 frets in a day, I bought a cheap £7 (made from) stainless steel fret profiling file from Amazon. It worked remarkably well. The results were a little bit rough, but I had the diamond files to smooth things off. Then another polishing session followed, after which I was ready to try again with a set-up. A half-turn clockwise on the truss rod from the flat neck position (my go-to initial setting which normally works well) and I was ready to string up again.

    Cont...

  3. #3
    GAStronomist Simon Barden's Avatar
    Join Date
    Oct 2016
    Location
    Reading, UK
    Posts
    10,547
    ...Cont.

    The strings went on, the bridge height came down and – perfect! Low, choke-free action:


    A bit more polishing of the body and it was finished:


    The neck pickup has a nice well-defined sound to it. The Dirty Torque is a bit too mid-rich and powerful for my tastes, but it suits Matthew's. He definitely wanted something with more poke and less treble than his Firebird pickups. But if he tires of it, a new pickup is only a soldering iron away. Both Steve and Matthew loved the transformation and see it as almost a different guitar.

  4. Liked by: Danny B, JimC, matthew

  5. #4
    Member
    Join Date
    Oct 2018
    Location
    Canberra, ACT
    Posts
    249
    Great job and a good read.

    Sent from my LG-H930 using Tapatalk

  6. #5
    Member
    Join Date
    Oct 2019
    Location
    Cairns, Qld
    Posts
    13
    Really nice job.

    I like that you aged the bridge pickup to match the neck. Did you also find an old pickguard screw to replace the broken one, or are they all new (slightly hard to tell)?

  7. #6
    Overlord of Music Sonic Mountain's Avatar
    Join Date
    Jul 2017
    Location
    Toowoomba, Qld.
    Posts
    3,261
    Nice work Simon and great write up. It's lots of fun getting to play around with vintage stuff.
    Build 1 - Shoegazer MK1 JMA-1
    Build 2 - The Relliecaster TL-1
    Build 3 - The Black Cherry SG AG-1
    Build 4 - The Sonicaster TL-1ish
    Build 5 - The Steampunker Bass YB-4
    Build 6 - The Howling Gowing ST-1

    "What I lack in talent I make up for with enthusiasm"

  8. #7
    GAStronomist Simon Barden's Avatar
    Join Date
    Oct 2016
    Location
    Reading, UK
    Posts
    10,547
    I used one new pickguard screw, but the existing ones were all a bit rusty so I went over them all with a black Sharpie to give them a more unified look.

  9. Liked by: matthew

  10. #8
    GAStronomist Simon Barden's Avatar
    Join Date
    Oct 2016
    Location
    Reading, UK
    Posts
    10,547
    Quote Originally Posted by Sonic Mountain View Post
    Nice work Simon and great write up. It's lots of fun getting to play around with vintage stuff.
    Indeed. I've currently got a 1973 Gibson Les Paul Signature (the wonky 335-style one) from the same chap that needs a new selector switch and a fret dress. Looks are love/hate but it plays well and it sound nice.

  11. #9
    Overlord of Music McCreed's Avatar
    Join Date
    Oct 2018
    Location
    AUS
    Posts
    3,552
    Great post Simon!
    Nice work too.
    Making the world a better place; one guitar at a time...

  12. #10
    Overlord of Music Dedman's Avatar
    Join Date
    Mar 2016
    Location
    The "Fabulous" Gold Coast
    Posts
    3,566
    lovely work Simon
    Build 19 PSH-1 Kustom
    Build 18 HB-4S Kustom
    Build 17 WL-1 Kustom
    Build 16 TL-1TB Kustom
    Build 15 PBG-2-
    Build 14 FTD-1
    Build 13 RD-1 Kustom
    Build 12 DM-1S
    Build 11 MKA-2 -
    Build 10 Basic strat
    Build 9 JM Kustom
    Build 8 FV-1G
    Build 7 ES-2V
    Build 6- Community prototype
    Build 5 LP-1LQ
    Build 4 ES-5V
    Build 3 JR-1
    Build 2 GD-1
    Build 1 TLA-1

Page 1 of 7 1 2 3 ... LastLast

Posting Permissions

  • You may not post new threads
  • You may not post replies
  • You may not post attachments
  • You may not edit your posts
  •