Hello all,
I am building a mahogany explorer with my dad. This is our first proper woodworking project and is going to be my guitar as my dad has a Les Paul. hopefully it turns out well. So thanks for all the support we might get from you.


Hello all,
I am building a mahogany explorer with my dad. This is our first proper woodworking project and is going to be my guitar as my dad has a Les Paul. hopefully it turns out well. So thanks for all the support we might get from you.
Good luck,
Looking forward to following your build and seeing what you and your dad do with this build.

Good to have you on board - feel free to ask any questions - plenty of help here.
Current builds:
GPB-4B: https://www.buildyourownguitar.com.a...548#post184548

Thanks @FCD and @Brendan for the support and welcome. (I'm hobbydobby's old man).
For those interested, we've decided to get ourselves organised with Trello. Rather than a whiteboard or something in the garage, this enables us to link to the Pitbull guitar manual, finishing ideas, things to buy, and the build order. Check it out if interested: https://trello.com/b/KYWmxLHH/explore-it-yourself
Day 1
The package arrived. We checked the contents. Boy made a list of everything and we ticked it off. Everything arrived thanks Adam and co. exactly as promised.
Day 2
One of the major preparation steps was organise the garage! Great excuse. Son and I really motivated to clear the bench and organise the tools.
All ready...
Day 3
Decided on some Entwistle pickups. So we ordered those.
We've done a full dry fit here.
Everything looking very good.
The black hardware chosen by Boy will be rather attractive along with the ebony fretboard.
Found the same thing as a few other forum users/builders: when the neck is placed ideally (for string length), there is not quite enough room for the pickup ring.
As you can see here, with the neck held in place, the ring is aligned in one direction ok, but if I pushed it over the pickup cavity it would bump into the neck.
It's out by a few mm. If we went ring-less, it would be ok, but thinking about either extending the cavity towards bridge, or filing the fretboard back a few mm.
A Further Note on Scale Length
Having watched the very helpful primer video by the Pitbull guys on scale length and compensation, I wanted to know what the precise lengths of the strings should be based on this 'compensation' principle. I did a little more research and found a compensation calculator on a website here: https://www.liutaiomottola.com/formu...mpensation.htm
Based on a scientific paper on the subject, the programmer of the calculator on the website uses formulae to output an offset from the nominal/theoretical length.
For example, on our particular kit neck - measuring from nut to middle of 12 fret = 312.25mm
So the nominal length from 12th to bridge would be 312.25mm as well. With an overall nominal scale length of 624.5mm
Inputting this value into the calculator, the formula takes into consideration some other variables such as the action height, string type (eg electric, steel core) etc and gives an output per string. This output is the extra length you add to the nominal length, to achieve a length which compensates for pitch sharpening. So, based on a scale length of the output for each string was as follows:
String | Pitch | Offset + Nominal length = Total Compensated length
1 | E | 1.32mm + 312.25 = 313.57
2 | B | 2.47mm + 312.25 = 314.72
3 | G | 4.58mm + 312.25 = 316.83
4 | D | 3.67mm + 312.25 = 315.92
5 | A | 4.58mm + 312.25 = 316.83
6 | E | 7.5mm + 312.25 = 319.75
With the neck fit as far into the pocket as it will go, (held with clamp), when i measured these out on the guitar, I found the bridge in a perfect position. The saddles within the bridge have a range of about 8mm they can move, and with that flexibility, we'll be able to hit all the ideal, compensated target lengths as above!
So a) thanks to Adam and co for building such a precise and refined kit. and b) it means we can glue that neck in the 'default' place (as far in as possible against the end of the pickup cavity) and know we're going to be able to set the intonation of the strings ideally.
After sweating a little over the whole scale length business, I'm now feeling a lot more confident that we'll end up with an accurate instrument, and super impressed at the precision of these kits to be honest.
Frets
The other awesome thing is: after straightening the neck, we checked the fret levels and they appear to need almost no work at this stage. (We'll slightly adjust a couple). So again - hats off to Adam as design/organiser and the guys in the factory.
Neck Straightness
Stringing up the low and high Es, and checking the line all the way down to the saddle - the neck appears to be as straight as necessary and needs no adjustment.
Filing fretboard
With the issue above, we had to make a call on either going ringless, or filing a little of the fretboard to accomodate the rings. Boy decided he preferred the 'ringed look', so we filed a few mil off the fretboard! Yikes! I'll post pics tomorrow to show the outcome.
Last edited by Maverick_aus; 14-07-2019 at 07:47 AM.
Builds:
Under way - EXM-1
Plus I'm wondering about a few things, and could do with the collective wisdom-trust's opinion, if you have time?:
Question
Boy is keen on this finish here:
https://www.rig-talk.com/forum/viewtopic.php?t=173147
The builder kindly informed me the colouring is based on a blend of Old Master's stain. But importing this stain is costly. I wonder could anyone recommend a Dingotone which could achieve a similar colour for mahogany?
Builds:
Under way - EXM-1
Nullarbor ochre is the only real brown Dingotone - and that's not a reddish brown - maybe try a Feast Watson Jarrah or Mahogany stain? Just need to be careful with the Feast Watson stuff - smell is pretty toxic and it eats gloves (i.e., goes straight through nitrile gloves). If you're working with the boy - make sure its well ventilated. Not sure what alternatives exist at the moment.
Current builds:
GPB-4B: https://www.buildyourownguitar.com.a...548#post184548

I had to do a similar operation with both my EXA-1 and ESR-1.Originally Posted by Maverick_aus

I opted to put a saw cut down the end of the neck heel, then use files and sanding blocks to tidy up. Generally less stressful, as if you arent confident in the saw cut, you can mount it in a mitre bloc to insure you get it square and perpendicular to the tenon.
I hope yours didnt cause too many conniptions!
FrankenLab
Hand crafting guitars, because Death Rays are expensive.

Welcome Hobbydobby & Mav.
Current:
GTH-1
Completed:
AST-1FB
First Act ME276 (resurrected curb-side find)
ES-5V
Scratchie lapsteel
Custom ST-1 12 String
JBA-4
TL-1TB
Scratch Lapsteel
Meinl DIY Cajon
Cigar Box lap steel
Wishing:
Baritone
Open D/Standard Double 6 twin neck
@Brendan - thanks for the responses. I'll have a look at that Feast Watson stain.
@Frankenwashie - thanks. Interesting. Good to hear others took a similar approach. No - not too stressful, but both of us were nervous. I'm not 100% sure with the outcome yet, but it's in the ballpark. (more to come soon).
@Fretworn - thanks! Nice to be welcomed to the community
Pickups
In choosing pickups I wanted to try something a little different (and interested to see how a lower-cost pickup compares), rather than the same old standards. After discussing back and forth a few times with Simon from Entwistle, we tried to come up something based on my pickups of reference - Seymour Duncan JB & Jazz. I ended up with the Dark Star (ceramic) (bridge) and HV58+ (neck). They've arrived and look good. Some good attention to detail with tinning of the cable ends. It will be interesting to see how they sound.
Room For Pickup Ring Issue
So on to the issue we found. Recap - whilst the neck as cut fits beautifully for the right length, there's not quite enough room for the pickup ring. (Making room results in the bridge being too far away).
We marked off where to file to. After filing for a little while, Hobbydobby came up with the idea of using our very coarse grit paper instead. This worked rather well. We paused to check and voila! just the distance we needed.
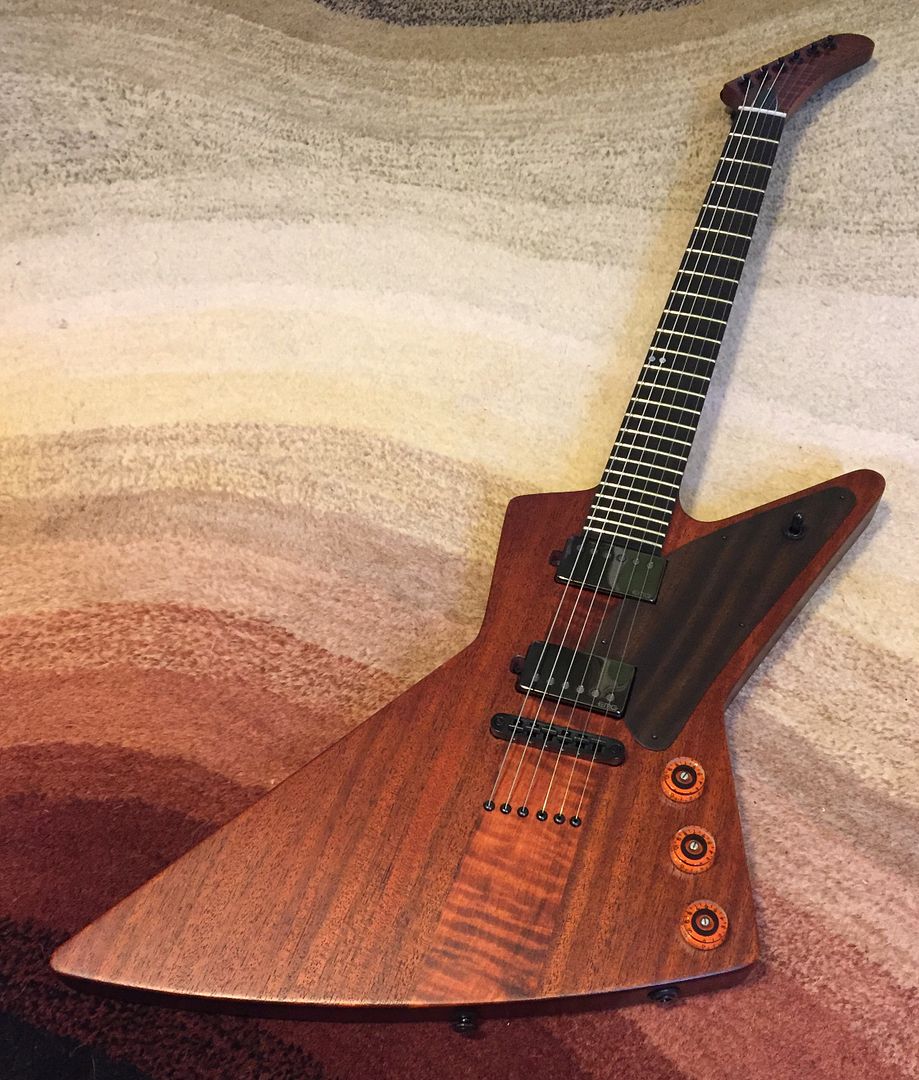
We test-fitted with the pickups in the rings and it's close but fits.
Our sanding/filing job was not perfect as you can see, but will be mostly covered by the ring.
How Should We Handle This?
Onto the next thing to solve:
The neck pocket 'edge' arrived with these two minor imperfections. We're thinking about what to do if anything. Any advice would be most appreciated.
1. On this first one, you can see the wood had split off at the very edge on the corner

Based on feedback in the forums about not sanding or modifying the inside of the pocket, I'm not sure about how to level this corner out.
2a. You can see the thin end of the two sides of the pocket walls come to an end at different points. One is thicker and ends with a right angle to the floor of the pocket. The other (closer to the 'lower point' of the explorer shape) is a little thinner and ends a mil or two short.
With the neck in it really isn't noticeable, but I'd like to get it as perfect as possible and be interested in the what others would do.
2b. The other qn here, in the above photo is the you can see on the shorter one, the verticle line is not straight - it's a little jagged looking. Would you try and straighten it with sanding?
Whether and How to Smooth the Neck-Body connection
My son specifically said he doesn't like the big step from the neck up to the body, and he likes the smooth flowing look from neck to body you see on other guitars.. See below
Could something like this be achieved? Maybe not as scooped but just smoother.
Could we sand down that step to a point where it meets the neck? Or does it need to be thicker for strength?
Also the next spot down: ie the 'D' shaped part on the neck itself, could that be sanded down smooth too?
Last edited by Maverick_aus; 15-07-2019 at 07:36 AM.
Builds:
Under way - EXM-1
 Posting Permissions

 Reply With Quote