New reamer arrived and it did the job. So all ready to do the wiring harness and finish it all up tomorrow.


New reamer arrived and it did the job. So all ready to do the wiring harness and finish it all up tomorrow.
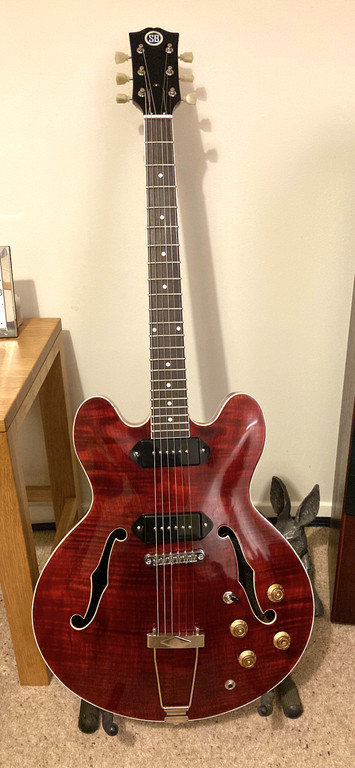
...Well the day after tomorrow. And it's not finished. Assembled, but not finished.
There's a short on the bridge pickup wiring so that's silent, probably a braided neck pickup wiring touching something. I just knew I should have put heat shrink on them just after I'd soldered it all up. And I've wired the selector switch back-to-front (I decided to rotate the switch 180° at the last minute before soldering and forgot to flip the contact connections). So that will come out tomorrow and be fixed.
The bridge pickup wire is also slightly too short to be run round the outside of the F-hole, So I'll probably lengthen that so it can (as well as cover it in heatshrink).
As I feared, the bridge is far too high at its lowest setting, so I'll be waiting for an ABR style one to arrive on probably Tuesday. The nut's a mile high as well at the moment but that's easy to take down once I've got the new, hopefully lower, bridge. At least the strings run nicely down the neck, even if the neck angle could have done with being a bit greater
I also totally forgot about the knobs, so I've just fitted some out of the knob box and will be getting either some slightly darker ones or possibly black. I have lots of both in my spares box, but in 18-spline versions, not the 24-spline I need.
Plus the nickel dog-ear covers should hopefully arrive on Tuesday and then they'll need to be sprayed black, so it's likely to be Thursday at the earliest before it's all finally re-assembled.
But at least I think it looks nice.
Last edited by Simon Barden; 19-10-2020 at 02:05 AM.

It looks gorgeous, but definitely needs different colour knobs
First (proper) build: http://www.buildyourownguitar.com.au...ead.php?t=8546
Second build: http://www.buildyourownguitar.com.au...ad.php?t=10229
Probably black with silver inserts like the SG Jr. Though a lot did have gold knobs - but not as light a gold as those currently fitted.
Looks great!!! Well done!!!
Would compliment the headstock logo.Originally Posted by Simon Barden

First (proper) build: http://www.buildyourownguitar.com.au...ead.php?t=8546
Second build: http://www.buildyourownguitar.com.au...ad.php?t=10229

Another excellent example. You are shelling them out like peas lately.
So would have allowed the bridge to sit within adjustment.
FWIW Every guitar I have required a small shim in the neck heel to bring the bridge up slightly.
Being a non-pick player allows me to place palm on the bridge without the adjustment screws digging in.
cheers, Mark.

Hi Simon
I have just found this build and have missed out on all the drams of the last couple of years. Maybe you would have scared me off.
I am currently working on an ES-1F and recently posted details of my problems which also resulted in a sand off. Had to sand off my cap because I slipped twice in two seconds with my craft knife while scrapping the last F-hole. I put two one inch scratches in the finish and couldn't repair the cap well enough so I had to take the finish off. I used a Bosch Ventaro,- saved a lot of elbow grease. I constantly had the numerous warnings from the forum about sanding through the cap in my ears I could not believe how hard the Tru-Oil was.
We have had similar issues but I had a lot of trouble with what looked like glue in the grain. I have had a close look at your ES photos and cannot see a similar issue. I posted a photo in my last report a couple of days ago. You may be interested. The link is below.
Good Luck
Greg
PS I forgot to mention how fantastic your ES looks
Last edited by GregLane; 19-10-2020 at 04:35 PM.
Guitars:
Build #4 - Scratch SG - Qld Mahogany - In Progress
PBG#3- - ES-1F - kit electronics (Dec 2020)- upgrade if I can do it justice
PBG#2- - STA-1 Ash w black upgrades GOTM June 2020
PBG#1- LP-1MQ http://www.buildyourownguitar.com.au...ead.php?t=6378
Acoustics -Washburn WD18SW
- Maton Australian EA80C
Electric - Magnum pseudo Stratocaster - upgraded with PitBull bits - 2020
Hi Greg. The only glue issue I had with mine was quite a visible line down the veneer join, which is why I went with a few coats of the Vintage Cherry lacquer, which hid it nicely. It obviously darkened the overall colour, but in a nice way, so I'm not displeased.
As you will have read, I too had to sand off the original Tru-Oil, after doing a sand-through. And yes, when it's fully hardened, it is very hard. I just wondered how I ever managed to sand-through in the first place!
Tinted lacquer seems to be a good remedy for mitigating glue spots that can't be removed, as it doesn't rely on being absorbed by the wood, it just sits on top. So I think if I did any more builds with veneer tops, I probably wouldn't stain, I'd just go with lacquer, though I might stain just to pop the grain and then do the main colour through lacquer.
I'm certainly not immune to slipping with tools on finishes (failing to mask off for protection is a recurring crime for me) and the binding has been painted twice. I'd much have preferred not to have done that, but that spirit-based stain forced me to.
Yes, I mixed colour tone black with the truoil which successfully covered the glue in the grain but of course it also covered the flame. I was in fact lucky I had to sand off as I have a much better finish with more flame showing.
I am still happy with TruOil but I have learnt not to use 1200 ( too many scratches), sharpie black covers glue, I now only use microfibre to flatten (no scratches).
Guitars:
Build #4 - Scratch SG - Qld Mahogany - In Progress
PBG#3- - ES-1F - kit electronics (Dec 2020)- upgrade if I can do it justice
PBG#2- - STA-1 Ash w black upgrades GOTM June 2020
PBG#1- LP-1MQ http://www.buildyourownguitar.com.au...ead.php?t=6378
Acoustics -Washburn WD18SW
- Maton Australian EA80C
Electric - Magnum pseudo Stratocaster - upgraded with PitBull bits - 2020
 Posting Permissions

 Reply With Quote