Results 1 to 4 of 4

Thread: Setup measurements and the TRAIN approach

  1. #1
    Overlord of Music fender3x's Avatar
    Join Date
    Jan 2016
    Location
    Miami, FL, USA
    Posts
    2,199

    Setup measurements and the TRAIN approach

    I thought it might be useful to have some setup measurements in one place. A lot of YouTubers web-pages suggest doing things by look or feel. Not having a ton of experience I need measurements. The more setups I do, the more confident I am about doing small tweaks after the initial setup, but I certainly haven’t gotten to the point where I can do an initial setup without feeler gauges and a 6” ruler that measures in 64ths of an inch.

    I hope other folks from this forum will chime in. I have done just a few guitars and basses. Some members have done lots of setups and may be able to add corrections, nuance, advice, or alternative approaches.

    I did my first setup on a bass using the method suggested by John Carruthers
    Here’s his approach for the Strat:

    Vid’s 1-4

    #1 https://www.youtube.com/watch?v=PHHe...Wb-rw&index=86

    #2 https://www.youtube.com/watch?v=oWpnW8ICn-U&list=PLS9PifayhVzSVnzRjOlWA2hlMEa4Wb-rw&index=87

    #3 https://www.youtube.com/watch?v=zz9UKX2lcxw&list=PLS9PifayhVzSVnzRjOlWA2hl MEa4Wb-rw&index=85


    #4 https://www.youtube.com/watch?v=CqN7...Wb-rw&index=88


    Here’s his approach for electric bass (p-bass)

    Vid’s 1-4

    #1 https://www.youtube.com/watch?v=te44eWXd9pc

    #2 https://www.youtube.com/watch?v=c2DlwxSIPA0

    #3 https://www.youtube.com/watch?v=cI9Y9MsmnEc

    #4 https://www.youtube.com/watch?v=FC30nJgIAJM


    I make one small change on the order of the Carruthers method: I do the nut slotting last. This follows the TRAIN approach that I have seen an number of times on the internet. TRAIN is an acronym that makes it easier to remember the order:

    T–Tune
    R–Relief (truss rod adjustment)
    A–Action (bridge/Saddle height)
    I–Intonation (string length adjusted at the bridge)
    N–Nut (string height at the nut) or sometimes N-Noodle (final tweaking).

    For builders, I think the last step is pretty much always “nut.” Almost any new nut will require some setup. Usually this means cutting the nut to the right string depth.

    However, many of the online setup guides are geared to a guitar that has been purchased, and leave out nut-cutting. Sometimes they still use the TRAIN acronym, but replace “Nut” with “Noodle.” For these folks the last step (the noodling) is doing some final tweaking of the settings. For me, tweaking things usually comes after the setup when I have played the guitar for a while. So I think of the final step as “Nut” but that does not mean I won’t do a little tweaking of settings later.

    The TRAIN acronym makes the order easy to remember, but I don’t think it makes much difference whether you do intonation last (like John Carruthers) or the nut last (as in TRAIN). Everyone seems to agree about doing TRA first. I think that we can all agree, however, that TRAIN makes for a better acronym than the alternative ;-)

    To the measurements!
    Note: Fender gives different setup measurements for different neck radii. All measures I am using are for a 12” radius neck which is the radius for all PB necks and most other kit necks.

    Fender strat:
    https://fendercustomersupport.micros...ticle/KA-01901
    Fender bass:
    https://support.fender.com/en-us/kno...ticle/KA-01903

    Following the TRAIN approach:

    TUNE
    Most sources think the guitar/bass should be in tune for setup. I doubt that anyone will find this shocking.

    RELIEF

    This is the adjustment of the truss rod. It’s always first after tuning.

    All relief measurements and adjustments are made in playing position, not with the guitar/bass on its back.

    Guitar
    Capo 1st Fret and depress the 17th (Fender says “last” but all others say 17th.) Check gap at 7th fret (internet consensus) or 8th Fret (Fender)
    Fender and Carruthers say it should be about .010” (.25mm)

    Bass
    The consensus on the internet is pretty much to capo the 1st fret, and depress the lowest string where it joins with the body (about the 16th Fret). Relief measurement is taken at the 7th Fret. Fender’s slight variation says to depress the “last” fret and take the measurement at the 8th fret. Fender says the measurement should be .012” (.03 mm). Carruthers says it should be .015” (.381mm). I use the Fender measurement (.012), but I used it with the Carruthers setup approach (depress sixteenth, check at 7th). I also leave the capo on the first fret, whereas Carruthers takes his off.

    The differences between the approaches sound more dramatic than they probably are. For example the clearance under the 7th and 8th frets is in my experience almost identical. For another example, if the nut is properly set up, the difference between .012 and .015 would be almost the same. The reason that I prefer to leave the capo on the first fret doing this setup is that it takes the nut height out of the equation. Since I am using the TRAIN order, the nut has not yet been set up, so it seems best to go with the capo-on approach.

    ACTION

    All relief measurements and adjustments are made in playing position, not with the guitar/bass on its back.

    Guitar
    Capo on 1st String, measurement taken at the 17th.
    Bottom of the string to the top of the fret should be 4/64ths” (AKA 1/16th” or 1.6mm). This is the measurement for both the lowest string and highest string.*


    *Note: Carruthers uses 5/64th” for the low string, which is the fender recommendation for a 7.25” radius neck. For a 12” radius, Fender recommends 4/64ths on both E-strings.

    Bass
    Carruthers does this a little differently than most. He does not capo the first fret, and sets a somewhat higher action than Fender recommends. I leave the capo on the 1st fret and use the Fender measurements at the 17th fret. Distance from the bottom of the string to the fret should be 6/64ths” (3/32nds” or 2.4mm) on the bass side and 5/64ths” (2mm) at the treble side.

    For guitars/basses with individual saddle adjustments, I do the middle strings with a radius gauge under the strings. I raise the middle string saddles so they are a bit high. I put the radius gauge under the strings with the highest and lowest strings gently touching the gauge. I then lower the middle string saddles until they gently touch the radius gauge. Without a radius gauge, as long as the frets have been leveled, you could probably just adjust the strings by doing it the way Adam does in the video in the manual, using the buzz test.

    https://www.youtube.com/watch?v=ad4Xs8h6gwk

    INTONATE

    Adjust the string length so that the pitch is the same note an octave apart on an open string and fretted at the 12th Fret. If the note is flat when the 12th string is fretted, the string is too long. If sharp it is too short. Carruthers does this step last. I do it before cutting the nut…but I confess that I will often check it again after cutting the nut, and make small adjustments if necessary.

    To be continued next post

  2. #2
    Overlord of Music fender3x's Avatar
    Join Date
    Jan 2016
    Location
    Miami, FL, USA
    Posts
    2,199
    Continued from previous post

    NUT

    Guitar
    There seem to be two ways of setting the string height at the nut. One is the “Carruthers” approach, which is to measure the string height over the first fret, with no capo or string depressed anywhere. This approach is dependent on having all the other steps completed. You only want to do this after doing a complete setup with a neck that has been leveled. Carruthers sets it at .018 (.457mm)

    An alternative used by a number of folks on the PB forum is essentially the approach referred to as “basic” on the Bryan Kimsey website:

    http://www.bryankimsey.com/nuts/nuts3.htm

    In this post the capo (or finger) goes on the third fret, and measurement is between the string and the 1st fret. One nice thing about this approach is that it takes action and relief measurements out of the equation. Pressing the string at the third fret means the string will touch the second fret. The idea is to get the clearance over the first fret to be as small as possible without touching the first fret, with the string touching the 2nd fret.

    There is a nice graphic of how to do this on the Lutherie.net website:

    Click image for larger version. 

Name:	basic.png 
Views:	90 
Size:	134.3 KB 
ID:	44717

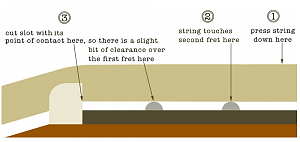
    One of our forum members who uses this approach has supplied some clearance measurements for between the first fret and string:

    Quote Originally Posted by McCreed View Post
    I find the "basic method" as he calls it, works just fine. To each his own.
    Whilst nut work requires practice to get consistent results and learn what not to do, it isn't rocket science.
    If I'm cutting a nut from scratch or starting with a pre-slotted blank, I do use feeler gauges for roughing in. Again, this is what works for me.

    My gap targets (with capo on 3rd fret) are .008" E6 & A; .006" D & G; .004" B & E1. I know that doesn't create a perfect radius, but I've never had a complaint from a customer or problem on my own guitars using those measurements.

    FWIW, when I first started doing nut slots I did step them evenly (.008"/.007"/.006" etc.) but I didn't notice a difference between that and my current method.
    I use the Carruthers approach on the first couple of strings to get close, and then switch to the “basic” approach using McCreed’s measurements. After the first two strings, I stop using the Carruthers approach and just go with the basic/McCreed approach.

    Bryan Kemsey’s webpage suggests yet another approach…which I don’t know anyone who has tried, so I have no official opinion on it ;-)

    Bass

    I have really only used the Carruthers measurements with bass. These measurements are from the bottom of the string to the top of the fret.

    Resting on bench (not playing positon)

    All strings to .022” (.559mm)

    It is hard to find measurements for the capo-3rd-fret method, although it is also used quite a bit. Measurements for that approach tend to be vague, like “about a piece of paper.” This is a little better from Lutherie.net (http://www.lutherie.net/nuts.html) where they say that the clearance should be the same at the first fret with the string depressed at the 3rd fret as it is one fret up from any depressed fret on the instrument.

    “If you hold any string down on any fret of a well set up instrument, you'll see that same preferred clearance at the next fret up.”

    Ian Partanen at Bassox.com recommends between .004 and .005 (.1 to .13 mm) (https://www.bassox.com/bass-guitar-nut-height/) He also notes that this is about the same as a piece of paper or a dollar bill US. Maybe a touch higher (.008?) on the E-string.

    Before buying a feeler gauge you may want to make sure it has the sizes you need. Not all include blades this small.

    NOODLE

    The other “N” that you see folks use with the TRAIN acronym is “Noodle.” This is a way of saying that you may want to make some adjustments once you have finished a basic setup so that the guitar/bass conforms to your preferences. I am getting a bit more confident about tweaking settings after the initial setup as I do more of them. The one caution (courtesy of Simon) relates to the nut. You can adjust a nut to make it deeper, but if you cut it too deep you adjust it by knocking it out and replacing it.

    One small tip. If I hear buzzing, I’ll also sometimes do micro adjustments (as in just under one string) using a fret dressing stick with 320 grit. These are sometimes called sanding or detailing sticks.

    Click image for larger version. 

Name:	sand_stick.png 
Views:	94 
Size:	344.6 KB 
ID:	44718

    Pickup Height

    The one bit of setup not in TRAIN is pickup height. I don’t have any great insight into this. I try to set at roughly the mfg specification, and then make adjustments for balance (with multi pickup guitars) or practicality. An example of the latter is with rail pickups. With factory specs on a bass, a slap was causing the string to hit the rail. On a guitar my palm sometimes touched both rails and I got a little buzz. In both cases Adjusting them down a little made a world of difference.

    Hopefully others will chime in with their approaches!
    Last edited by fender3x; 15-08-2023 at 03:20 AM.

  3. #3
    GAStronomist Simon Barden's Avatar
    Join Date
    Oct 2016
    Location
    Reading, UK
    Posts
    10,547
    I generally follow the TRANI method (intonation last), though it's often more iterative and TRARARARNI for me.

    If I've fitted a new nut, especially if I've created one from a blank, then I'll normally start by cutting the nut slots down so the strings are not too far above the first fret. Even if you use a capo to set up the string height you don't want to have to pull the strings down 3-4mm on the first fret.

    If I've had the neck off to level the frets, then the board will be straight so I normally give the truss rod about a half turn to tighten it before stringing it with new strings and tuning up. I may adjust the saddles/bridge height so the strings run free of the fretboard but aren't too high off the board before tuning.

    If the neck has been unstrung for a while (a day or more), then I'll normally leave it overnight as a minimum to settle down before doing any more work on it.

    I stick a capo on the first fret and lower the bridge/saddles until I can't bend a string on the 11th fret and all frets upwards without it choking, then back them up slightly until choke-free. I'll then check that the lower frets are all playing without buzzing.

    I'll look at the gap between string and fret around the 7th fret area. If it's bigger than that around the 12/13th frets, then I tighten the truss rod a bit. This will straighten the neck and pull the overall action down, so I'll normally need to raise the bridge/saddles slightly to compensate. Then it's time once more to check each fret for buzzing and not choking when bending.

    If that's fine, then I'll normally tweak the truss rod a touch more. (I like my action really low). Again, I may need to raise the bridge/saddles very slightly or back off the truss rod to its previous setting.

    This is the 'iterative' bit I mentioned where I'm alternating between truss rod and saddle/bridge height. Both of these are affecting the action, so you could lump this all under 'A' though you are affecting the relief, so it's also under 'R'.

    Then once I'm happy, I'll take the capo off and cut the nut slots (obviously only applicable if you have nut files). Again, I like the strings as low as possible at the nut without buzzing. I don't measure, I just do it by eye. I know some people will use feeler gauges to use fret 'height+x' as the feeler gauge total depth setting, but I've tried that and I still ended up with buzzing, so it's very much an empirical cut and test, cut and test method.

    I have invested in some Hosco Groovbars which help me cut down to a certain height quickly without having to worry about going too far, but it's rare I use any but the thinnest one, the two thicker ones remain unused.


    Of course, any time you cut a slot without a mechanical stop you risk going too deep, and I've got through a fair number of replacement nuts in my time, but I'm prepared for that. Each nut file I've got has a different sharpness and takes more or less strokes to cut a certain depth, so it's hard to guess how many strokes to risk each time you want just a small amount removed.

    So again it's very iterative; slacken off string, remove from slot, cut slot, replace string, tune up, check the height above the fret and test for any buzzing. Repeat as necessary.

    Once I'm happy with the nut slots, I'll normally leave it for a while, have another look and decide one or two are still a bit high and I'll work on them again.

    It's then either time to fit a new nut or to leave the guitar strung up overnight. The changing tensions on the neck can take a time to sort themselves out in the neck wood, so you should always leave the guitar to settle overnight as a minimum, especially if it's for someone else and you're handing it back to them. You may or may not need to do a bit more truss-rod and bridge/saddle height tweaking.

    At this point I'll loosen the strings, tape off around the nut, file it down to string top height and polish it.

    I may fit a new set of strings, depending on how marked the current set are after being played about with during the set-up.

    It's then I set up the intonation. Until you've got the action set, then you don't know how far the strings have to be pressed down at the 12th fret. And that will affect the extra tension placed on the string and therefore where the saddles need to go for good intonation. Yes, moving a saddle backwards and forwards by a few mm will affect the string height, but it's by so small an amount that it's not worth worrying about. And it will be half that small amount at the 12th fret.

    I do try and pre-set the saddles in roughly the right places based on my other guitars, so often the intonation movements required are minimal.

    The above works for me because I like low actions. Some people prefer higher actions and digging into the strings a bit more, in which case having a bit more neck relief and setting string height using feeler gauges is probably more appropriate.

    You always have to be aware of what the neck is doing. Sometimes it's perfect and you get the same amount of relief on both sides of the neck, but often you'll find the lower overall string tension on the treble side keeps that a bit flatter and you have more relief on the bass side. A little extra relief on the bass side isn't a bad thing as the amplitude tends to be greater, but excess relief in comparison can give you a much higher action on the bass side than the treble, which can feel awkward to play. I recently took off a neck from a Mexican Tele that I'd refinished in nitro, and stuck on one from a Chinese Squier because the Mexican Tele neck suffered from excessive bass-side relief. Tightening up the truss rod caused the treble side to have back-bow and choke out before much had happened on the bass side, so it had to go.

  4. #4
    Overlord of Music fender3x's Avatar
    Join Date
    Jan 2016
    Location
    Miami, FL, USA
    Posts
    2,199
    Thanks, Simon. I think a lot of what you see on the internet makes you think the process is very linear and one-and-done. Nice to capture the the more iterative and nuanced process of an expert! Thanks for the thorough walk through.

    On the topic of cutting the nut...how has not not really been covered. Here's a web page that does a reasonable review of virtually every way I have heard of.

    https://www.snathanieladams.com/2021...nut-files.html

    I think there is pretty much consensus that the best way to cut nuts is with high quality nut files. Most people here seem to have Hosco or StewMac. I have heard that the Uo-Chikyu files are great.

    Unfortunately a good set of nut files will run you about the cost of a cheap kit. A great complete set for bass, acoustic, classical and electric could put you in Warmoth kit territory.

    Being a cheapskate, I have not (yet) invested in decent set of good files. I'll let others chime about minimum needs for files...

    For those considering the cheap approaches you'll see on the web, IMHO forget about using the torch cleaners on a guitar. Bass strings are thick enough that the "cleaner" diameter gives it some stiffness, even for the G string. But for guitar they are just too flimsy. I don't know how anyone can get a straight slot using them. I tried to modify a jewler's saw to do it. It was a waste of time.

    I have done all my bass nuts with torch cleaners. However, the review in the link matches my experience. It takes a LONG time. Your hands will be very sore when you finish if you do it at a setting, and you will have gone through a very long playlist doing it. But it can be done.

    On the guitar nuts I have done, I have cut teeth into a sacrificial feeler gauge set. It works reasonably well. I wouldn't do it with a triangle file. Get a rotary tool and cutting disk. They are cheap too and you can use them for a lot of things.

    The feeler gauge approach is easier than the torch cleaner approach, but feeler gauges don't come big enough for bass strings.

    While these approaches work, I can definitely say that every nut I cut makes me wish for good nut files. EVERYONE who has tried the cheap ones on this forum, to the best of my knowledge, says that the cheap ones are a complete waste of money and do a terrible job. I haven't bought any for that reason. But I really would like a good set of nut files...probably just a matter of time.
    Last edited by fender3x; 16-08-2023 at 06:12 AM.

Posting Permissions

  • You may not post new threads
  • You may not post replies
  • You may not post attachments
  • You may not edit your posts
  •