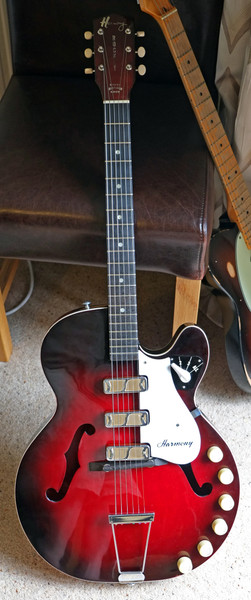
wow this is an epic build! Would like to hear where you hired that boat as well. I didn't know you could sail on the Norfolk broads


wow this is an epic build! Would like to hear where you hired that boat as well. I didn't know you could sail on the Norfolk broads

Yes, I've been doing it since the mid 1970s when I was a small boy. Not as many yacht hire boatyards as there were. The main ones are:
http://www.huntersyard.co.uk/ (Original 1930s/1940s yachts without motors.)
https://www.eastwood-whelpton.co.uk/ (Some older yachts but mainly newish glass fibre hulls with wooden topsides)
https://www.marthamboats.com/ (Mainly a post-war fleet of older wooden boats with motors, a lot have been recently refurbished as they had let most off them fall into a state of disrepair).
The ES-3 still needs completing and the body needs the final bits of old paint removing so that I can re-spray it again and finally finish it this year!
But I've got two new kits arriving tomorrow: A custom ES-1 that will be finished in an ES330 style with dog-ear P90s and a trapeze tailpiece, and a custom ESB-4 bass kit I'm making for a friend. These will be stained and tru-oiled so that I can work on them inside during the winter. The kits were originally supposed to arrive end of November, but a series of unfortunate events delayed their travel.
Over two years later and I'm starting back on this kit again.
Had a go removing the last of the paint with a heat gun, but it doesn't work for this guitar. The lacquer is too firmly bonded to the wood for it to come off easily and I have to scorch it to get it off at all. Fine if I was painting a solid colour, but its nit, and I can't sand any scorch marks off because of the veneer top. So I'll just have to try and lacquer over a few times with tinted amber and hope it matches up.
But it's now too hot to spray, so that's for another day.
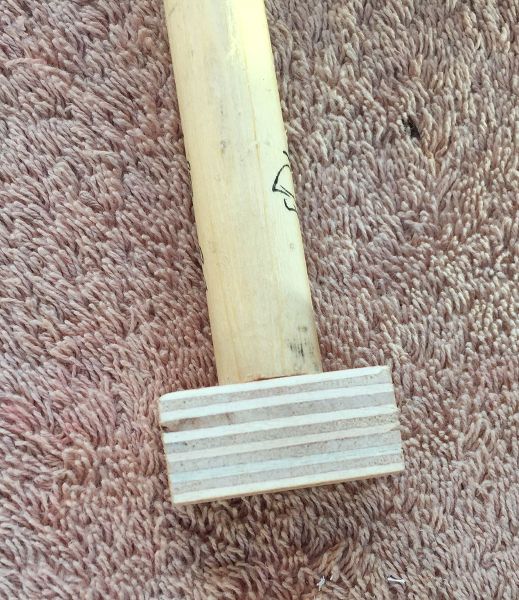
And in the meantime, I'm also waiting for glue to dry, so I can't spray at the moment anyway. I decided to glue a block inside the body so I can put a strap button on the side.
I cut the block to size a few times so it (eventually) fit inside the kerfing, next to the neck block, The neck block is just under 1" thick on the bass side of the neck pocket, but it looks like paulownia, which is very soft and won't take a screw near the edge securely. So a small block of plywood has now been inserted, stuck to the end of some dowel with double sided tape.
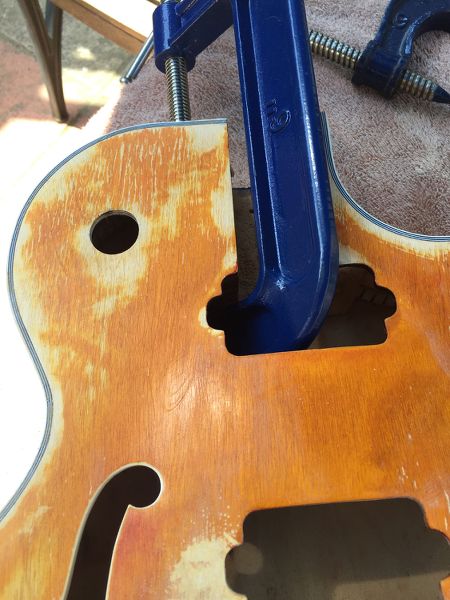
The block was applied with glue, initially held in place by hand until it started to set, and then clamped firmly in place.
It took several goes to get the clamp into a position where it applied pressure firmly on the end of the dowel. But I did it.
The eagle-eyed may have noticed that the toggle-switch hole is rather large. That's because I've just enlarged it with the help of my trusty Dremel + drum sander attachment. I've got a proper anti-vibration rubber grommet for the switch to fit into, as on a real 175. I did a test fit and it was perfect. I was a bit worried that the ply might be too thin for the grommet and so the grommet would move backwards and forwards, and was ready to try and glue some veneer underneath to make it thicker. But that won't be needed.
I must say that it's relatively easy working on the insides of a large hollow body guitar like this.
Good news and bad news on the build front for this.
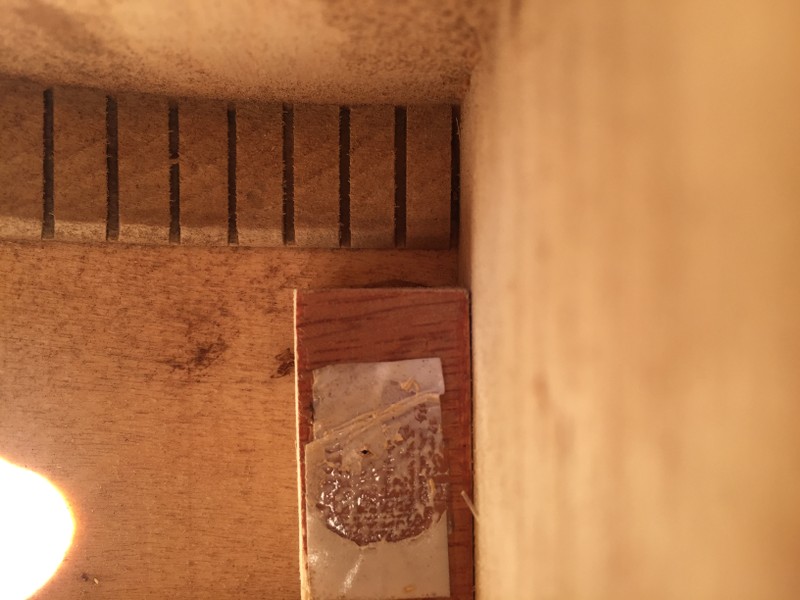
The good news is that my wooden blocked glued on successfully, I pulled off the clamping dowel from the double sided tape and I then drilled a small pilot hole in the strap button position. This is the block inside the guitar and you can just see the dark end of the pilot hole amongst the lighter double sided-tape residue. I also managed to keep the strap block up against the heel block, so that it has a glued surface on two sides.
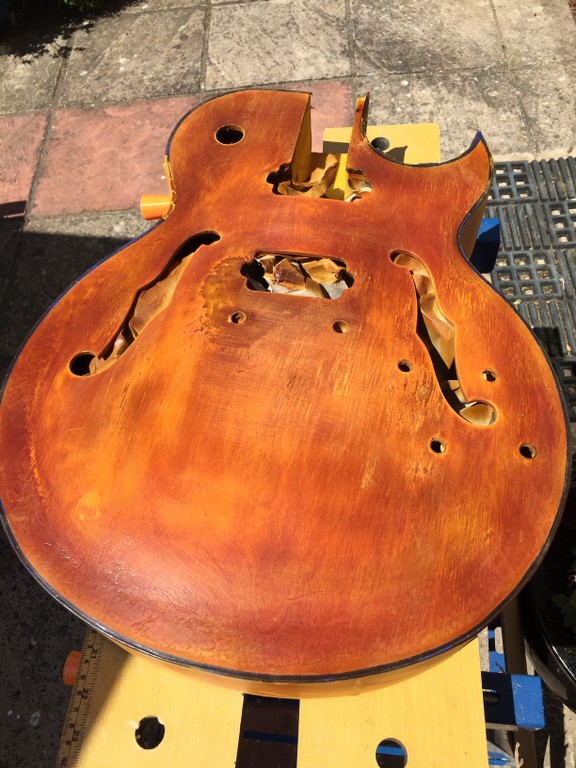
The bad news is that all hopes of getting the sunburst finish back on this guitar have gone. I tried to patch things in with some yellow lacquer, but that stayed much lighter than the original colour, which had a touch more orange in it. I wasn't interested in the edges, as they would have been dark tobacco, but needed a clean centre section.
So I mixed a very small drop of red in with the yellow, and it came out a lot more orange. I could live with that, but it still didn't blend things in and in some ways it just made it worse. In addition, in a couple or areas the wood grain of the surface veneers has started coming away, so they'll need filling. So the guitar will become black.
Which would be OK if I could get hold of some black nitro, but Rothco and Frost, my normal source, had sold out of all the tins and only had aerosol sprays left. It has to be black, as I've got gold hardware for it, including an expensive Allparts trapeze tailpiece.
But in looking for retardant thinners, I've just discovered that Northwest Guitars has some, along with those retardant thinners, (which are necessary for spraying nitro when it's hot). So I'll grain fill the top today, ready for the paint when it arrives tomorrow.
A miserable cold and damp feeling day today,. The paint arrived, but a sand flat of the headstock revealed some bubble holes in the finish, and a quick respray spray of black on the headstock still didn't fill those bubble holes in, so I decided that today was a day for leaving well alone.
So I went and had a nice long soak in the bath, and whilst doing so, decided that I'd do a solid dark red to black sunburst on the top, rear and neck, similar to what I did on my Harmony H59 restoration.
So I've just ordered some solid red paint and a few extra bits and pieces.
I now have a good excuse not to do anything on this for a couple of days, after which hopefully it will warm up again. After a month of clear blue skies and 25°C-30°C temps, today's 15°C, damp air, solid cloud cover and a strong wind isn't conducive to working outside.

I think the guitar decided it wanted a solid finish a long time ago!
The black/red should look good.
Build #1, failed solid body 6 string using neck from a scrapped acoustic (45+ odd years ago as a teenager!)
Build #2, ugly parlour semi with scratch built body and ex Peavey neck
Build #3, Appalachian Dulcimer from EMS kit
Build #4, pre-owned PB ESB-4
Build #5, Lockdown Mandolin
Build #6, Sixty six body for Squier
Build #7, Mini Midi Bass

Thats where my head was at with this build also.Originally Posted by JimC

Watching Simon push through is really encouraging though.
Gives me confidence to try harder also!!
Sent from my iPhone using Tapatalk
Tele Deluxe: http://www.buildyourownguitar.com.au...ht=tele+deluxe
Johnny Ramone:https://www.buildyourownguitar.com.a...=johnny+ramone
ES2V:https://www.buildyourownguitar.com.a...?t=7455&page=9
DMS-1 Mustang: https://www.buildyourownguitar.com.a...=10548&page=12
AG-1 Perhaps i am Tony Iommi: https://www.buildyourownguitar.com.a...t=11537&page=7
As I'm now putting a solid colour on the top, I was considering whether to fill in the bridge post holes and fit a floating bridge with a TOM on top of it, like a proper 175 has. But this sort of bridge is too tall, about 25mm minimum, whereas with the current neck angle, I've got about 17mm height above the body at the bridge position. My current Tonepros TOM is about 16mm high, so will just fit in once I allow for string height above the fretboards. I could put a wedge in under the heel and fit a floating bridge, but then the strings would be a long way from the body, which will raise problems with pickup heights and they'd have to sit a long way out of their rings. So it's all a bit swings and roundabouts on the visual front. Best to keep things as they are.

I can't wait to see it in red. I think the gold hardware will be super classy. I'm right on the verge of saying screw the green stain on my current project and painting it metallic green and a silver racing stripe. It's just hard for me to admit defeat on the original plan
Sent from my iPad using Tapatalk

Ive had to modify the floating bridge on my ES-5V and mess with the neck pocket on my GR-1SF to get a floating bridge to fit.
With my ES-3 Ive taken a floating bridge base, the type which follows the curve of the body all along the length of the base, and sanded the top down until its thin at the middle. The sides still have enough thickness for the height adjustment screws - just, however they may need trimming on top. I think it might just be low enough to work with a TOM on top. 🤞
Had I known the issues at the time I might of stuck with the stock bridge and holes, but I do like the look of the floating bridge.
Last edited by DarkMark; 06-06-2020 at 09:30 PM.
1) ES-5V
https://www.buildyourownguitar.com.a...highlight=Es5v
2) ES-3 (Custom)
https://www.buildyourownguitar.com.a...ead.php?t=8953
3) GR-1SF (Custom)
https://www.buildyourownguitar.com.a...ead.php?t=9376
4) Non-Pit Bull Travelling Guitar.
https://www.buildyourownguitar.com.a...ad.php?t=10303
5) AES-1 Special (Unwanted Custom)
https://www.buildyourownguitar.com.a...ad.php?t=11118
 Posting Permissions

 Reply With Quote