Results 1 to 9 of 9

Thread: RC-1

  1. #1
    Overlord of Music gavinturner's Avatar
    Join Date
    May 2013
    Location
    HOLGATE NSW
    Posts
    3,057

    RC-1

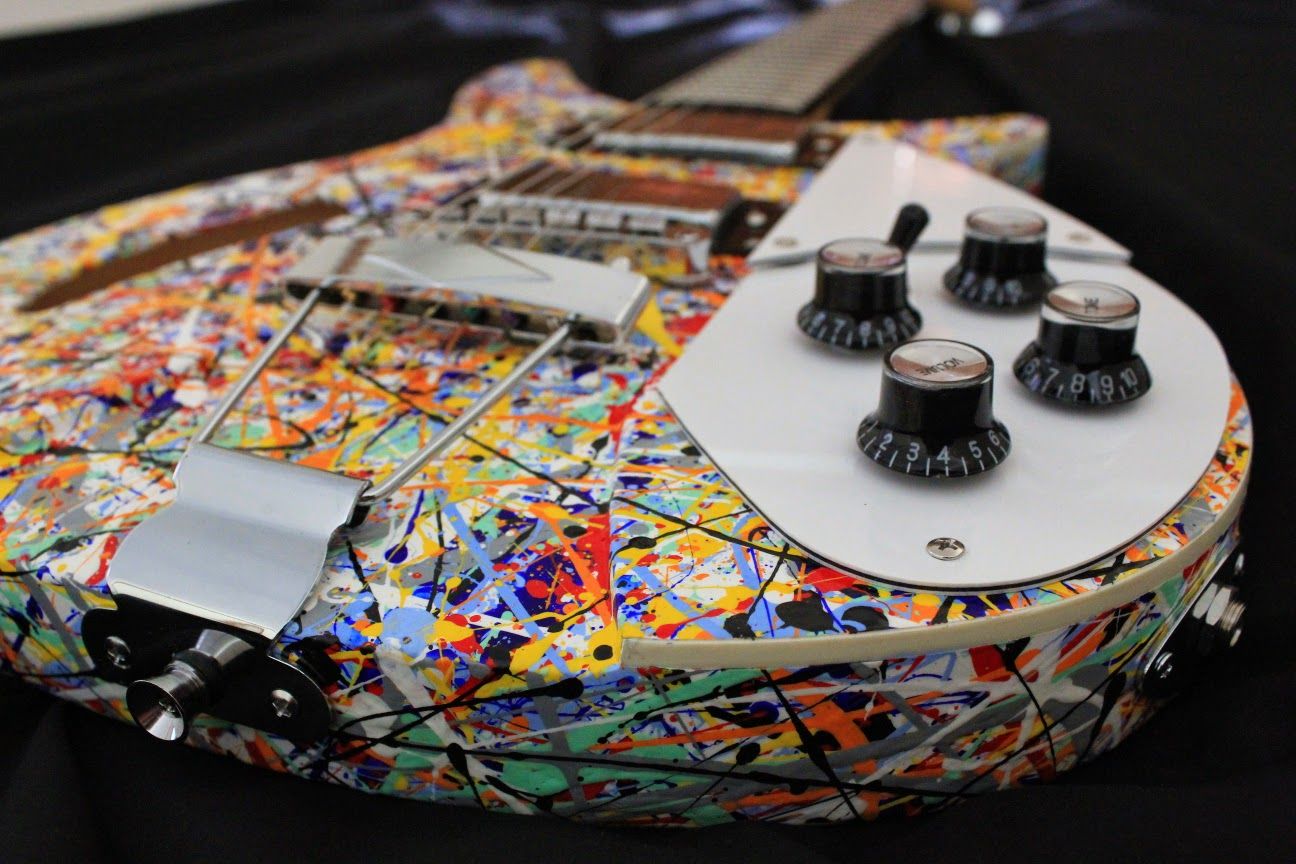
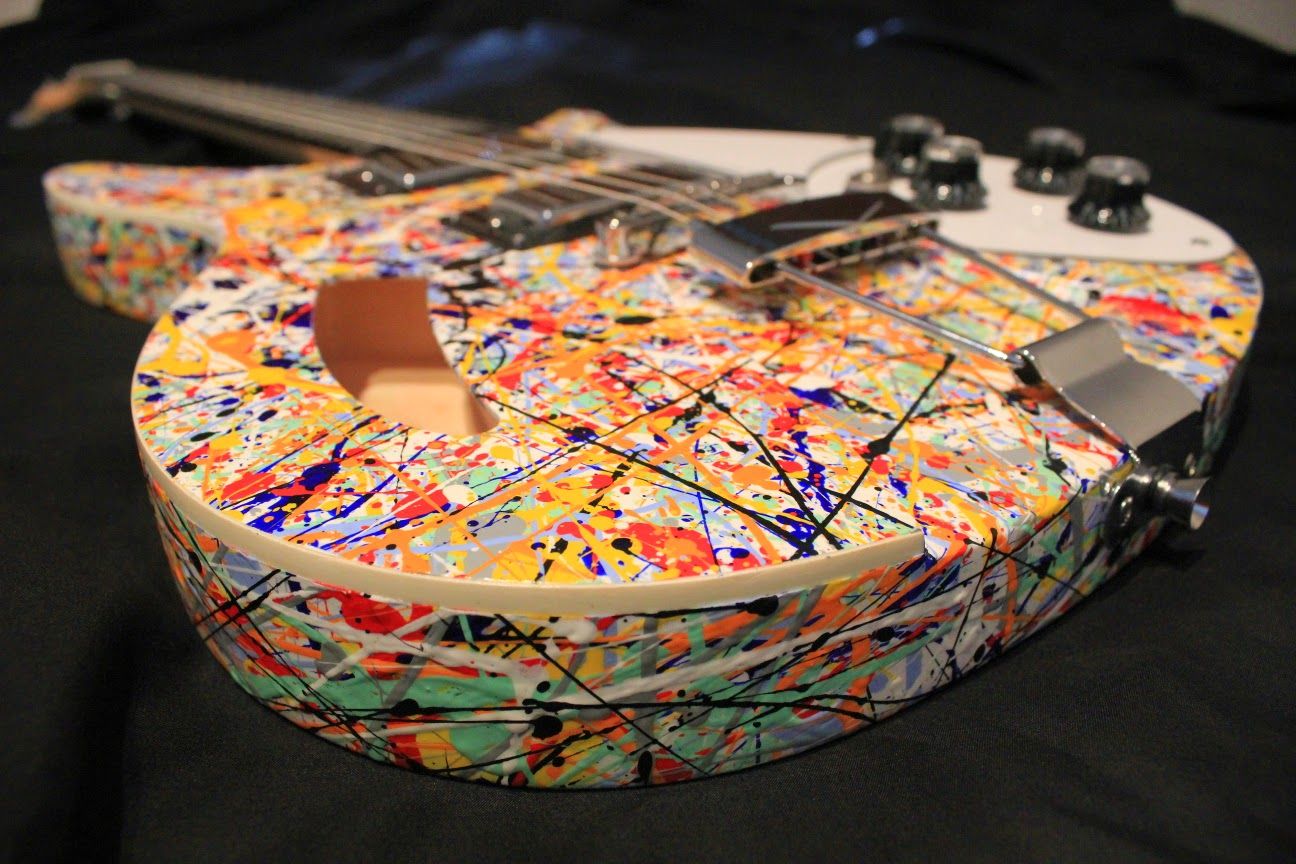
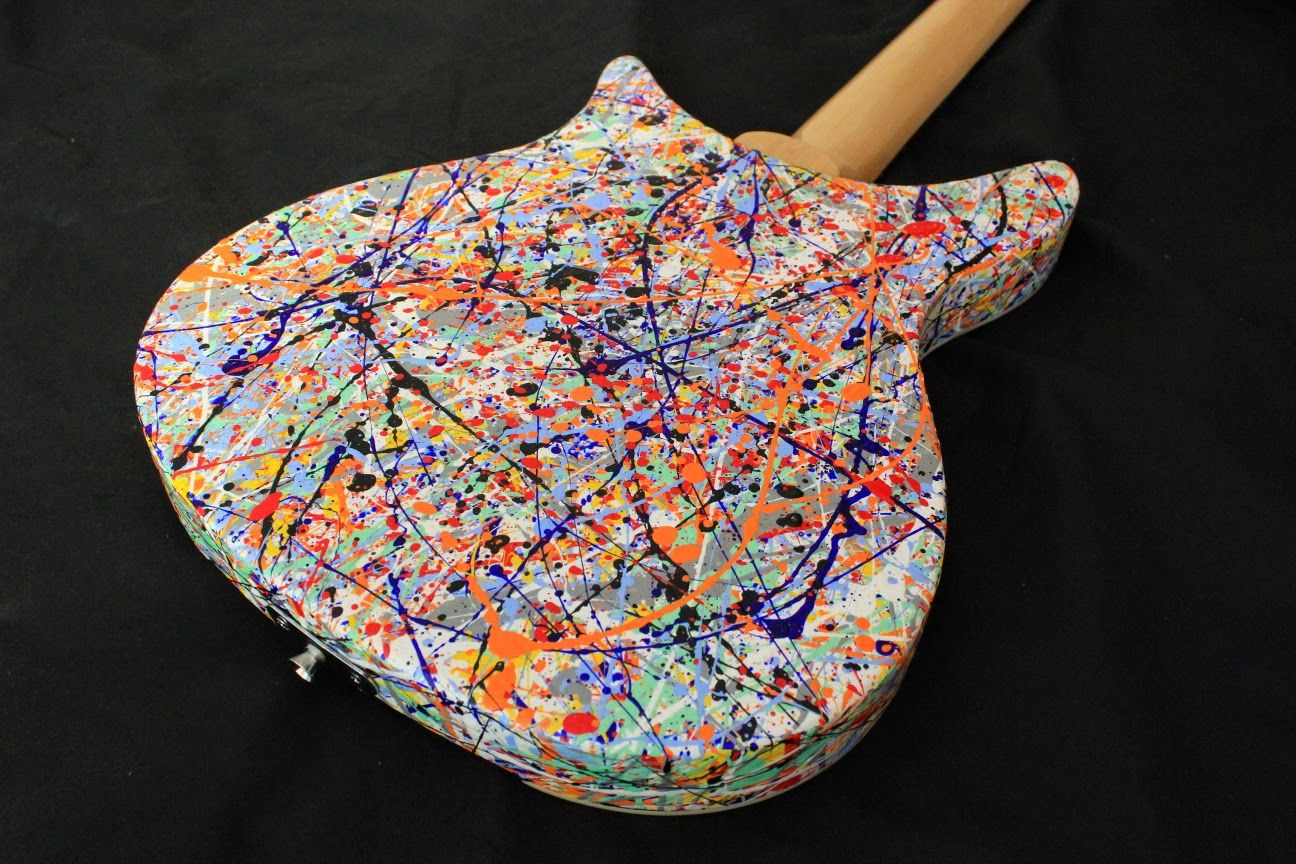
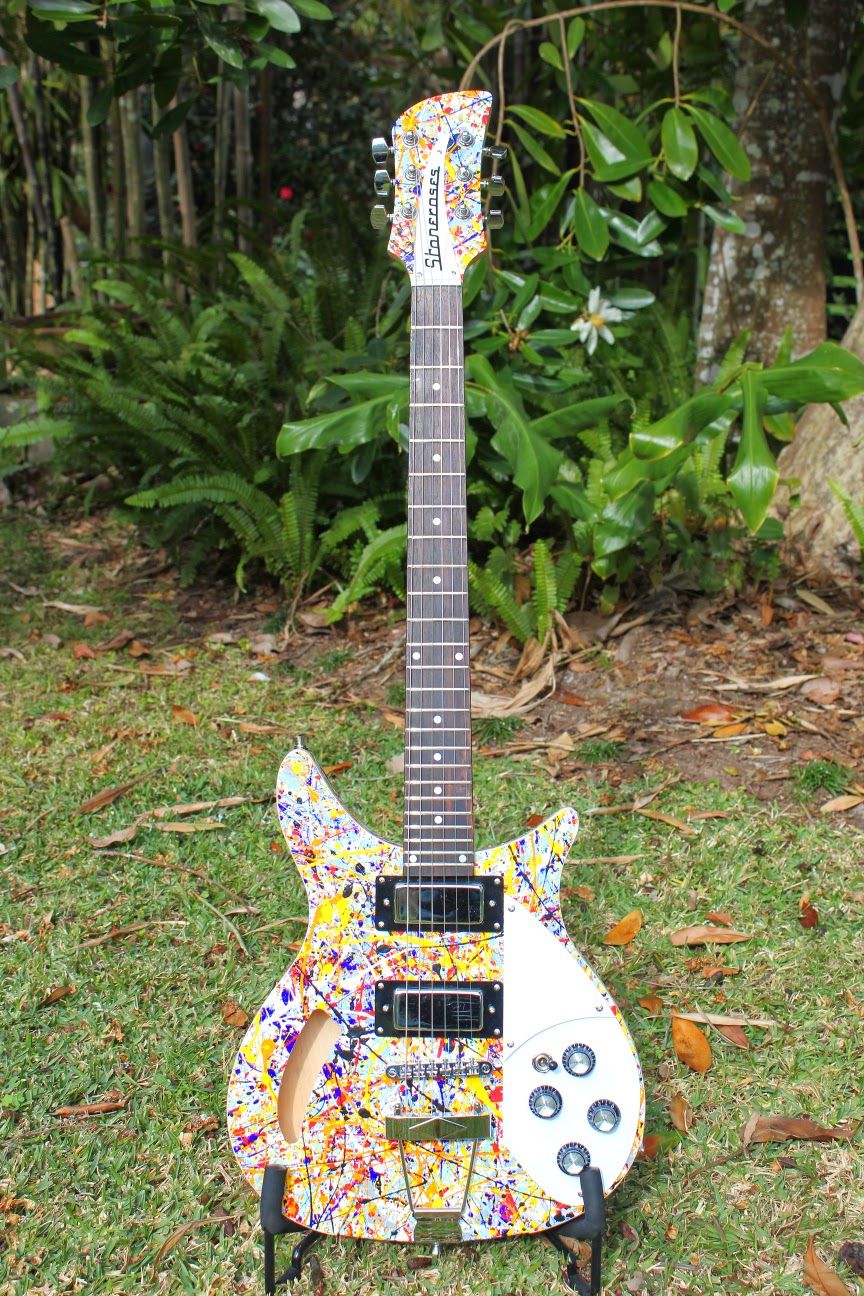
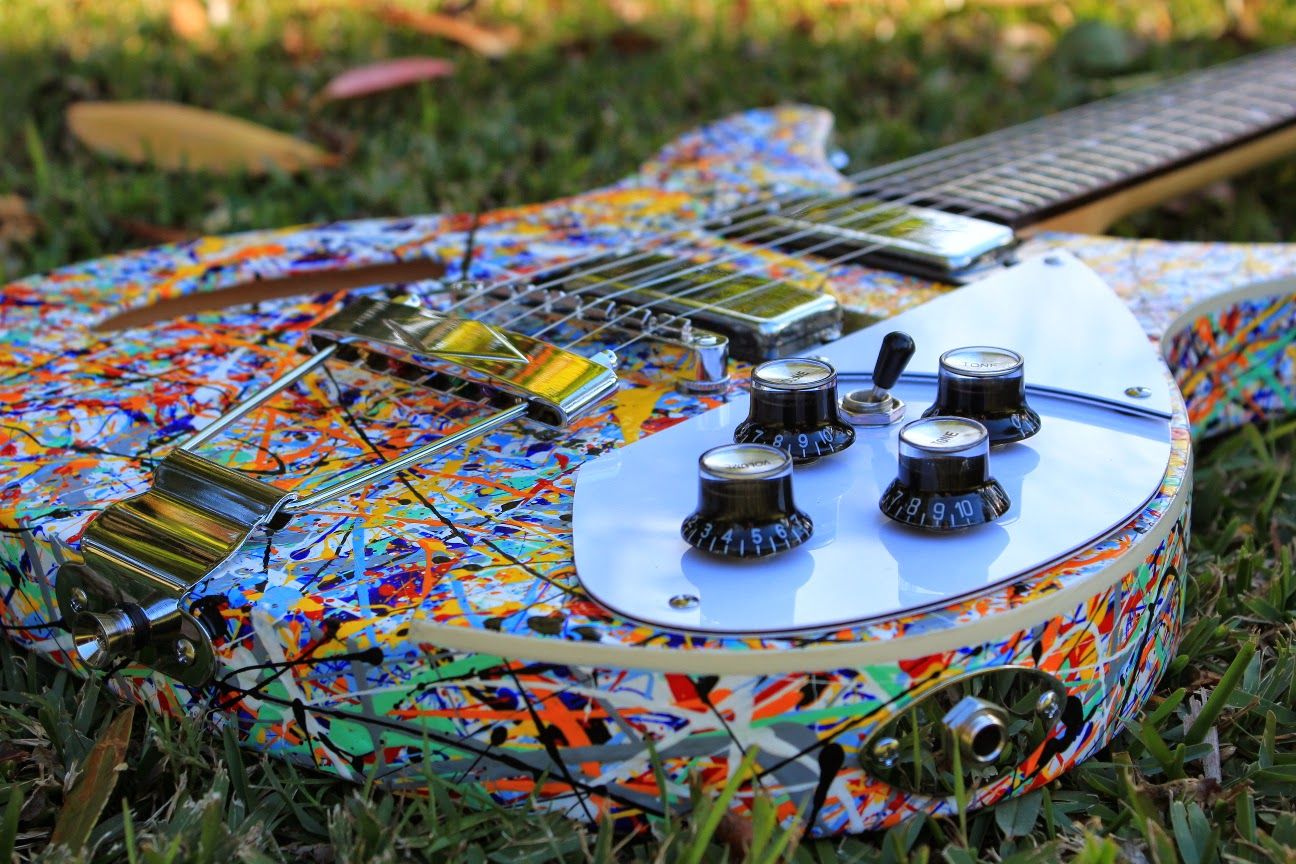
    Here is my RC-1 "Stone Roses Tribute".

    She is finished in an acrylic "Jackson Pollock" design and covered with Behlen spray-on Satin Nitro. The neck is Wudtone clear neck finish. All hardware is stock except a switchcraft output jack and jackplate, a new trapeze tailpiece and a custom truss-rod cover.


    cheers,
    Gav.


    --
    Build #01: BC-1
    Build #02: ST-1
    Build #03: JR-1DC
    Build #04: ES-2V
    Build #05: ESB-4 (GOTM July 2014)
    Build #06: RC-1
    Build #07: MK-2
    Build #08: TLA-1
    Build #09: JR-1DC
    Build #0A: LPA-1
    Build #0B: STA-1 (GOTM April 2015)
    Build #0C: MKA-2
    Build #0D: LP-1M
    Build #0E: JB-1
    Build #0F: FS-1

    Find me:
    https://www.facebook.com/firescreek.guitars/
    http://www.guitarkitbuilder.blogspot.com.au/

  2. #2
    Overlord of Music gavinturner's Avatar
    Join Date
    May 2013
    Location
    HOLGATE NSW
    Posts
    3,057
    more...


    --
    Build #01: BC-1
    Build #02: ST-1
    Build #03: JR-1DC
    Build #04: ES-2V
    Build #05: ESB-4 (GOTM July 2014)
    Build #06: RC-1
    Build #07: MK-2
    Build #08: TLA-1
    Build #09: JR-1DC
    Build #0A: LPA-1
    Build #0B: STA-1 (GOTM April 2015)
    Build #0C: MKA-2
    Build #0D: LP-1M
    Build #0E: JB-1
    Build #0F: FS-1

    Find me:
    https://www.facebook.com/firescreek.guitars/
    http://www.guitarkitbuilder.blogspot.com.au/

  3. #3
    Overlord of Music gavinturner's Avatar
    Join Date
    May 2013
    Location
    HOLGATE NSW
    Posts
    3,057
    more...


    --
    Build #01: BC-1
    Build #02: ST-1
    Build #03: JR-1DC
    Build #04: ES-2V
    Build #05: ESB-4 (GOTM July 2014)
    Build #06: RC-1
    Build #07: MK-2
    Build #08: TLA-1
    Build #09: JR-1DC
    Build #0A: LPA-1
    Build #0B: STA-1 (GOTM April 2015)
    Build #0C: MKA-2
    Build #0D: LP-1M
    Build #0E: JB-1
    Build #0F: FS-1

    Find me:
    https://www.facebook.com/firescreek.guitars/
    http://www.guitarkitbuilder.blogspot.com.au/

  4. #4
    Member
    Join Date
    Aug 2015
    Location
    Canberra
    Posts
    42
    Name:  RC1.jpg
Views: 4261
Size:  15.4 KB

    All standard, The best I could do on the black paint with rattlecans. After rubbing it back 3 or 4 times I settled on this...

    Great Kit!!!

    Cheers,

    Dan

  5. #5
    Member
    Join Date
    Mar 2016
    Location
    Wyndham Vale
    Posts
    129
    Click image for larger version. 

Name:	Close Front.JPG 
Views:	599 
Size:	667.7 KB 
ID:	9637Click image for larger version. 

Name:	Front.JPG 
Views:	421 
Size:	302.8 KB 
ID:	9636Click image for larger version. 

Name:	Head.JPG 
Views:	360 
Size:	549.2 KB 
ID:	9638Click image for larger version. 

Name:	Rear Close.JPG 
Views:	360 
Size:	509.1 KB 
ID:	9639Click image for larger version. 

Name:	Rear.JPG 
Views:	334 
Size:	320.5 KB 
ID:	9640

    I replaced the truss rod cover for a copy of the original Rickenbacker shape but changed the name to something I can relate to. I made my own tailpiece to try and make it look like an original but changed the R to a D to relate to the Truss rod cover. Changed the bridge to a roller version and put in a set of Allparts Vintage single coil Pups that gives it that jingle sound that the original has.

  6. Liked by: ikeus

  7. #6
    [QUOTE=Dikkybee007;100579]Click image for larger version. 

Name:	Close Front.JPG 
Views:	599 
Size:	667.7 KB 
ID:	9637Click image for larger version. 

Name:	Front.JPG 
Views:	421 
Size:	302.8 KB 
ID:	9636Click image for larger version. 

Name:	Head.JPG 
Views:	360 
Size:	549.2 KB 
ID:	9638Click image for larger version. 

Name:	Rear Close.JPG 
Views:	360 
Size:	509.1 KB 
ID:	9639Click image for larger version. 

Name:	Rear.JPG 
Views:	334 
Size:	320.5 KB 
ID:	9640

    I replaced the truss rod cover for a copy of the original Rickenbacker shape but changed the name to something I can relate to. I made my own tailpiece to try and make it look like an original but changed the R to a D to relate to the Truss rod cover. Changed the bridge to a roller version and put in a set of Allparts Vintage single coil Pups that gives it that jingle

  8. #7
    Member wzn4z5's Avatar
    Join Date
    Mar 2017
    Location
    Melbourne
    Posts
    2
    Hi guys.

    Attached are some images of my first build - a custom RC-1 in Behlen Nitro Jet. Its actually a 50th birthday present for my brother, and I used 3-D printing to customise the scratch plates and truss rod cover. This technique was easy, fast and infinitely customiseable!

    If you want to know more about the 3-D printing stuff, drop me a line.

    Andrew Holmes
    Click image for larger version. 

Name:	Holmes RC1.jpg 
Views:	267 
Size:	369.2 KB 
ID:	18337
    Click image for larger version. 

Name:	Holmes RC1 scratch plate.jpg 
Views:	267 
Size:	367.1 KB 
ID:	18338
    Click image for larger version. 

Name:	Holmes RC1 truss rod cover.jpg 
Views:	251 
Size:	282.7 KB 
ID:	18339

  9. Liked by: Hobastard

  10. #8
    Member
    Join Date
    Mar 2017
    Location
    Southeast of st louis in illinois usa
    Posts
    4

    My rc1

    My first attempt at a build. Rickenbacker pickups and bridge, bigsby tailpiece, grover tuners, offset holes for the tuners, chrysler brilliant pearl paint and several coats of clear. Made my own pickguard. axemasters compensated nut.
    Attached Thumbnails Attached Thumbnails Click image for larger version. 

Name:	IMG_1338.JPG 
Views:	290 
Size:	142.1 KB 
ID:	18798  

  11. #9
    Member AndyKilburn's Avatar
    Join Date
    Jan 2019
    Location
    Bradford, England
    Posts
    3
    Here's my first build, hope you like it. All stock apart from the saddle trapeze which I replaced and also the truss rod cover which I made myself by cutting out and shaping a sheet of 2mm perspex. The finish is 3 coats of royal blue stain, 6 coats of finishing oil then a couple of coats of Renaissance wax. Took several attempts to get the finish right and both the front and back were fully sanded back at least twice to start again from scratch but I'm over the moon with how it turned out.

    Click image for larger version. 

Name:	Img_1884.jpg 
Views:	228 
Size:	49.9 KB 
ID:	29860

    Click image for larger version. 

Name:	Img_1885.jpg 
Views:	215 
Size:	80.2 KB 
ID:	29861

    Click image for larger version. 

Name:	Img_1886.jpg 
Views:	204 
Size:	46.4 KB 
ID:	29862

    Click image for larger version. 

Name:	Img_1887.jpg 
Views:	211 
Size:	38.7 KB 
ID:	29863

  12. Liked by: wazkelly

Posting Permissions

  • You may not post new threads
  • You may not post replies
  • You may not post attachments
  • You may not edit your posts
  •