Page 3 of 10 FirstFirst 1 2 3 4 5 ... LastLast
Results 21 to 30 of 96

Thread: 335 - installing Pots, switches and Output jacks

  1. #21
    Moderator Gavin1393's Avatar
    Join Date
    Sep 2012
    Location
    Mindarie, Western Australia
    Posts
    3,151
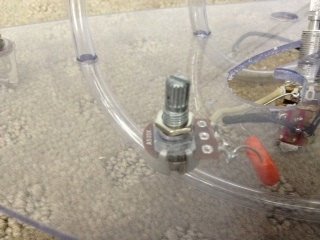
    Draw the pots into place and using the same process as with the Jack, slide the washer, volume and control indicators and nut over the tubing and allow it to drop down onto the pot. Tighten up and then remove the tubing.

    http://www.buildyourownguitar.com.au/forum/image.php?type=sigpic&userid=1258&dateline=1443806  448Gavmeister

  2. #22
    Moderator Gavin1393's Avatar
    Join Date
    Sep 2012
    Location
    Mindarie, Western Australia
    Posts
    3,151
    Draw the remaining 'tone and volume' unit through the 'f' hole and position the tubed pot into place. Using your fingers position the last remaining pot before turning your attention to the switch.
    http://www.buildyourownguitar.com.au/forum/image.php?type=sigpic&userid=1258&dateline=1443806  448Gavmeister

  3. #23
    Moderator dingobass's Avatar
    Join Date
    Sep 2012
    Location
    Perth
    Posts
    4,491
    Nice one Gavin

    I will be filing this away and if I ever need to wire up a hollow body again, I will be using this method.

    There is always a workaround for glitches, mistakes and other Guitar building gremlins.....

  4. #24
    Moderator Gavin1393's Avatar
    Join Date
    Sep 2012
    Location
    Mindarie, Western Australia
    Posts
    3,151
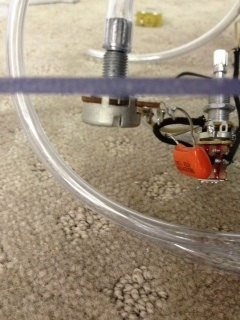
    Here is a quick picture of the two tubed pots about to be pulled simultaneously into place. This is fairly important if you don't want to rip the earth wires of the pots!
    http://www.buildyourownguitar.com.au/forum/image.php?type=sigpic&userid=1258&dateline=1443806  448Gavmeister

  5. #25
    Moderator Gavin1393's Avatar
    Join Date
    Sep 2012
    Location
    Mindarie, Western Australia
    Posts
    3,151
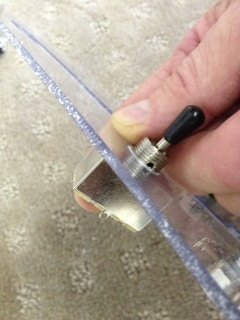
    Position the switch through the 'f' hole with your fingers and get it into position.
    http://www.buildyourownguitar.com.au/forum/image.php?type=sigpic&userid=1258&dateline=1443806  448Gavmeister

  6. #26
    Moderator Gavin1393's Avatar
    Join Date
    Sep 2012
    Location
    Mindarie, Western Australia
    Posts
    3,151
    Holding the switch in place supported by your finger insert the washer and nut and tighten.
    http://www.buildyourownguitar.com.au/forum/image.php?type=sigpic&userid=1258&dateline=1443806  448Gavmeister

  7. #27
    Moderator Gavin1393's Avatar
    Join Date
    Sep 2012
    Location
    Mindarie, Western Australia
    Posts
    3,151
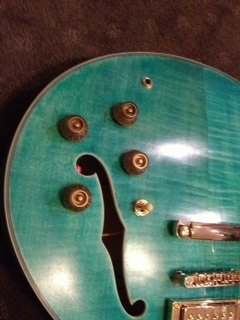
    ...and there you have it. Everything installed in a matter of minutes instead of the hours of frustration that some of us had to endure.
    No where on the internet or elsewhere have I seen this method used to I claim this one as a first in the world for Pitbull Guitars!!!
    http://www.buildyourownguitar.com.au/forum/image.php?type=sigpic&userid=1258&dateline=1443806  448Gavmeister

  8. #28
    Moderator Gavin1393's Avatar
    Join Date
    Sep 2012
    Location
    Mindarie, Western Australia
    Posts
    3,151
    A reminder of the finished article.
    http://www.buildyourownguitar.com.au/forum/image.php?type=sigpic&userid=1258&dateline=1443806  448Gavmeister

  9. #29
    Moderator Gavin1393's Avatar
    Join Date
    Sep 2012
    Location
    Mindarie, Western Australia
    Posts
    3,151
    Thanks DB! Would be nice to get the summation of your experience of your 335 on here.
    http://www.buildyourownguitar.com.au/forum/image.php?type=sigpic&userid=1258&dateline=1443806  448Gavmeister

  10. #30
    Mentor
    Join Date
    Jan 2013
    Location
    Talawa, Tasmania
    Posts
    1,173
    Genius solution! Well done! I actually feel somewhat confident about attempting this kit now....
    "Music is in the air; it's my job to pull it out."- Jaco Pastorius

Page 3 of 10 FirstFirst 1 2 3 4 5 ... LastLast

Posting Permissions

  • You may not post new threads
  • You may not post replies
  • You may not post attachments
  • You may not edit your posts
  •