Page 1 of 5 1 2 3 ... LastLast
Results 1 to 10 of 43

Thread: Tele with Graph Tech piezo saddle build for a friend

  1. #1
    GAStronomist Simon Barden's Avatar
    Join Date
    Oct 2016
    Location
    Reading, UK
    Posts
    10,547

    Tele with Graph Tech piezo saddle build for a friend

    I've had the parts for this build for a few years, but other things have always got in the way.

    My old keyboard player, Dave Boland, wanted an electric guitar he could also play some acoustic parts on for a few numbers in his current band.

    So he bought a Mexican Tele from eBay that had been severely bashed about in an attempt to fit some Graph Tech piezo saddles to it. The body wasn't worth saving, but the neck was OK and it seemed to have most of the required Graph Tech bits. But it didn't quite have all of them, and this was probably the biggest factor in me progressing with the build.

    I found a Tele body on eBay that looked OK. It had what I thought was a 3-4mm thick flamed maple top, stained black. The routs were very roughly done

    So the first job was to sand the maple top back a bit to reveal enough maple to stain and leave the top looking popped. Except that it wasn't a solid top, it was a veneer with a black binding. The black top and binding matched so much at the edges that I thought it was a thickish top and I'd been lucky in my purchase. But it was veneer, and the veneer was very thin (probably sanded back by the original owner) and before I'd sanded enough of the black away to give enough clean maple to stain, I was through the veneer to the body wood in places.

    So the random orbital sander came out and off came the rest of the veneer.

    I was umming and ahhing about how to wire up the controls as it turned out I'd have to solder wires to the header pins on the piezo pre-amp board, and I couldn't work out which pin did what. The installation kit comes with lots of different wires and pots and switches connected to little push-on connectors, but apart for the one for the piezos themselves

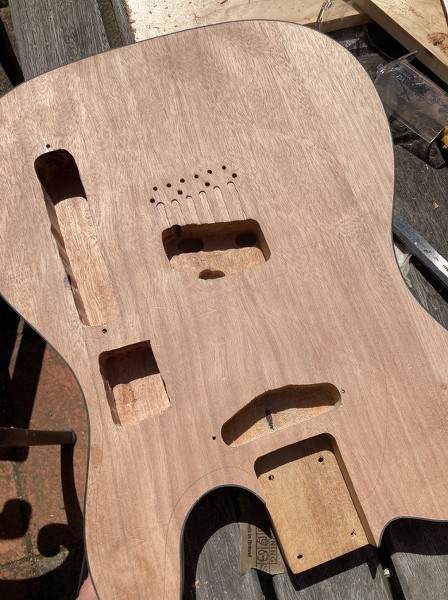
    Then the router came out as I needed to rout out two cavities; one for a battery compartment (on the rear) and one for the pre-amp board. I also needed to rout out some grooves so I could fit the piezo saddle wires through holes in the bridge plate and down to the bridge pickup rout. Here's the top after stripping and routing:


    I finally decided that I couldn't work out which wires should go to where, so bought a new preamp kit for it, with all the necessary pots and wires. I also bought a stacked pot so that I could do the guitar volume and tone on it, and have the other knob as the acoustic guitar volume. This is supplies with the kit and is push/pull, with two two tone settings on it for the piezo. I'll also fit the supplied selector switch for electric, acoustic or both together. The supplied TRS output jack is also switched (for the battery) and the board detects whether there's a TS jack in, in which case both the acoustic and electric signals are summed together, or a TRS jack, in which case the electric and acoustic signals go to the T and R respectively, so they can be split to different amps.

    I'll make up a small splitter box for Dave for this.

    I've got a 4-way selector switch, to give him the pickups in series option as well as the standard Tele ones.

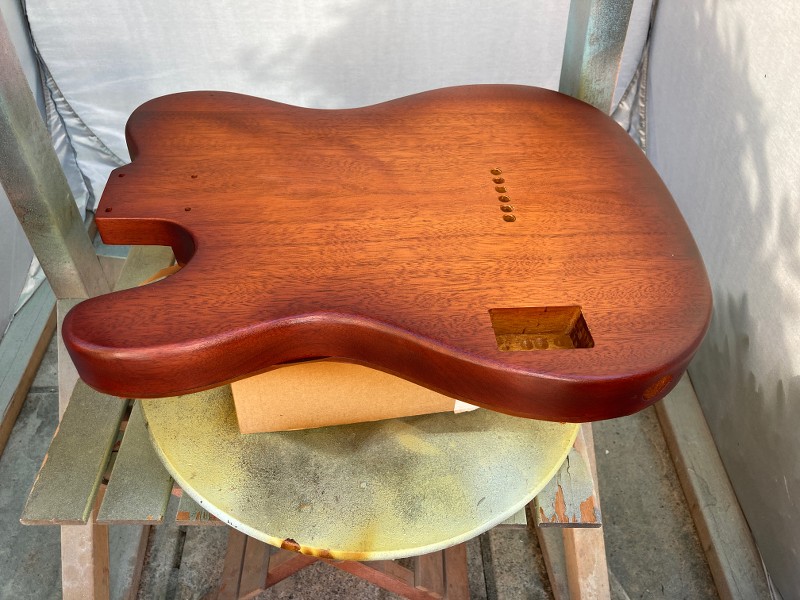
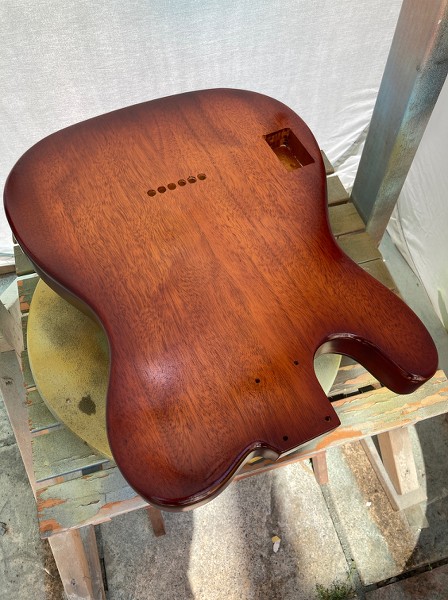
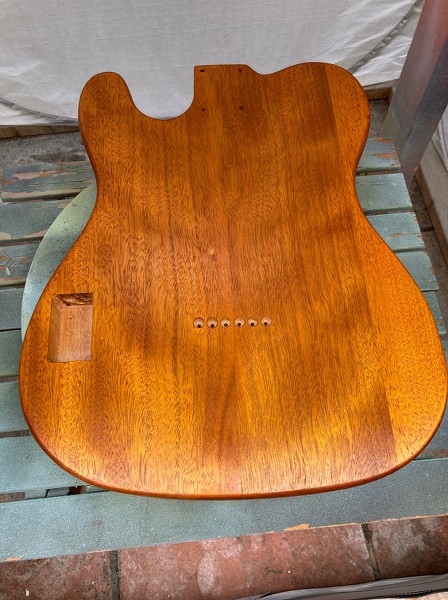
    I was unsure as to what the body wood was. At first I thought it was alder, but after staining it yellow, the grain has come out a lot more and I'm sure it's some variety of mahogany or near-mahogany, but without the deep pores that real mahogany has:


    I've now sprayed a couple of coats of vintage amber lacquer on the back, which has made it a bit darker (you can see the battery box rout here):


    I think I'll just use clear lacquer on the top, to provide a bit of contrast and interest.

  2. #2
    Mentor blinddrew's Avatar
    Join Date
    Apr 2018
    Location
    York, Uk
    Posts
    1,122
    Shame about the maple top but it's actually quite nicely matched for 4(?) bits of wood.

  3. #3
    GAStronomist Simon Barden's Avatar
    Join Date
    Oct 2016
    Location
    Reading, UK
    Posts
    10,547
    Maybe 3. I'll count next time I work on it.

    They'd used far too much black stain on it for veneer. It needed to be much more dilute. Some of it was stained almost all the way through. I feel they may have already sanded the veneer before the staining, which didn't help.

    You could only just detect the flame through the stain before sanding. Like Eric Olthwaite's mum's black pudding, 'even the white bits were black'.

  4. #4
    Overlord of Music McCreed's Avatar
    Join Date
    Oct 2018
    Location
    AUS
    Posts
    3,552
    Cool project Simon.
    You always do interesting ones!
    Making the world a better place; one guitar at a time...

  5. #5
    Mentor blinddrew's Avatar
    Join Date
    Apr 2018
    Location
    York, Uk
    Posts
    1,122
    Quote Originally Posted by Simon Barden View Post
    Like Eric Olthwaite's mum's black pudding, 'even the white bits were black'.
    I got that reference, in case you were wondering...

  6. #6
    GAStronomist Simon Barden's Avatar
    Join Date
    Oct 2016
    Location
    Reading, UK
    Posts
    10,547
    Quote Originally Posted by blinddrew View Post
    I got that reference, in case you were wondering...
    Good for you!

    Been doing various bits of binding scraping, sanding scratches that have shown up with lacquer on them, restaining, relacquering and swearing when bits of stuff kept falling onto the lacquer.

    Was going to drill holes for the piezo wires in the bridge baseplate, but then realised the ashtray bridge base I had was for 6x barrel saddles, so the rear intonation screw holes were offset from the through-body string holes, and they need to be in line for these saddles. So another bridge was ordered. Which is similar to the one I first had and drilled holes for the piezo wires in about 2 years ago, but has totally disappeared in the meantime.

  7. #7
    Member
    Join Date
    Mar 2020
    Location
    Surrey, UK
    Posts
    95
    I like the wood, nice colour. Despite the (I'm counting three) piece body.

  8. #8
    GAStronomist Simon Barden's Avatar
    Join Date
    Oct 2016
    Location
    Reading, UK
    Posts
    10,547
    Yes, a three piece. I counted today.

    The forward moving bit on this today was spraying the edges with dark brown lacquer and adding a slight burst to the back. The stain take-up was a bit patchy on the sides and despite re-staining and re-spraying with amber, their remained dark and light bits that looked odd. So, if in doubt, cover them up. I think it looks a lot better than it did


    The first backward moving bit was realising that I'd ordered yet another 6-barrel Tele bridge. D'oh! There are times when I'm very stupid indeed.

    The second was then double checking the piezo saddles, and realising that the original guitar owner had gone and bought Strat-spaced/width piezo saddles. Teles are normally 54mm string spacing (US/Vintage) or 52.5mm for Squiers and a lot of Mexican guitars. The piezo saddles are 11.2mm apart, or 56mm spacing. I couldn't find any Tele bridges like that at all. If a new set of piezo saddles wasn't around £130-£140, I'd suggest getting the right width ones. But that's too much money, so these will have to work.

    So I found a 3-barrel modern (non-ashtray) style bridge with 54mm string spacing (important as this matches the through-body hole spacing). This doesn't have any rear-stringing holes, so I'll just mark and drill holes for the saddle screws at 11.2mm spacing, so the saddles should all sit facing forwards nicely, rather than being splayed out.

    The strings will be slightly offset by 1mm max when they leave the baseplate holes due to the 54mm hole vs 56mm saddle spacing, but I don't think this will be too much of an issue, and the sideways force on the saddles provided by the string angle will keep the saddles nicely pressed together.

    It may have been possible to sand the saddle sides, taking 0.2mm off each edge, but the height adjustment screws are very near the sides and this may have made the sides very weak here (and doing an accurate 0.2mm sand/material removal is near impossible with the tools I have available). Plus, Graph Tech warn against filing the saddles to avoid damaging the piezo elements. I don't think the piezo would extend to the sides, but I don't want to risk it.

    So another bridge has been ordered. Thank god for cheap Chinese hardware!

  9. #9
    GAStronomist Simon Barden's Avatar
    Join Date
    Oct 2016
    Location
    Reading, UK
    Posts
    10,547
    Well, Thursday and Friday were over 30°C and far to hot to spray or do much. Saturday was much cooler but wet and windy, so no spraying, but today was a bit better, and generally dry (between occasional showers) and not too windy, so some spraying of clear was done, after a bit of touching up of the lighter patches just below the binding where the masking tape got applied just a bit too low.


    Not the smoothest of finishes so far as it's sinking in quite a lot; so a few more coats to go before I can sand it down.

    There's a lot of natural variation in the wood tone, which looks like it's fighting with the edge sunburst from some angles, and looks fine from others. It is what it is.

  10. #10
    Overlord of Music McCreed's Avatar
    Join Date
    Oct 2018
    Location
    AUS
    Posts
    3,552
    Well, Thursday and Friday were over 30°C and far to hot to spray or do much. Saturday was much cooler but wet and windy, so no spraying, but today was a bit better, and generally dry (between occasional showers) and not too windy, so some spraying of clear was done...
    Just the opposite of what I was going through a few weeks ago!
    Too cool, or too wet. It's frustrating being a slave to the elements!

    It is what it is.
    Yep. That's how I had to leave mine. Conditions weren't likely to improve for a quite a while, so... it is what it is!
    Hoping to sand & polish later this week.

    Yours is looking good!
    Making the world a better place; one guitar at a time...

Page 1 of 5 1 2 3 ... LastLast

Posting Permissions

  • You may not post new threads
  • You may not post replies
  • You may not post attachments
  • You may not edit your posts
  •