Thanks Simon for taking the time to explain!
Very clear and 100% makes sense. Will introduce this step in my workflow.


Thanks Simon for taking the time to explain!
Very clear and 100% makes sense. Will introduce this step in my workflow.

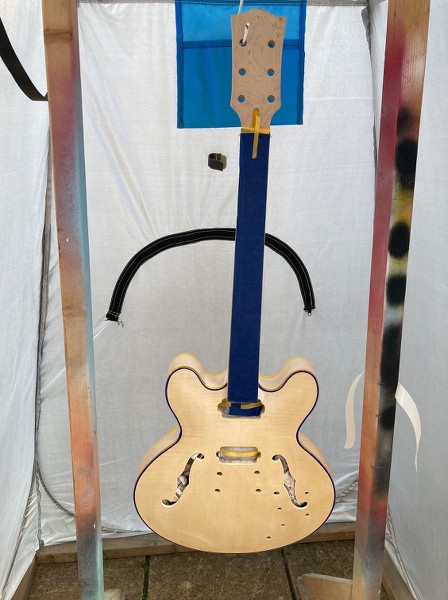
Neck join areas filled and sanded, so as the weather is a bit better at the moment, I've masked up the binding and put on a first coat of sealer/primer.
Masked:
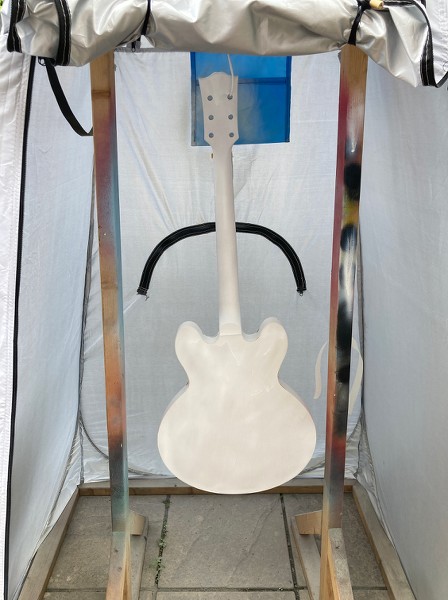
Primed:
You may notice that this year's pop-up toilet tent/spraybooth is white. A much better colour choice than the previous two green/brown camo tents as it stays a lot cooler inside when zipped up after spraying.
The primer/sealer is from a spray can, and it's a bit spluttery and has run in p[laces, but as it will get sanded right back before the blue goes on, I really don't care too much.
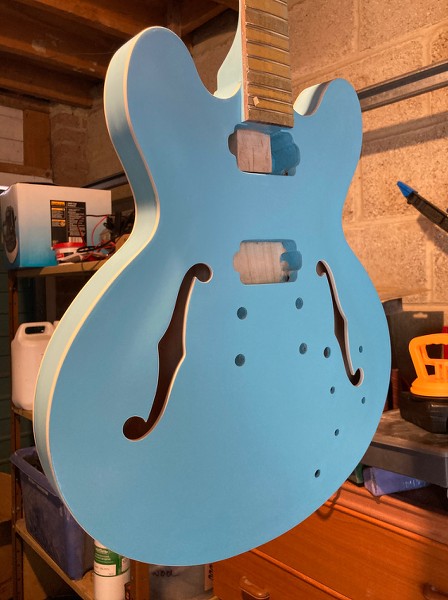
The primer's been sanded down. I'm now waiting for some more Daphne Blue paint to arrive. I thought I had more left than I did, and I don't want to mix different batches, as I'll probably end up with slightly different colours.
The white pigment in the nitro paint settles out a lot more than the blue, so you need to make sure it's thoroughly mixed with no residue at the bottom of the tin/bottle. I've failed to do that before, and then sanded through from a lighter blue to a darker blue layer when levelling the finish, requiring more layers to be sprayed to get a consistent colour.
First coat of blue just gone on. Weather has been rather windy and showery for a while.
The headstock face will be black, but no harm putting some more paint underneath that which I can sand flat before applying the black. It's about the one truly flat surface on the guitar, so might as well get it as flat as possible.
Well, I pulled off the masking tape from the binding and I think I overdid the paint thickness around the edges as it pulled some of the paint off with it, displaying thin streaks of the white primer (probably shouldn't have used the primer). Spent a bit of time scraping the binding where some spray had crept underneath, then touching up the edges with a paintbrush. With the thick striped binding it is very difficult to get a decent edge with paint that looks even, so I finally thought 'sod this', and decided to paint over the binding again and just scrape away to display the white edge before the black/white striping to give a more 335 look to the binding. So a more authentic look and generally easier to achieve. Just need to put enough layers on so I can feather in the paint edges and remove the line currently there due to the different numbers of paint layers.
Just wished I'd thought of it before I put the masking tape on and sprayed it!
Lots of touching up round the edges to hide the binding, sanding back, then a bit more touching up. Need to let the paint dry for a couple of days before each sanding so it's hard enough to sand properly. I think I should be there after today's touch-up stint, but it's so easy to sand it a bit too much and have to get the paint out again. Sanding is with a maroon Scotchbrite pad, so it's more gentle than normal sandpaper, if a bit more work.
Quite slow progress on this, mainly due to the weather, But I've been hand painting around the binding to cover it up on the top then sanding back after a few days after the paint has hardened enough, and then painting some more as I sanded through in my attempt to get the finish level around the edges, so repeat that x 2.
Today I scraped the bindings clean, and have just done a little bit of touching up in a couple of places where the scraping revealed a bit of primer or the line was a bit jagged, so that needs to dry and the final scrape applied. The paint is otherwise pretty much fully flattened and rubbed down with a maroon Scotchbrite pad.
Then the headstock face needs the logo backing applying and then painting black, before the clear goes on.
Not too far to actually do now. Just a matter of time and hoping the weather stays dry.

Thats looking very handsome.
Kit builds: JBA-4M | STA-1M | AIB-1Q | TL-1 (in progress)
Side projects: Artist TC59 | Sheoak Dreaming | Spalted Marri Metal | Randy Vs | Sassafrassin' | St. Vincent
Well, the weather turned too soon last year and I never got it finished.
So it was mid-May this year when I got round to getting a new spray tent (the old one got left out in a storm and ripped to shreds) and fired up the spray gun again. The binding edges were proving impossible to get properly even/straight by scraping, touch-up painting and re-scraping, so I decided that it would have to do as I couldn't face another round of painting the binding white and then re-spraying the blue, so the minor imperfections stayed, as my friend Mark, who I was building it for, much preferred a slightly imperfect guitar rather than one that took another year to build. I must say that since I put the clear on and polished it, I don't notice the slightly wavy edges unless I look for them.
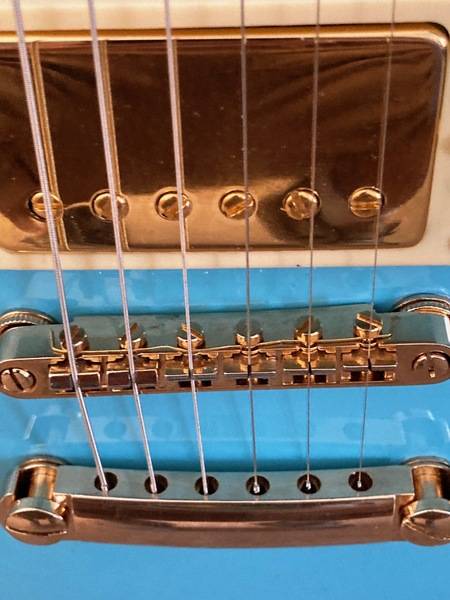
So then it was down fitting the hardware and setting up the guitar. My optimism for the neck angle being right on this ES-1 was unfounded, and the neck angle was too shallow. Had Mark chosen chrome hardware, I would have fitted a Lowrider bridge, which would have got around the problem, but they don't do them in gold, so it was a case of trying to modify the kit bridge to make it work.
I filed the undersides of the bridge ends so that it sat just very slightly off the body, and then used my nut files slot the saddles, by between 2-3mm. As I took over 1mm off the base of the bridge, the bridge would have been over 4mm too high without remedial action. When setting the intonation, it became clear that the bridge position was a couple of mm too far back, as the intonation with the saddles right forward is between 1-3 cents out. Not the end of the world, but still annoying.
I don't like having the saddle slots, but it worked, and the guitar now has a good low action.
I replaced the kit electronics with CTS pots, a PureTone output jack and a lever-style selector switch. Pickups are Tonerider Alnico IVs. The pots went in and out several times as something kept breaking each time, but 4th time lucky (plus replacement tone caps).
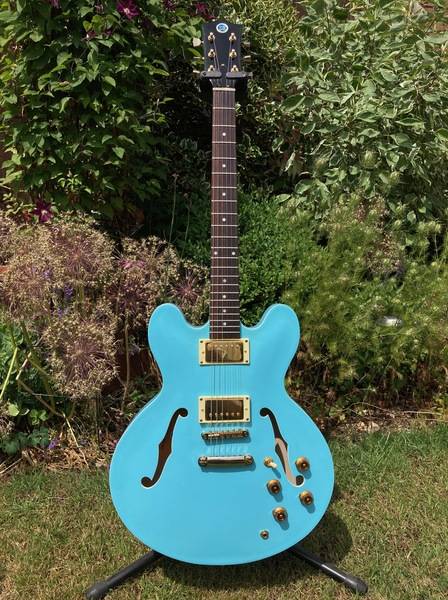
So it's now all done and set-up.
It's very bright and jangly, not quite how I expected it to sound, but overall I'm happy with it, if not with some of the details.
It will be a couple of weeks before Mark gets it, but I think he'll be happy too.

Looks great Simon. Nice work around with the bridge to get a good action.
PitBull Builds: FVB-4, LP-1SS, FBM-1, AG-2, TB-4, SSCM-1, TLA-1, TL-1TB, STA-1HT, DSCM-1 Truckster, ST-1, STA-1, MBM-1.
Scratch Builds: Pine Explorer, Axe Bass, Mr Scary, Scratchy Tele's.
The little voices in my head keep telling me "build more guitars"
 Posting Permissions

 Reply With Quote