Page 1 of 2 1 2 LastLast
Results 1 to 10 of 17

Thread: SG Junior

  1. #1

    SG Junior

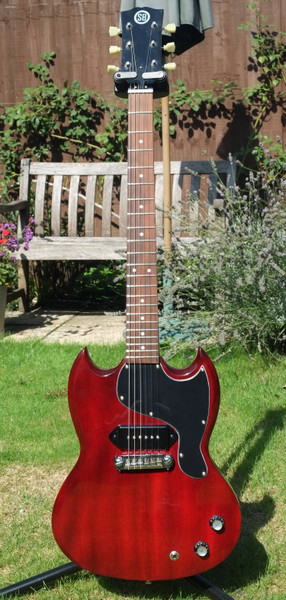
    Started my second build, this time a SG junior kit with the karajini red dingotone finish. I spent some time with a shinto rasp refining the bevels and put on the stain coats - unfortunately the front of the guitar seems to have faded particularly compared with the end-grain. So faded cherry it is

    Had some difficulty with the stain continuing to come off as I moved to the top coat, and based on the feedback from the forum the suggestion was to use Tru-Oil instead. Luckily I still had some from my first build so I've got four coats on the body, and two on the neck (the neck already had two coats of the dingotone neck finish so I'm not sure I'll need to add more). Plan is to go for a matt to slightly satin finish, so when I'm done adding coats on the body it will be a vigorous rub down with 0000 steel wool, t-shirt and maybe some printer paper. Then a quick buff and polish with dingowax.

    Plan for the hardware, I have:

    Martin Smith handwound p90 pickup
    Kluson keystone tuners
    Kluson wraparound bridge - going for old school non-compensated junior goodness
    2 x 500k CTS pots with orange drop .22uf cap
    Vintage braided wire

    Going for an uncomplicated rock guitar
    Attached Thumbnails Attached Thumbnails Click image for larger version. 

Name:	IMG_4861.jpg 
Views:	89 
Size:	300.1 KB 
ID:	42969  
    Last edited by geoffro; 18-04-2022 at 01:16 PM.

  2. #2
    Mentor Trevor Davies's Avatar
    Join Date
    May 2020
    Location
    Perth
    Posts
    1,379
    Hi geoffro.

    I think this will make a great colour - not sure if I would call it cherry!

    Has the red made a huge difference to the (I think) mahogany? It is hard to tell from the picture. In my LP1-SS build (Mahogany body and neck) I added DT Nullarbor Ochre to the back and sides of the body but that did not make much difference!
    PitBull Builds: FVB-4, LP-1SS, FBM-1, AG-2, TB-4, SSCM-1, TLA-1, TL-1TB, STA-1HT, DSCM-1 Truckster, ST-1, STA-1, MBM-1.

    Scratch Builds: Pine Explorer, Axe Bass, Mr Scary, Scratchy Tele's.

    The little voices in my head keep telling me "build more guitars"

  3. #3
    Hi Trevor,
    Yeah initially the Karijini red was very dark cherry coloured - you can really see the difference in the end-grain of the horns. And yes it’s mahogany and there was definitely a difference when I first applied the stain coats.

  4. #4
    Testing out headstock logo. Now just waiting on my transfer paper to arrive from the brazilian rainforest...
    Attached Thumbnails Attached Thumbnails Click image for larger version. 

Name:	IMG_4865.jpg 
Views:	73 
Size:	83.0 KB 
ID:	42970  

  5. #5
    GAStronomist Simon Barden's Avatar
    Join Date
    Oct 2016
    Location
    Reading, UK
    Posts
    10,547
    Is this a GSJ kit, or another one (can't see an SG Jr on the PB shop web site ATM)? My GSJ had symmetrical horns, which yours doesn't seem to have. Is this down to your rasp or was the kit like that?


    My only comment on your hardware choice is the bridge. There is no angle on the post holes, which is authentic as far as I can see, but obviously provides intonation issues if you are using a flat-topped wraparound bridge. The first SG Jrs (61-62) had a simple wrapover bridge, but the post holes were staggered, so gave an acoustic guitar level of intonation compensation (although the adjustable screws at the rear of the bridge gave a bit more adjustment). From 63 to 65 they had a compensated (fixed casting) wraparound with no angle on the bridge.

    So if you want it to be playable, I'd seriously suggest a rethink on the bridge choice, or else be prepared to plug the existing post holes and redrill so it sits at an angle.

  6. #6
    Hi Simon.
    That is a nice looking guitar and the colour I was shooting for! But I’m liking the faded look more and more.

    Regarding the kit. I think it was old stock and/or discontinued as I contacted pitbull and was offered this.

    It may not show in the pics but I’ve already plugged the bridge holes and was actually marking out the new locations last night based on some advice I found in the mylespaul forum. It is angled with both holes slightly further back than the nominal scale length.

    I’ve also considered if I really can’t get it to intonate to my satisfaction then I’ll either get a mojo tone (I think that’s the brand) or grind a split intonation line into my bridge.

  7. #7
    GAStronomist Simon Barden's Avatar
    Join Date
    Oct 2016
    Location
    Reading, UK
    Posts
    10,547
    Great news.

    It's difficult to know what peoples levels of knowledge are on these things, so I'd much prefer to point things out than leave something unsaid that could lead to problems down the line.

    I can see that your kit is a bit different to mine, as the neck is inset into the body further and the pickup and tailpiece are set further towards the rear of the body as a result.

  8. #8
    Thanks Simon appreciate the guidance, there are things I’ve over researched and other I’m sure I’m terribly out of knowledge on.

    Also yes your neck is what I was looking for but mine is what was available.

  9. #9
    Well I've been struck, unfortunately not thunderstruck but struck with disaster.

    Man what a tale of woe that I have to tell, I had marked the locations of the new bridge holes, used a straight edge to check that the strings would pass over the pickup poles, yet somehow I managed to completely screw it up so badly the low E string was off the fretboard by the 17th fret in the process managing to put a few dings in my lovely finish.

    To make matters worse, trying to drill the earth hole to the new hole I popped the screw out through the top. And then managed to snap the drill bit in the hole and can't get it out I had also seen people of the 'tube use a small bolt to help pop out the bridge bushing, but it apparently wasn't big enough so I ended up with it getting stuck down there. I managed to pop them using a claw hammer and lots of padding on the body and bridge pin.

    So I've plugged the holes up, trying this time to use long grain instead of end-grain (from the dowel) to see if I can make the plugs disappear better! Oh and I also managed to chip some of the plug off the bass side when flattening it, so have tried to make a sawdust and PVA filler.

    Wall meet my forehead, multiple times with some force!

    Plan is sand back the front, reapply the dingotone stain coat to see if I can hide the patches, possibly even covering the existing dowel plugs with a small long grain plug. And then I've been toying with the idea of a home made finish similar to tru oil (1/3 poly, 1/3 boiled linseed, 1/3 metho) or maybe just buy another small bottle of tru-oil.
    Attached Thumbnails Attached Thumbnails Click image for larger version. 

Name:	IMG_4905.jpg 
Views:	72 
Size:	64.0 KB 
ID:	43011  

  10. #10
    GAStronomist Simon Barden's Avatar
    Join Date
    Oct 2016
    Location
    Reading, UK
    Posts
    10,547
    Ouch indeed!

    I feel for you. Been there quite a few times.

    There's always the solid colour option if all else fails.

    With the bridge at an angle, the strings will come off the top of it further to the right (looking at it as per the photo above) than the string holes in the bridge, so you really need to check using string from the bridge up to the headstock, and then mark the bridge position using the mounting screw cutouts.

Page 1 of 2 1 2 LastLast

Posting Permissions

  • You may not post new threads
  • You may not post replies
  • You may not post attachments
  • You may not edit your posts
  •