Headstock look fantastic!


Headstock look fantastic!
#001 (LP-1S) [finished - co-runner up Nov 2018 GOTM]
#002 (WL-1)
#003 (MPL Megacaster - semi scratch build) [finished]
#004 (ST-1 JR - Arachnoid Superhero build) [finished]
#005 (LP jr)
#006 (TL-1A)
Junk shop acoustic refurbs (various)
'The TGS Special'
Added a bit of ink to headstock.

Completed Builds
#7 FS-1
#6 FV-1G
#5 ATL 1SB Thinline
#4 ST1-Jnr
# 3 JBA-4
# 2 LP-1S
# 1 TLA-1R
Success ! (?)
Managed to keep flamed cap in spite of dreadful glue patches.
It was a disaster in blue. There was glue in the flamed maple cap. So the dye would not penetrate. Using the idea that ink sits on a surface, and on a previous build highlighted the grain very well - I decided to give it a try with the tiny sliver if cap left. It seems to have worked !
I still have flame and the glue spots seem hidden very well at this stage.
Have burnished with newspaper and I reckon it should look good under some nitro.

Last edited by DJP; 14-05-2022 at 06:33 PM.
Completed Builds
#7 FS-1
#6 FV-1G
#5 ATL 1SB Thinline
#4 ST1-Jnr
# 3 JBA-4
# 2 LP-1S
# 1 TLA-1R
And another shot. I am so pleased.

Completed Builds
#7 FS-1
#6 FV-1G
#5 ATL 1SB Thinline
#4 ST1-Jnr
# 3 JBA-4
# 2 LP-1S
# 1 TLA-1R
With a few clear coats.
More needed - but its already getting there.

Completed Builds
#7 FS-1
#6 FV-1G
#5 ATL 1SB Thinline
#4 ST1-Jnr
# 3 JBA-4
# 2 LP-1S
# 1 TLA-1R

It's certainly getting there. Looking good. Just got to keep going!
Thanks Simon.
I thinks the finish will turn out ok after all.
Top is now glassy.
I have had to re-coat the back though - I had sprayed and flattened most of it a few weeks back, but noticed a few hairline cracks in the nitro finish - water got through when finishing sanding it with fine grits today and caused some swelling. So I've had to re-spray the back. Should work out though.
Neck and headstock pretty much polished up and finished - now just need to panick about fixing in my first set neck.
Completed Builds
#7 FS-1
#6 FV-1G
#5 ATL 1SB Thinline
#4 ST1-Jnr
# 3 JBA-4
# 2 LP-1S
# 1 TLA-1R
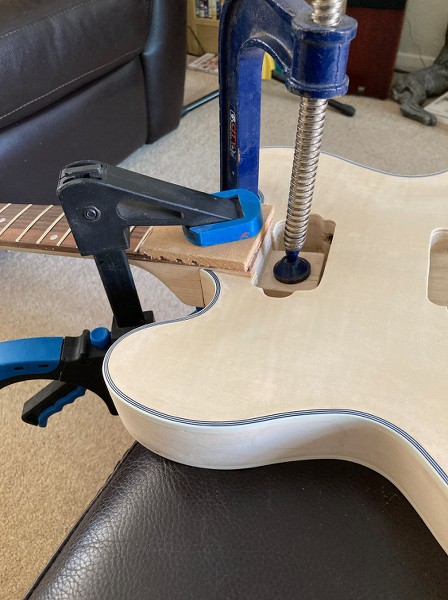
Fixing it is easy. Just glue and clamp!
I'd use one clamp for the end of the fretboard, and one for the tenon.
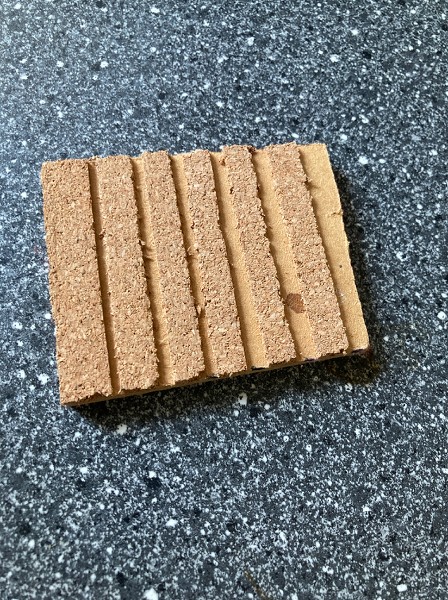
Don't forget to use some wood cauls to protect the finish. You don't want to clamp directly to the guitar. I made up a fretboard clamping caul from a bit of MDF and a self-adhesive cork tile cut into strips. It's better if you can clamp on the fretboard wood rather than the frets, as applying pressure in the middle of the frets does try and lift the ends of the frets out.
I used more self-adhesive cork (bought from Amazon and designed for the back of drinks coasters) on other bits of MDF for more clamping cauls that shouldn't mark the finish.
That cork is a very good idea. I had seen someone recommend using some wood to avoid clamping the frets ad the finish - but this will add a whole extra layer of protection. I'm sure I have a cork tile somewhere and I will definitely make up a piece like yours. There is no tennon on the neck of the FS kit - so I will need to be really careful measuring and setting the neck in position. (needed to do that carefully to mask off the neck before finishing - so am part way there).
Completed Builds
#7 FS-1
#6 FV-1G
#5 ATL 1SB Thinline
#4 ST1-Jnr
# 3 JBA-4
# 2 LP-1S
# 1 TLA-1R
I have an unused pack of cork placemats somewhere that would do the job nicely, by cutting & glueing varied width strips on a wood block @ fret spacing offsets. Another WDITOT moment!Originally Posted by DJP

Peter
Ashton AB-1505
Ibanez Musician
PBG HB-4 The Hobbit
Godin A5 Ultra SA (fretless)
fEARful 15/6/1-tube with True3way X-over
Ampeg PF-500
 Posting Permissions

 Reply With Quote