I like the 2 tone wood finish with the fluoro strings.


I like the 2 tone wood finish with the fluoro strings.
PitBull Builds: FVB-4, LP-1SS, FBM-1, AG-2, TB-4, SSCM-1, TLA-1, TL-1TB, STA-1HT, DSCM-1 Truckster, ST-1, STA-1, MBM-1.
Scratch Builds: Pine Explorer, Axe Bass, Mr Scary, Scratchy Tele's.
The little voices in my head keep telling me "build more guitars"


Hey there campers, time for an update. I tried having someone at the men's shed do the flying bass clef dragon logo in some thin timber with the small CNC router, but it did not go well... the feed speed looked to fast to me and I suspect the bit was blunt.. I could see the bit chattering. After browsing Amazon and a a lot of humming and haring (I didn't want to spend the money)I coughed up for a Cricut Maker which was old stock and going for cheap. The upshot is that I decided to go the Trevor's suggested route and use paint.
Obviously since it's a KISS inspired instrument I felt compelled to put the Black Sabbath logo on there........I wasn't too worried about the bumpy first coat of clear over the old , sanded clear, but what did bother me was this:
Sadly there was some marking from the stencil film that I thought would disapear with the clear... it didn't
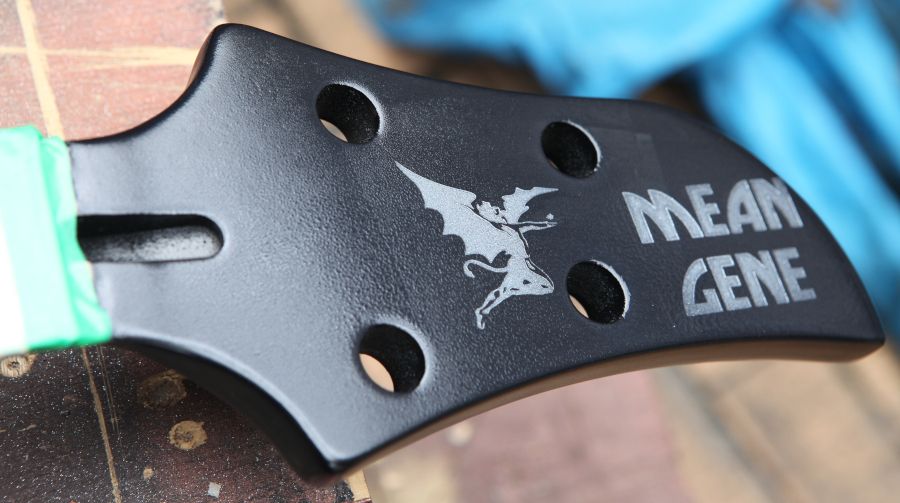
Looks like I'm gunna have to sand it back to the clear under the logos. I've already did another stencil, this time on a larger piece of vinyl with the lettering and logo on the same piece so it will mask the whole headstock in one hit. The realy tricky bit is weeding the stencil and then removal of the stencil after spraying. I used a medium flake silver called Sparkalecent Bada Bling Silver. It's kinda translucent , so you have to build up thin coats , but also be aware that what it looks like in just the black background is different to when the stencil is there. The temptation is to add more coats than you need and that just builds up an edge that would require more coats of clear to bury. I'm happy with the effect so the next time round should hopefully work out.
Hi Rabbit,
The logo looks great. There is good detail in the image. Shame about the film leaving a mark.
Some thoughts (probably silly)
Was the film the temporary vinyl? Would a few coats of clear cover the marks?
Did you try making a cricut stencil of your Dragon Logo?
What about using permanent silver (Shimmer!) vinyl to make your logo - and then try to bury that under a few clear coats?
PitBull Builds: FVB-4, LP-1SS, FBM-1, AG-2, TB-4, SSCM-1, TLA-1, TL-1TB, STA-1HT, DSCM-1 Truckster, ST-1, STA-1, MBM-1.
Scratch Builds: Pine Explorer, Axe Bass, Mr Scary, Scratchy Tele's.
The little voices in my head keep telling me "build more guitars"
I used Cricut stencil vinyl. I found that I had to change the pressure to "more" because the default wasn't reliably cutting through the vinyl thickness.If one coat of clear doesn't make it disapear, additional coats won't either. I use a water based clear, so maybe a solvent based clear would have disolved whatever it was ... although I suspect what happened was that the removal of the vinyl actually cleaned the sanded clear that was the substrate for the paint. I did use a tack cloth to remove any sanding dust, but I should have probably used a post sanding cleaner.Originally Posted by Trevor Davies

Yeh, I gave it a shot and discovered that it didn't cut the dots. I should have "welded" them before going to "make it". In the end I decided I liked the irony of using another band's logo for a KISS bass. <shrug> I'm using Geezer Butler pups ... I was going to use Steve Harris flats.
Too many coats of clear would be needed.

All good to know Rabbit. I was about to bust into vinyl with the better half's cutter and do a headstock title decal. Will modify my files to do a mask instead that covers the headstock.
Might also do a FrankenLab Logo mask for the body while I'm about it. Thanks for the tips.
FrankenLab
Hand crafting guitars, because Death Rays are expensive.
When you spray the mask, just be sure to use light coats. you will have less of an edge and fewer problems when you remove the mask.
More lessons to teach... mainly what *not* to do. It's been two steps forward, one step back.
Although I only sprayed one thin coat of clear over the logo and lettering, it took a surprising amount of time and effort to sand back to the underlying clear. When I did finally get it all off I discovered I had sanded though to the base coat in one spot. My experience has been rather than hoping a coat of clear will set things right, I decided to spray another coat of base to give a even colour on the front of the headstock. Rather then doing plain black I decided for the front with black pearl. Unfortunately I'm dealing with three different generations of product from the same manufacturer, and each need to be either prepped or sprayed a bit differently. I layed on a couple of coats and got fish eyes. Withe a solvent based base coat that would be due to contamination, but with water bornes it's separation from putting on too much at once. While still wet I was able to wipe it off and try again. Second time was more of the same . Third time I didn't go with a full trigger pull and that gave me just the right atomisation to lay down a few very light coats that dried perfectly flat and even.
More challenges with the stencil. I didn't get it lined up right and it was destroyed when I removed it. Then I discovered that the next one had the stuff upside down... in my mind the headstock was reversed, because I like headstocks that swoop up. I fixed things and tried again, Success!
It was ligned up and after removing the transfer paper it was looking good. To change things up I airbrushed on a coat of silver, then decided to change it up with rainbow mini flakes to give the logo and lettering some sparkle. The flakes were suspended in a clear carrier ... base coat with no pigment. I could not see properly and thought I was applying it fairly light. Instead it was very wet. The upshot was that when I went to remove the stencil , most of that layer came with it, but it left patches behind. So I had to sand it back ...again. I cut another stencil but forgot to tell the machine to use more pressure. Weeding it was a pain. but, I managed.
I sprayed another couple of light coats of base, but since I had discovered there was a heap of pearl sitting on the bottom. I stirred that up and into the base. The upshot was the base is too light in colour.. less of a black pearl and more like a slightly silver graphite. I need to wait for some more clear to arrive so that I can mix up some black candy to spray over the top before I can try again with the stencil.
On the plus side I was able to finish the silver primer on the blade and back of the blade, so tomorrow I should be masking and hitting it with black primer. Once that stage is done I'll post some pics.
Still waiting for the clear carrier for the black candy to arrive, and I wasn't happy with the difficultly I had aligning the headstock stencil using transfer paper (I usually use the stuff to make hand cut stencils) so I ordered some clear transfer vinyl... I just hope it's "medium tack" isn't too hard core for the stencil vinyl and leaves the floating bits of the Black Sabbath logo behind. Supposedly I should have what I need to move forward with the headstock on Monday.
The weather finally gave me a break and decided to hold off till afternoon giving me a window in the morning to mask up the blade and throw the first rounf of primer at the body.... first round because it's mostly to fill the grain. The primer is black enough that I don't think I will bother with smother it in a bunch of black base coat . I may throw in a little blue candy into the primer for the final coat to trick you into thinking it's a deeper black.:
I did get a tiny bit of bleed. Haven't decided if I will in the last stages mask the black and touch up the silver (it's hard to cover black) or do what some of the axes have which is a black soft edge airbrushed around the perimeter of the body.
Looking good!
PitBull Builds: FVB-4, LP-1SS, FBM-1, AG-2, TB-4, SSCM-1, TLA-1, TL-1TB, STA-1HT, DSCM-1 Truckster, ST-1, STA-1, MBM-1.
Scratch Builds: Pine Explorer, Axe Bass, Mr Scary, Scratchy Tele's.
The little voices in my head keep telling me "build more guitars"
 Posting Permissions

 Reply With Quote