Page 5 of 5 FirstFirst ... 3 4 5
Results 41 to 47 of 47

Thread: 3rd Kit- YB-4 Mean Gene

  1. #41
    Whah! Originaly, this post was going to start off with "I think it's a neck", because I was anticipating the headstock would be complete.Yeh, a guy called Murphey and his thice damed laws had something to say about it...

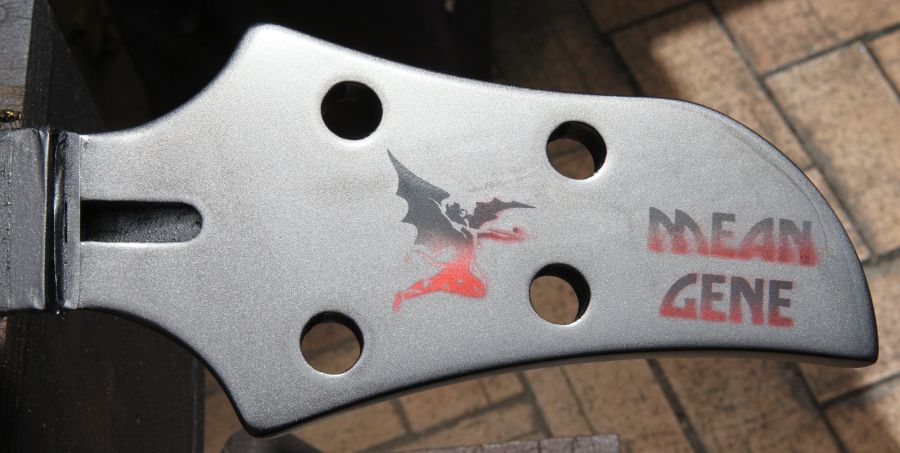
    Ok, so the story. As some of you may recall from previous posts I had sprayed the headstock, but it came out almost silver. The plan was to spray some black candy over the top to darken it, then do the logo and lettering in silver. Plans change. Instead I thought the lighter colour on the face of the headstock might look alright... I'm not making a replica, so it dosen't have to be black. I added some black base coat to the now almost silver pearl to bring it back to black pearl, and used that to do the logo and lettering. The contrast looked good and the prismatic pearl gave it a little pop.......BUT! Yeh, there is always a friggin BUT. In order to help with lining things up I had the holes for the tuners cut out as well. I wasn't happy with this.since I had changed to clear plastic transfer film from paper, I could see what was happening, and had things aliened a little further forward. The upshot was aside from killer looking graphics I also has little crescents towards the front of the headstock because I had forgotten to tape over the holes. Bugger!

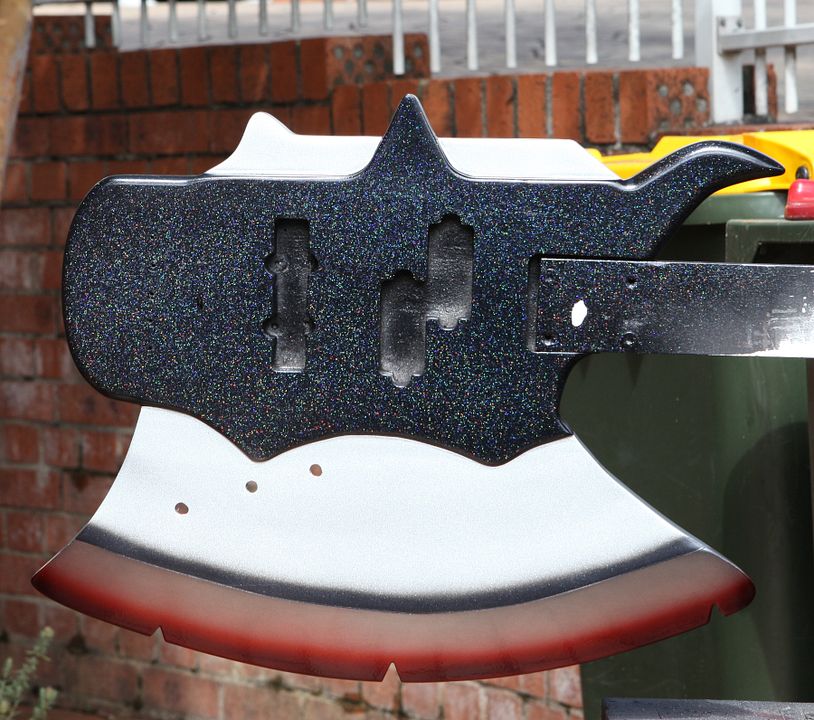
    I had made the black pear black pearl again and there wasn't enough to do the headstock, so I had to come up with a new plan. I discoverd I had some metallic charcoal-viola basecoat. Ok so new plan, sand the front of the headstock back to the underlying clear, base coat in charcoal, and use the black pearl for the lettering. Plans change.....


    And the BUT! The lettering was all nice and crisp...Till I clear coated it. Red candy is notorious for bleed. Added to this is the fact that the clear and the candy is water based further increased the potential for issues. I say potential, because I used the same candy and clear on Dora for the katatna handles and there was no bleed. The problem stems from putting too much clear on too soon between each coat, and not spraying a clear barrier coat, a product available specifically to prevent candy bleed. <sigh> Back to sanding the clear and base and try again later....

  2. #42
    Ok, so I sanded back, got some more stencil vinyl, and decided to have another crack. I managed to destroy yet another stencil when I tried to reposition it, but finaly managed to get it right. Unfortunately, I didn'y take my own advice, didn't spray some clear basecaut first to seal the edges, and ended up with bleed through between some of the letters :

    Click image for larger version. 

Name:	Mean_gene_bleed.jpg 
Views:	72 
Size:	907.9 KB 
ID:	42532

    It looks a little weird because I was able to find the weeded letters and back masked them. I was happywith the way Henry had turned out, it was just the letters and I didn't want to sand and start *again* so I mixed some more of the charcoal base, held a card just off the surface and sprayed some light coats. The card off the edge masks off Henry whilst giving a soft edge that blends in with the previous basecoat. There was a chance that this could go wrong and the two coats didn't match and the edge still stood out. But they didn't. :

    Click image for larger version. 

Name:	Mean_Gene_headstock_cleared.jpg 
Views:	71 
Size:	664.7 KB 
ID:	42533

    I'm waiting for the clear to cure before flat sanding beause there is an edge around Henry. A bi product of my fix for the between letter bleed is that there is no edge on the letters.Because I didn't mask the tuner holes when I sprayed the base coat, the back of the headstock has a light dusting of metallic flake. I didn't think this was a bad thing, so I didn't try removing it before clearing. :

    Click image for larger version. 

Name:	Mean_Gene_Headstock_back.jpg 
Views:	63 
Size:	557.3 KB 
ID:	42534

    I have started on the body. The body is black with no more of the grain peeking through, and the blade is silver. I have a few more details to address with paint and it should be ready for clear in the next week. Stay shiny everyone!

    Edit: Just noticed you will need to click on the pics to get the size I posted... I had to upload them rather than link them.
    Last edited by Rabbit; 06-02-2022 at 11:11 AM.

  3. #43
    Mentor Trevor Davies's Avatar
    Join Date
    May 2020
    Location
    Perth
    Posts
    1,377
    Looks good.
    I'm glad you got it to work.
    PitBull Builds: FVB-4, LP-1SS, FBM-1, AG-2, TB-4, SSCM-1, TLA-1, TL-1TB, STA-1HT, DSCM-1 Truckster, ST-1, STA-1, MBM-1.

    Scratch Builds: Pine Explorer, Axe Bass, Mr Scary, Scratchy Tele's.

    The little voices in my head keep telling me "build more guitars"

  4. #44
    I wanted to do a particular effect on the bevel. The paint has been around for a while by a number of manufactures. One thing they all have in common is they need to be done over a gloss black. This usually involves black base coat with polished catalysed clear coat. Some mobs brought out catalised gloss black . both required you to wait several days to cure before polishing and applying the overcoat. The stuff I used brought out a single stage gloss black specifically for it. But tried as I might I just could not get the stuff to come out glossy without it spitting, no matter what gun I used I kept having to sand smooth . In the end I had to resort to sanding smooth and spraying a coat of single stage gloss clear. Something like this:


    Then I find out that with the merging of the paint into another paint line, the tech sheet says to get the effect I was going for , gloss white was the way to go. even their own videos say gloss black .

    So anyway, I got the body painted and cleared, just need to flat sand and polish.Sorry Trevor, but I just had to show off....


    But credit where credit is due. I have a compressor, semi professional touch up guns, a professional airbrush, professional custom paint and several years experience with custom painting . All Trevor had to work with was a few rattle cans. His axe still turned out alright .
    Last edited by Rabbit; 13-02-2022 at 12:32 PM.

  5. #45
    Mentor Trevor Davies's Avatar
    Join Date
    May 2020
    Location
    Perth
    Posts
    1,377
    "All Trevor had to work with was a few rattle cans. His axe still turned out alright ."

    Hey, I used 5 rattle cans! And it is the best axe I've got!
    PitBull Builds: FVB-4, LP-1SS, FBM-1, AG-2, TB-4, SSCM-1, TLA-1, TL-1TB, STA-1HT, DSCM-1 Truckster, ST-1, STA-1, MBM-1.

    Scratch Builds: Pine Explorer, Axe Bass, Mr Scary, Scratchy Tele's.

    The little voices in my head keep telling me "build more guitars"

  6. #46
    Quote Originally Posted by Trevor Davies View Post
    Hey, I used 5 rattle cans! And it is the best axe I've got!
    hehe sounds like Angus Young when a journalist asked "what do you say to having 13 albums and they all sound the same?" He replied, "It's a dirty lie! We have *14* albums, and they all sound the same!"

  7. #47
    It was an expensive day. My 0.5mm airbrush had never worked properly. I finally figured out it wasn't getting enough air. I pulled the air assembly apart and found out what was restricting the air flow. Unfortunately I dropped the air brush and it landed on the fluid nozzle. So that was buggered up irreparably.

    I sanded through to the bare timber in a couple of places on the neck, and noticed there was a strip on the blade where there must have been something masking a tiny strip in the back of the blade that also need touching up. My 0.3mm Iwata airbrush is kinda my go to brush for tiny touch ups. Given how usefull it has been and how much it would set me back (more than my compressor) to replace , I get fussy about cleaning afterwards. I took the fluid nozzle off and put it on the cap. Without thinking I took the cap and rinsed it gently under the tap. The nozzle went down the drain. I thought being metal and how low the pressure was with the water I thought it might be sitting at the bottom of the elbow connecting the sink to the down pipe. No such luck . *bugger!*.

    After uttering a string of curses, I proceeded to hunt for the best price for replacement nozzles for the two brushes. I was horrified how much even the cheapest prices were! Luckily to keep me going it turned out that the nozzle for a different 0.3mm brush I had just happened to have the same thread. Didn't even know it it was going to work. If anything the brush was spraying better. Let that be a lesson for all the young players (yeh, I'm channelling Rex Hunt). Pay attention to your small parts! Should be sanding and buffing soon.

Page 5 of 5 FirstFirst ... 3 4 5

Posting Permissions

  • You may not post new threads
  • You may not post replies
  • You may not post attachments
  • You may not edit your posts
  •