Page 1 of 3 1 2 3 LastLast
Results 1 to 10 of 29

Thread: September GOTM

  1. #1
    Moderator Brendan's Avatar
    Join Date
    Apr 2013
    Location
    Perth, WA
    Posts
    3,444

    September GOTM

    September Guitar of the Month (for Guitars and Basses finished in August)

    Enter your finished guitar or bass here to be judged for the Pit Bull Guitars September Guitar of the Month.

    Please remember:

    For Guitars or Basses finished on (or before) the end of August.

    One guitar/bass per member per month.
    It must be a Pit Bull Guitars kit (mods and upgrades acceptable).
    Guitar or Bass must be finished and playable.

    We need at least 4 photos:
    · full guitar shot from the front;
    · close up of the body finish;
    · shot of the back of the guitar; and
    · close up of the headstock (please, no brand name logos)


    Please post your photos in this thread. If you are having issues posting photos on the forum, please email them to brendan (at) pitbullguitars (dot) com

    Please note: This competition is open to amateur guitar builders only. If you are making and selling guitars for profit, you are ineligible. Also while there are some stunning guitars around - you never know what the judges are looking for, so we encourage anyone who's built a Pitbull during the month to enter!

    Competition for September closes at the end of August (Perth Western Australian time).

    The sorts of things we judge on include:
    · How well have the body and neck been prepared
    · Is the choice of finish for the style of guitar appropriate
    · How well has the finish been applied
    · How well has all the hardware, pickups, etc, been installed
    · Does it have the 'Wow Factor'· Which guitar would you make a beeline for in a guitar shop. That is, which one would you most like to take home.

    BTW - remember that the winner is invited to be a guest judge the following month!

  2. #2
    GAStronomist Simon Barden's Avatar
    Join Date
    Oct 2016
    Location
    Reading, UK
    Posts
    10,547
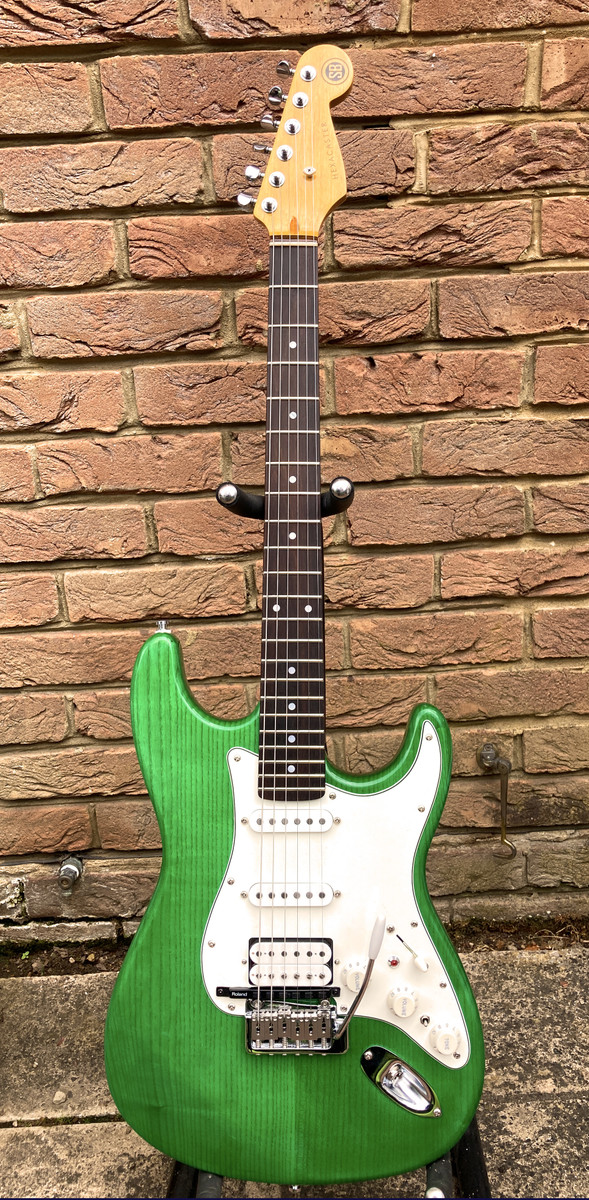
    Here is my GST-1, hereafter described as the Hexacaster.

    This is a build of a GST-1 kit for a friend of mine, Steve, who's very into MIDI guitars and plays them live in a prog band. He wanted another guitar equipped with a MIDI pickup with internal controls as a backup guitar, in case his main MIDI guitar broke a string etc. I wasn't keen on trying to mod one of his existing guitars, so I said it would be much easier to build one from a kit, hence the GST-1 with a Roland GK-KIT-GK3 installed, and named 'Hexacaster' named after the hex pickup fitted.

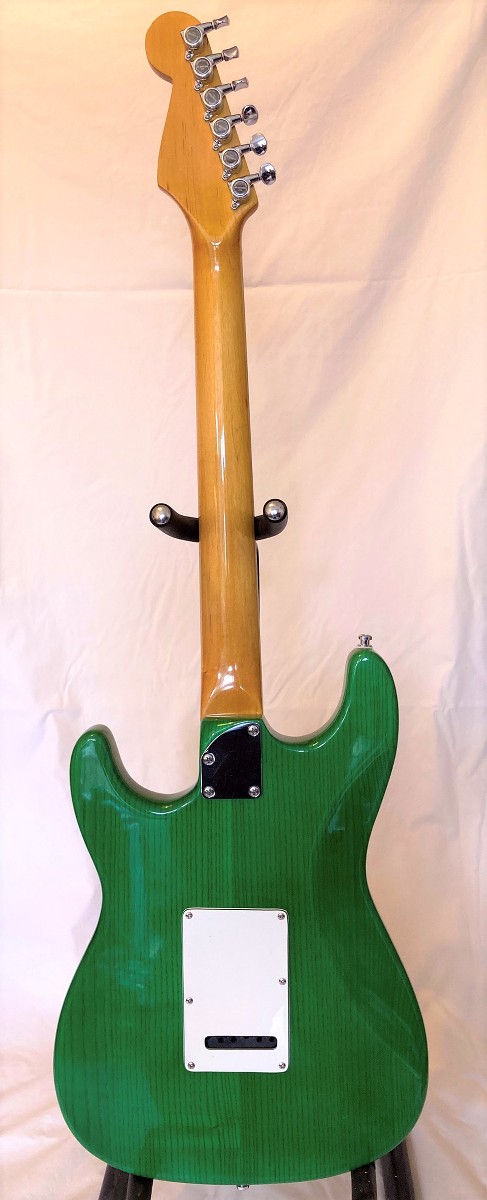
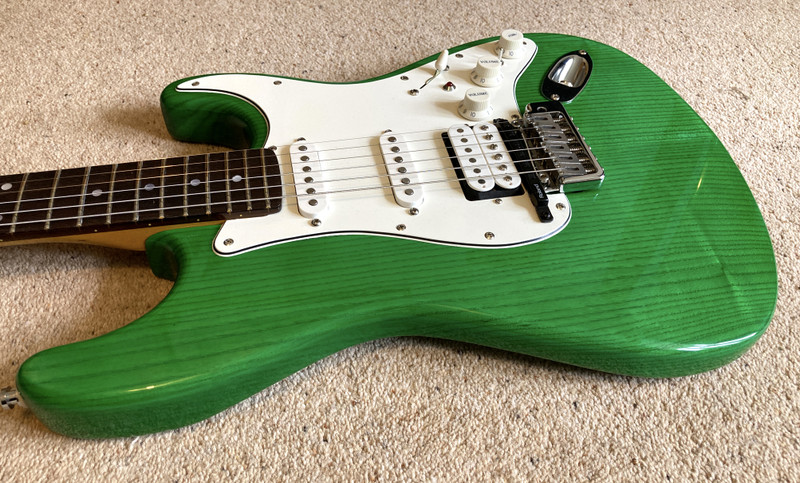
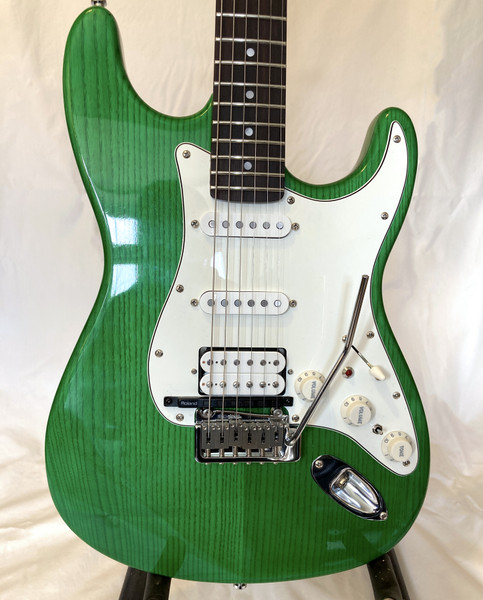
    It's finished in sprayed nitro, with a slight amber tint neck lacquer with clear lacquer over that, with the body being finished in an emerald green tinted clear lacquer, with clear over the top of that.

    Basic front and back pictures:


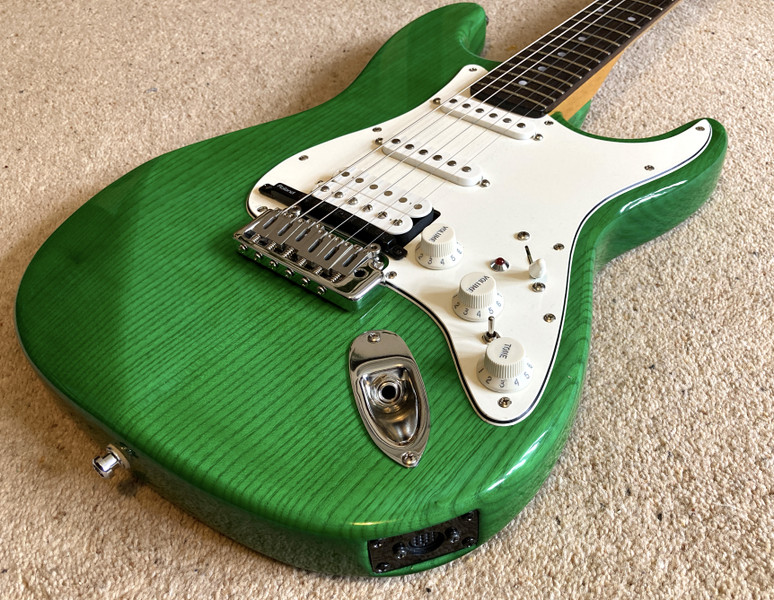
    Side view showing the 13-pin GK connector. The 13 wires carry the six individual hex pickup outputs, the standard guitar signal, power and various control signals, to/from the guitar synth unit. The standard guitar jack can be used, and it has a switching jack to disconnect the guitar signal from the GK unit if the guitar is being used just as a guitar, to stop the input impedance of the GK board from loading the pickups and dulling the sound slightly:


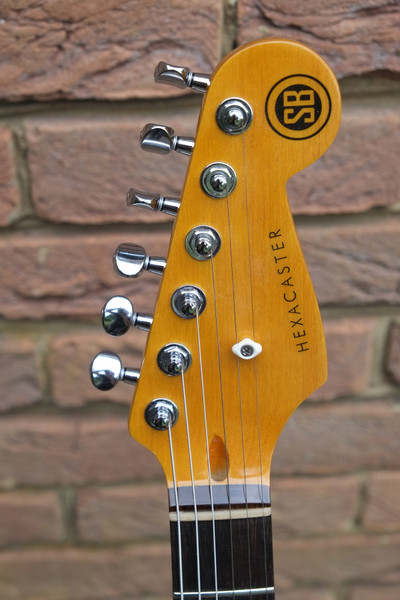
    The Hexacaster headstock. Graphtech string tree and camel bone nut:


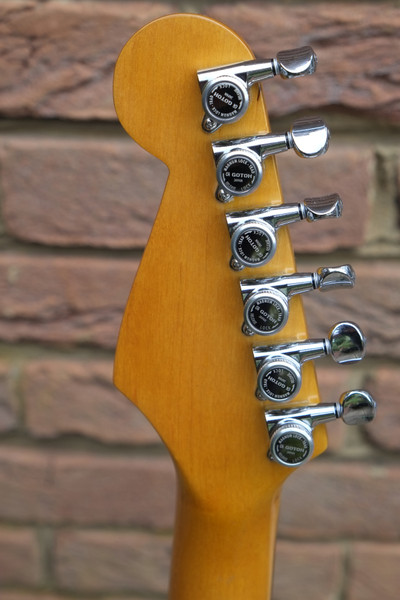
    Rear of the headstock showing the Gotoh SG381 locking tuners. These have a great 16:1 gear ratio:


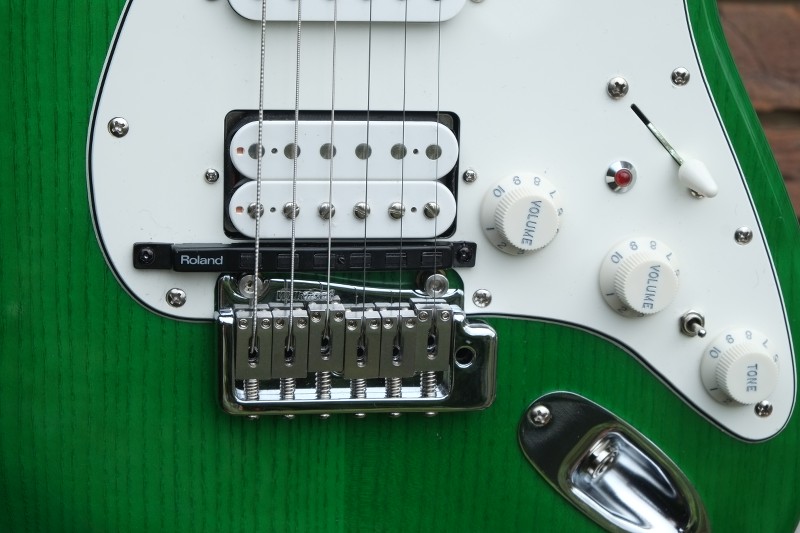
    Now for all the interesting bits. Two Bare Knuckle True Grit Boot Camp single coils and a Tonerider Rocksong bridge humbucker. The Roland GK hex pickup. Two volume knobs and a standard passive tone control. It's quite a bright guitar, with the Rocksong a good fit for the two medium-hot BKs, with not a huge jump in output or difference in tone when switching from single coils to the humbucker.

    The volume nearest the humbucker is a 500k Bourns audio taper push/pull switched pot, with the switching splitting the bridge humbucker. There is a treble bleed (cap and resistor in series) wired across the volume pot.

    The middle knob is the GK synth volume (50k linear), which sends a variable output signal to the synth unit, and doesn't lower the hex pickup signal at all.

    The common tone control (on all pickups) is a 250k Bourns audio taper push/pull switched pot, with the 'up' position swapping from GK + guitar to GK signal only out on the 13-pin connector. The tone capacitor is a 0.022uF orange drop.


    The LED shows the GK preamp board inside the guitar is receiving power from the synth and reassure the user that they have plugged the lead in and it hasn't fallen out. The mini toggle switch is a sprung-loaded-to-centre momentary contact switch, and sends out signals that can be set up in the synth controller to do things like increase/decrease patch selection values or turn effects on and off, though it does depend on the synth controller as to what it can be programmed to do. On some older Roland/Boss modules, the function is fixed.

    The CRL 5-way switch has one side dedicated to the pickup selection, whilst the other brings in a 470k resistor in parallel with the volume pot when either of the two single coils are selected.

    The bridge is a two-point Wilkinson trem, with steel saddles and a steel block. There is both the standard-sized trem arm and a reduced-sized trem arm à la Gilmour, you can see both fitted in various photos.

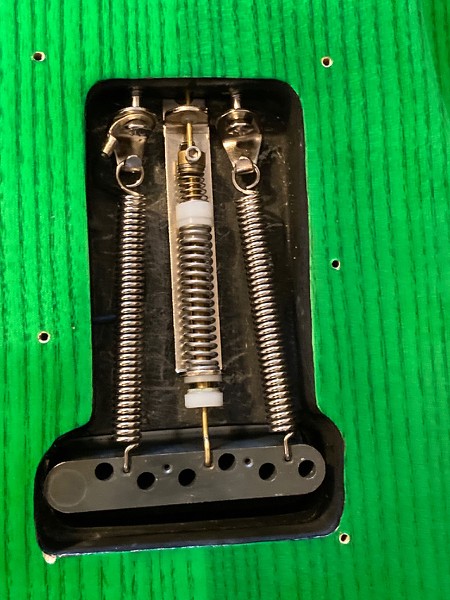
    In the trem cavity are two springs and a Hipshot Tremsetter unit, which keeps the trem remarkably stable and under control. The cavities are graphite paint shielded, and this was carried over into the trem cavity for neatness:


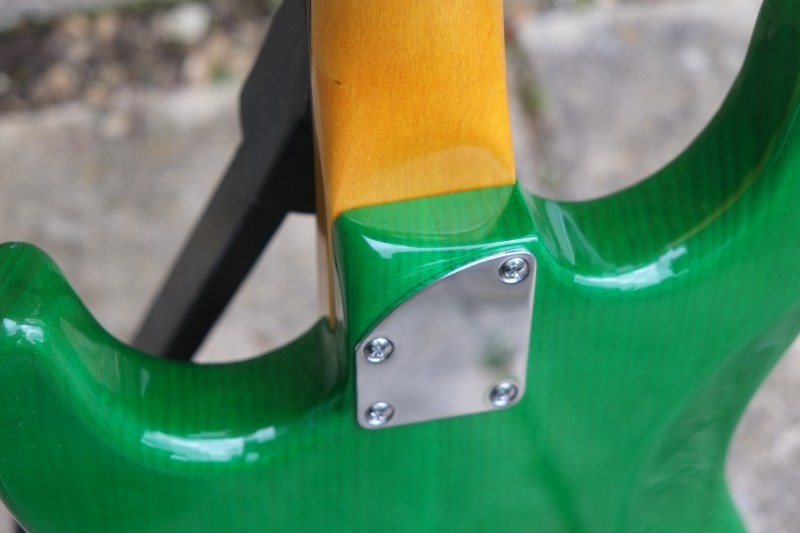
    The cutaway heel and rounded neck plate. The neck shape was modified so that there was a minimal flat section poking out from the heel joint and a much more gradual transition to the joint:


    A player's view of the Hexacaster. You can see the far more gradual neck to heel transition with no step quite well:


    And here is a photo showing the standard trem arm fitted:


    Here's a very rough video showing Steve trying out the guitar on the day he picked it up. He's testing, rather than demonstrating, so note that it's not the most exciting demo in the world. He runs through some synth patches, then some hex pickup processed sounds e.g. nylon string and steel string acoustics) before moving to the straight guitar sounds.

    http://youtu.be/NBjolfF2Kx4

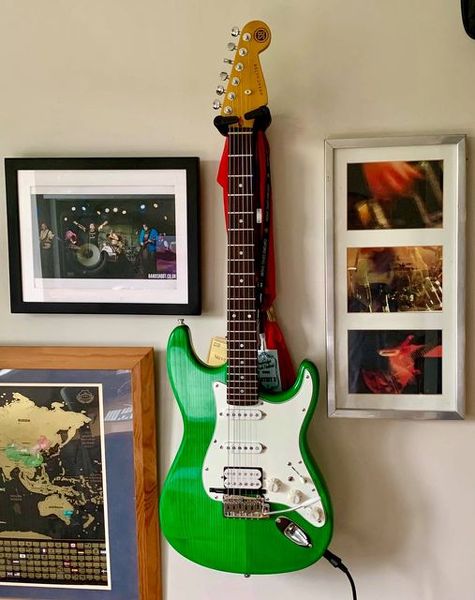
    And to finish off, a photo of it hanging proudly on Steve's wall. Apparently rather than be a backup guitar, it will probably replace his Brian Moore as his main MIDI guitar. Which is nice :


  3. Liked by: jmax, PJSprog

  4. #3
    Mentor blinddrew's Avatar
    Join Date
    Apr 2018
    Location
    York, Uk
    Posts
    1,122
    That is an awesome piece of work! From every perspective.

  5. #4
    Member PJSprog's Avatar
    Join Date
    Dec 2018
    Location
    Trenton, Illinois, USA
    Posts
    230
    Nice work, Simon. Definitely not your average kit guitar with upgrades.
    What Did You Play Today? ~PJS~

    Build #1) KH-1 - November 2019 GOTM

  6. #5
    Mentor Andyxlh's Avatar
    Join Date
    Nov 2016
    Location
    Sydney
    Posts
    1,206
    OK here's my shot, I don't seem to be able to upload better quality photos, am I the only one that struggles to get pics uploaded?
    It's a TL-A with a rosewood fretboard
    Most of the guitar parts are from the kit, pickups, bridge and machine heads.
    5V, 6W stereo amp, $5 from eBay
    Built in Toneworks Pandora PX2 that was given to me years ago with a dodgy input and output jack.
    5V phone backup battery under the scratchplate, dropped to 3V for the Pandora. 2x 40W ultra slim speakers from a caravan
    Here's a short video of a sound demo using the onboard amp and speakers (apologies for the playing )

    https://www.youtube.com/watch?v=PM02fk-JuKo

    The output jack still functions, so the effects can be played through an external amp with or without the onboard amp and speakers operating
    The control panel works in the standard way with the pickup selector and the vol/tone, the third knob is for the amp(it's off a Marshall amp) and works as vol/on. The small switch next to the Marshall knob turns the Pandora on and off
    There's a miniUSB input for charging and a 3.5mm jack for input to play along with music (pics below)
    It's super-useful to pick up and have a quick play without faffing around with cables and amps. The battery seems to last ages, I have not run it flat yet! It is fairly big physically, I didn't note the claimed energy storage as most of the time they are fairly fantastical!
    Click image for larger version. 

Name:	guitar (3).jpg 
Views:	170 
Size:	201.9 KB 
ID:	41404
    Click image for larger version. 

Name:	PX2 (2).jpg 
Views:	154 
Size:	120.4 KB 
ID:	41405
    Click image for larger version. 

Name:	Body front (2).jpg 
Views:	155 
Size:	155.2 KB 
ID:	41406
    Click image for larger version. 

Name:	Headstock back (2).jpg 
Views:	163 
Size:	167.8 KB 
ID:	41408
    Click image for larger version. 

Name:	charging (2).jpg 
Views:	132 
Size:	87.8 KB 
ID:	41486
    I'll pop in some more photos below of the wiring
    Last edited by Andyxlh; 05-09-2021 at 06:17 PM.

  7. #6
    Mentor Andyxlh's Avatar
    Join Date
    Nov 2016
    Location
    Sydney
    Posts
    1,206
    Here's a few more:
    Click image for larger version. 

Name:	Headstock front (2).jpg 
Views:	138 
Size:	168.6 KB 
ID:	41409
    Click image for larger version. 

Name:	body neck (2).jpg 
Views:	148 
Size:	316.4 KB 
ID:	41410
    Click image for larger version. 

Name:	wiring.jpg 
Views:	154 
Size:	845.5 KB 
ID:	41411
    Click image for larger version. 

Name:	finishing wiring.jpg 
Views:	157 
Size:	835.6 KB 
ID:	41412
    The paint is a Rustoleum white primer and surf blue with a wash of oak Feast Watson stain thinned with Meths to turn it to a green from blue, with a light sand with fine paper to age it.
    It is a bit heavier than a standard TL, because of the weight of the speakers (although as you can see I removed a lot of Ash!)
    There's the standard output jack, that allows the use of the onboard effects through an external amp, a mini USB port for charging the onboard battery and a 3.5mm input to allow me to play along with input music through the onboard speakers:
    Click image for larger version. 

Name:	plugs (2).jpg 
Views:	144 
Size:	189.9 KB 
ID:	41485
    Last edited by Andyxlh; 05-09-2021 at 06:01 PM.

  8. #7
    This is a first build for me, learned a lot! . Upgraded to SD Slash pickups, and orange drop caps. Plays and sounds great!

    Click image for larger version. 

Name:	r20210624_161941.jpg 
Views:	157 
Size:	229.5 KB 
ID:	41455
    Click image for larger version. 

Name:	r20210624_162015.jpg 
Views:	143 
Size:	221.0 KB 
ID:	41456
    Click image for larger version. 

Name:	r20210624_162637.jpg 
Views:	141 
Size:	113.3 KB 
ID:	41457
    Click image for larger version. 

Name:	r20210721_152134.jpg 
Views:	150 
Size:	106.7 KB 
ID:	41458
    Click image for larger version. 

Name:	r20210721_152149.jpg 
Views:	147 
Size:	139.1 KB 
ID:	41459

  9. Liked by: PJSprog

  10. #8
    Moderator Brendan's Avatar
    Join Date
    Apr 2013
    Location
    Perth, WA
    Posts
    3,444
    With only two entries - we'll keep this one open for September and have September / October GOTM.

  11. #9
    Member
    Join Date
    Feb 2021
    Location
    Chile
    Posts
    19
    Hi everybody,
    here's my entry, first build.

    Veintidós - Telemonster (DJT-1)

    Body finish: water based black dye and spray can acrylic varnish
    Neck finish: tru-oil
    Dimarzio ToneZone T bridge pickup
    D`adario auto-trim locking tuners
    Bone nut upgrade
    Custom decals
    Custom neck pickup cavity cover
    Kill switch (pickup selector)
    Alternative knobs
    Round string tree
    The rest of the hardware and circuit is from the kit.

    I enjoyed building this kit and im really happy with the results, plays nice!
    Here's my diary, if anyone want to take a look
    https://www.buildyourownguitar.com.a...ad.php?t=11356

    Click image for larger version. 

Name:	01 IMG_1616.JPG 
Views:	447 
Size:	543.2 KB 
ID:	41515
    Click image for larger version. 

Name:	02 IMG_1618.JPG 
Views:	172 
Size:	482.3 KB 
ID:	41516
    Click image for larger version. 

Name:	06 IMG_1626.JPG 
Views:	157 
Size:	280.9 KB 
ID:	41517
    Click image for larger version. 

Name:	05 IMG_1622.JPG 
Views:	153 
Size:	504.7 KB 
ID:	41518
    Click image for larger version. 

Name:	03 IMG_1624.JPG 
Views:	150 
Size:	328.1 KB 
ID:	41519
    Last edited by Christian_cgs; 08-09-2021 at 06:56 AM.

  12. Liked by: dave.king1

  13. #10
    Member
    Join Date
    Feb 2021
    Location
    Chile
    Posts
    19
    More pics!

    Click image for larger version. 

Name:	07 IMG_1628.JPG 
Views:	141 
Size:	350.6 KB 
ID:	41522
    Click image for larger version. 

Name:	08 IMG_1635.JPG 
Views:	140 
Size:	300.0 KB 
ID:	41523
    Click image for larger version. 

Name:	09 IMG_1636.JPG 
Views:	135 
Size:	378.9 KB 
ID:	41524
    Click image for larger version. 

Name:	04 IMG_7749.JPG 
Views:	143 
Size:	424.5 KB 
ID:	41520
    Click image for larger version. 

Name:	05 a IMG_7746.JPG 
Views:	132 
Size:	465.5 KB 
ID:	41521

Page 1 of 3 1 2 3 LastLast

Posting Permissions

  • You may not post new threads
  • You may not post replies
  • You may not post attachments
  • You may not edit your posts
  •