Page 2 of 5 FirstFirst 1 2 3 4 ... LastLast
Results 11 to 20 of 46

Thread: Build#2 GPB-4 Fretless

  1. #11
    Member
    Join Date
    Aug 2021
    Location
    Blue Mountains NSW
    Posts
    128
    This is absolute gold! thank you so much!

    Not too much, and not too late at all! Mine was just an initial 180 sanding, mostly to get my head around the side scratches.
    I will definitely use the amazing tips you and Trevor kindly shared.

    My test inside the pickup cavity was probably not an ideal way to familiarise with the technique. But between that test and the forum tips I feel definitely more confident.

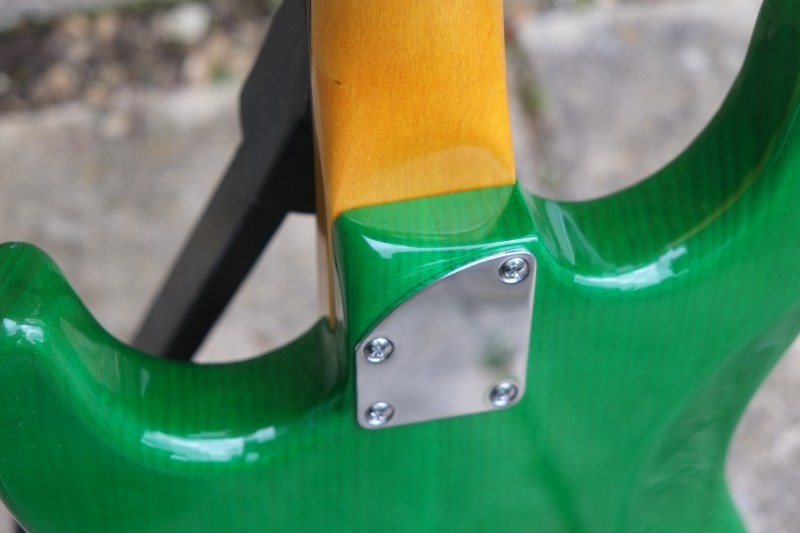
    In the meantime, I have decided to put some work onto the neck plate, modified for better reach of higher notes.
    After trying to purchase the neck plate online (I am thankful to all the delivery persons that have been/are doing an amazing job but the shipping times are very long these days in NSW) I have decided to dust some cobwebs off my angle grinder and mod the neck plate provided with the kit.

    Click image for larger version. 

Name:	01_2021-10-06 16.18.41.jpg 
Views:	113 
Size:	395.7 KB 
ID:	41790

    Click image for larger version. 

Name:	02_2021-10-06 17.10.29.jpg 
Views:	118 
Size:	400.8 KB 
ID:	41791

    Click image for larger version. 

Name:	07_2021-10-06 20.03.40.jpg 
Views:	116 
Size:	338.2 KB 
ID:	41794

    Click image for larger version. 

Name:	05_2021-10-06 20.17.05.jpg 
Views:	124 
Size:	354.4 KB 
ID:	41792

    Click image for larger version. 

Name:	06_2021-10-06 20.17.16.jpg 
Views:	113 
Size:	518.0 KB 
ID:	41793

    Everything seems pretty smooth so far, but I am too tired now to approach that cut on the body. I'll sleep on it and I'll see if I can find some time tomorrow.

    Any tips or heads up before this cut?

  2. #12
    GAStronomist Simon Barden's Avatar
    Join Date
    Oct 2016
    Location
    Reading, UK
    Posts
    10,547
    It's fairly easy, though you can go for the current Fender approach and transition from round to square so the neck keeps the same amount of support but you loose the pointed heel where it matters most.

    I did it on my Hexacaster build using a file and sandpaper.


  3. #13
    Member
    Join Date
    Aug 2021
    Location
    Blue Mountains NSW
    Posts
    128
    Thank you Simon, that looks absolutely stunning!

    The cut I have in mind is more similar to the Fender American Ultra Precision. Although that neck plate seems longer.

    Click image for larger version. 

Name:	10_2021-10-06 20.58.15.jpg 
Views:	116 
Size:	277.4 KB 
ID:	41795

    Click image for larger version. 

Name:	11_2021-10-06 20.56.53.jpg 
Views:	105 
Size:	382.2 KB 
ID:	41796

    Or is it too drastic?

  4. #14
    GAStronomist Simon Barden's Avatar
    Join Date
    Oct 2016
    Location
    Reading, UK
    Posts
    10,547
    The Fender American Ultra definitely uses a longer, 5-screw neck plate. It's similar to a Music-man as well.

    These are the dimensions of a MM plate

    Click image for larger version. 

Name:	neckplate-mm-bass-5hole.jpg 
Views:	114 
Size:	16.3 KB 
ID:	41797

    I know I'd prefer to use something longer for a bass neck (if possible) than a guitar-length plate.

  5. #15
    Overlord of Music McCreed's Avatar
    Join Date
    Oct 2018
    Location
    AUS
    Posts
    3,552
    I did a similar thing as Simon and Fender on one of my strats, except with ferrules instead of a plate.

    This was on a previously finished build and I didn't want to do major surgery, so it was kind of a proof of concept.
    If I was starting with a unfinished body and neck, I would make a couple changes, but this definitely accomplishes what I wanted.
    Makes higher access easier and more comfortable.

    Click image for larger version. 

Name:	Modded neck join 675x900.jpg 
Views:	112 
Size:	186.4 KB 
ID:	41798
    Making the world a better place; one guitar at a time...

  6. #16
    Member
    Join Date
    Aug 2021
    Location
    Blue Mountains NSW
    Posts
    128
    Thank you so much Simon and McCreed for the suggestions and for the photos & measurements!

  7. #17
    Member
    Join Date
    Aug 2021
    Location
    Blue Mountains NSW
    Posts
    128
    Some updates on this project...

    After taking some time to think and to research, I have decided to go ahead with cutting the neck pocket for better reach of high notes.
    I am very happy the way it feels and the way it looks.

    Click image for larger version. 

Name:	01_cut 2021-10-08 17.46.21.jpg 
Views:	116 
Size:	682.8 KB 
ID:	41849

    Click image for larger version. 

Name:	02_cut 2021-10-08 17.45.40.jpg 
Views:	112 
Size:	456.3 KB 
ID:	41850

    Click image for larger version. 

Name:	03_ cut 2021-10-08 17.45.47.jpg 
Views:	115 
Size:	408.7 KB 
ID:	41851

  8. #18
    Member
    Join Date
    Aug 2021
    Location
    Blue Mountains NSW
    Posts
    128
    After that I reshaped the neck, to match that curve.

    It felt a bit strange to have and ergonomic cut on the body, but having the neck still following a sort of "rectangular" shape.
    I don't have a rasp, I have used a metal file wrapped in sandpaper 40 grit and it did job for removing the bulk of the material and getting me close to the shape I wanted.

    The rest was done by hand going up to 220 grit.

    Click image for larger version. 

Name:	11_neck 2021-10-09 14.14.49.jpg 
Views:	113 
Size:	284.2 KB 
ID:	41852

    Click image for larger version. 

Name:	12_neck 2021-10-09 14.19.06.jpg 
Views:	100 
Size:	381.8 KB 
ID:	41853

    Click image for larger version. 

Name:	13_neck 2021-10-09 14.25.04.jpg 
Views:	118 
Size:	440.5 KB 
ID:	41854

  9. #19
    Member
    Join Date
    Aug 2021
    Location
    Blue Mountains NSW
    Posts
    128
    The body has been sanded to 220 grit.

    applied a mix made mostly of TimberMate with a small portion of acrylic paint to achieve the colour I had in mind.
    sanded to 220, reapplied Timbermate, sanded again and started applying TO, I am TO coat #5.

    This photo is after the first TimberMate coat
    Click image for larger version. 

Name:	21_2021-10-09 11.10.22.jpg 
Views:	133 
Size:	305.0 KB 
ID:	41856

    This is a detail of the body after 2x TM and sanding, and after 2x coats of TO
    Click image for larger version. 

Name:	22_2021-10-10 09.29.04.jpg 
Views:	116 
Size:	427.3 KB 
ID:	41857
    Last edited by FaustoB; 11-10-2021 at 09:56 AM.

  10. #20
    Mentor dozymuppet's Avatar
    Join Date
    Jun 2020
    Location
    Perth, WA
    Posts
    842
    Nice progress there

    Sent from my Pixel 4 using Tapatalk

Page 2 of 5 FirstFirst 1 2 3 4 ... LastLast

Tags for this Thread

Posting Permissions

  • You may not post new threads
  • You may not post replies
  • You may not post attachments
  • You may not edit your posts
  •