Page 2 of 5 FirstFirst 1 2 3 4 ... LastLast
Results 11 to 20 of 43

Thread: MBM-1 Custom build

  1. #11
    GAStronomist Simon Barden's Avatar
    Join Date
    Oct 2016
    Location
    Reading, UK
    Posts
    10,547
    It isn't easy to do a rubbed stain burst. Made harder by the body being different pieces of wood that take up the stain in different ways. But even on a veneer-topped guitar where the veneer woods match exactly, doing a rubbed burst that has a smooth transition between the colours is very hard to do and most people end up with a line. Which is why I much prefer spraying my bursts.

  2. #12

  3. #13
    Quote Originally Posted by Simon Barden View Post
    It isn't easy to do a rubbed stain burst. Made harder by the body being different pieces of wood that take up the stain in different ways. But even on a veneer-topped guitar where the veneer woods match exactly, doing a rubbed burst that has a smooth transition between the colours is very hard to do and most people end up with a line. Which is why I much prefer spraying my bursts.
    I wish I could do spraying, don't have a working space for it, do you have spray booth?

  4. #14
    GAStronomist Simon Barden's Avatar
    Join Date
    Oct 2016
    Location
    Reading, UK
    Posts
    10,547
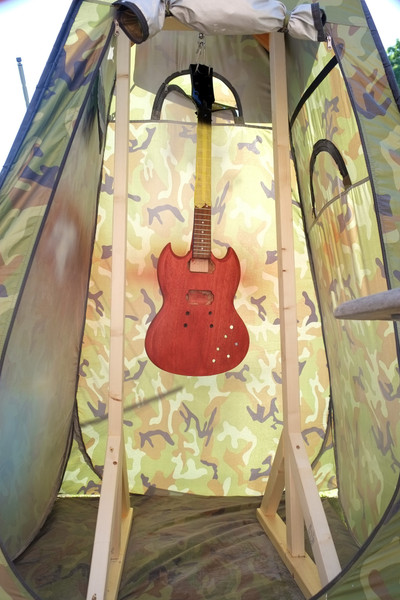
    Not a proper one. I have a cheap pop-up camping toilet tent that I use in the garden to act as a wind/bug shield.


    I close the front flap right after spraying, then open it after a few minutes for better ventilation after the paint surface has become touch-dry and won't get dust sticking to it if it then blows in.

  5. #15
    Quote Originally Posted by Simon Barden View Post
    Not a proper one. I have a cheap pop-up camping toilet tent that I use in the garden to act as a wind/bug shield.


    I close the front flap right after spraying, then open it after a few minutes for better ventilation after the paint surface has become touch-dry and won't get dust sticking to it if it then blows in.
    Nice! I tried that with an Ikea camping wardrobe for the clear coat of my first build, went ok but I live in an awfully dusty area. No matter if it's indoor or out, I can't really get rid of all the dust specks that sticks to everything. The only thing I can think of for now is to go with really thin layers of tru oil, and wipe the specks after the oil polymerized. Wish I had a ventilated space clear of those specks which can drive me crazy sometimes.

  6. #16
    GAStronomist Simon Barden's Avatar
    Join Date
    Oct 2016
    Location
    Reading, UK
    Posts
    10,547
    Without a sealed room and filters on the air supply, you aren't really going to cure that level of dust problem. Even if you sprayed a water mist into the area to damp down the dust, more will just blow in with the door open.

    No real dust issues here, but there's a lot of pollen about at the moment, my car's covered in it, so it's not a good time to spray outdoors here in the UK at the moment. It's also fairly chilly until mid afternoon on a sunny day; too cold to spray without risk of the finish clouding.

  7. #17
    The only advantage here are the temperatures , but it gets really humid in the summer, I hope I'll end the finishing process before the end of June.

  8. #18

    4th coat of Tru-oil

    Applying layers of 50/50 Tru-oil and mineral spirit mixture, this is the 4th coat, seems it's starting to build up.
    Click image for larger version. 

Name:	4.jpg 
Views:	126 
Size:	104.6 KB 
ID:	40304Click image for larger version. 

Name:	4a.jpg 
Views:	143 
Size:	62.0 KB 
ID:	40305Click image for larger version. 

Name:	4b.jpg 
Views:	145 
Size:	63.4 KB 
ID:	40306

  9. #19

    update

    I bought some 3mm basswood sheets and I'm trying to make the covers for the cavities on the back of guitar, still don't have a fit, but I'm taking a break for now I'll come back to it later.
    Click image for larger version. 

Name:	cover1.jpg 
Views:	127 
Size:	252.8 KB 
ID:	40365Click image for larger version. 

Name:	cover2.jpg 
Views:	127 
Size:	177.4 KB 
ID:	40366Click image for larger version. 

Name:	cover3.jpg 
Views:	129 
Size:	211.8 KB 
ID:	40367Click image for larger version. 

Name:	cover4.jpg 
Views:	125 
Size:	268.5 KB 
ID:	40368Click image for larger version. 

Name:	cover5.jpg 
Views:	123 
Size:	192.3 KB 
ID:	40369

  10. #20
    The current status of the finishing process is 8th coat of tru oil and I'm waiting a few days before I'll sand it with a 0000 steel wool and then applying more coats of tru oil. Something I didn't excpected is that the color seems to shift from pinkish purple to crimson depending on the angle of the light, maybe the multiple coats of different colors in different grits is what causing this shift (notice the headstock on the photo at the right down corner) .
    Click image for larger version. 

Name:	IMG_20210501_115652_057.jpg 
Views:	127 
Size:	306.2 KB 
ID:	40370
    Last edited by Eitan Yerushalmi; 01-05-2021 at 05:31 PM.

Page 2 of 5 FirstFirst 1 2 3 4 ... LastLast

Tags for this Thread

Posting Permissions

  • You may not post new threads
  • You may not post replies
  • You may not post attachments
  • You may not edit your posts
  •