Page 3 of 8 FirstFirst 1 2 3 4 5 ... LastLast
Results 21 to 30 of 73

Thread: GST-1 'Hexacaster' build

  1. #21
    GAStronomist Simon Barden's Avatar
    Join Date
    Oct 2016
    Location
    Reading, UK
    Posts
    10,547
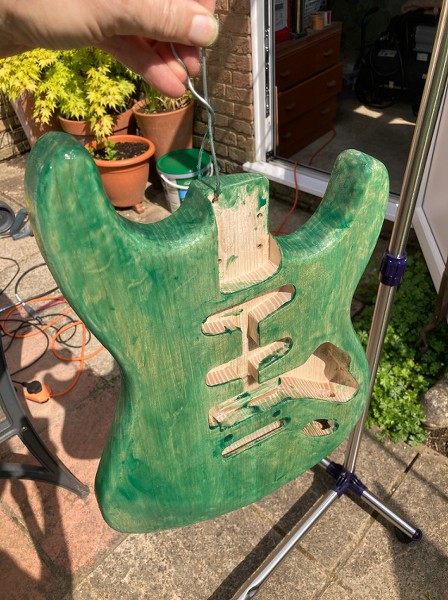
    Not a great day for the build.

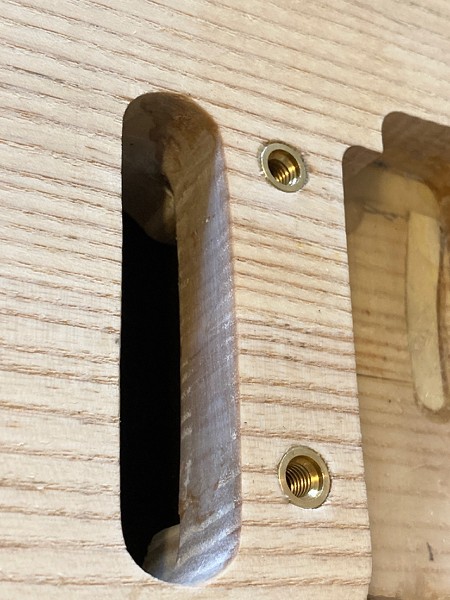
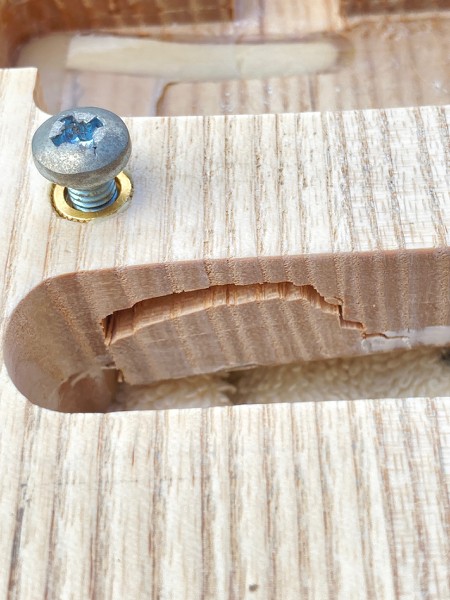
    Forgot to support the underside in trem spring cavity area when knocking the post insert in.


    Rude words were said very loudly.

    Insert measured 9.8mm over the splines, hole size was 9.5mm, so it should have only been the splines pushing into the wood.

    Epoxy stuffed into the crack and clamped. It's all gone back together, but the test will come when the insert goes back in (to be pressed in next time with a large G-clamp and fully supported).

  2. #22
    Overlord of Music fender3x's Avatar
    Join Date
    Jan 2016
    Location
    Miami, FL, USA
    Posts
    2,199
    Ouch! Glad it went together again. I am guessing that if Titebond will work for a neck, epoxy should be fine at the trem

    Sent from my ONEPLUS A3000 using Tapatalk
    Last edited by fender3x; 06-05-2021 at 11:09 AM.

  3. #23
    Mentor dozymuppet's Avatar
    Join Date
    Jun 2020
    Location
    Perth, WA
    Posts
    842
    Oh crappikins

    Sent from my Pixel 4 using Tapatalk

  4. #24
    GAStronomist Simon Barden's Avatar
    Join Date
    Oct 2016
    Location
    Reading, UK
    Posts
    10,547
    It can be fixed and it won't be visible once the trem and rear trem cover are in place.

    The insert was still very firmly fixed and took a fair bit of removing. You either need a proper stud puller for this (easiest way), or you'd need to clamp some support underneath the insert positions as there's only 1mm or less between the bottom of the insert and the other side of the trem cavity, so the 'smaller bolt down the hole and wind away' method won't work without that. Even then it may well poke a hole through the bottom in the process.

  5. #25
    Member
    Join Date
    Jun 2020
    Location
    Burnie, Tasmania
    Posts
    75
    Really nice work Simon, particularly fixing up all those problems.
    I recall the pain of transplanting my first Variax electronics into a Strat clone, and all the annoying little problems to resolve. I didn't have things like routers, etc at that stage, and it looked very ugly under the hood, I can tell you....
    Finding the extra space inside a Strat body for things that aren't supposed to be there, can be very tricky.

  6. #26
    GAStronomist Simon Barden's Avatar
    Join Date
    Oct 2016
    Location
    Reading, UK
    Posts
    10,547
    It’s amazing how much space is simply taken up by loose wires. You can cut everything mounted on the scratchplate down to a minimum, but all those controller wires are a set length because of the connectors on the end, so there’s a lot of excess wire to store away and not get in the way of the pots and switches.

  7. #27
    GAStronomist Simon Barden's Avatar
    Join Date
    Oct 2016
    Location
    Reading, UK
    Posts
    10,547
    The weather has finally moved on from Winter to Summer in the UK, mainly missing out Spring completely. So I've been able to progress further with the GST-1.

    The cracked body got epoxied together, successfully, then some support blocks made so I could get the inserts in without cracking the wood again:


    I did a bit more sanding to the forearm cutaway, as it ended up a bit smaller than I wanted, then the body was given a final sanding to remove all the remaining marks I missed:


    Then it was ready for grain filling (it is an ash body after after all). I mixed up some water-based green stain with some Aqua Coat grain filler and piled it on quite thickly for the first coat:


    I sanded that off, did another coat (a lot more sparing application this time) and sanded that all back so it's ready to spray. I prefer to spray bodies flat if I can, so there are temporary supports on the front and back to allow it to be raised off the spraying turntable:


    However, the trusty old spray tent had had enough, and five summers of UV exposure and nitrocellulose solvents had made the fabric so fragile that the back (which bears the brunt of the overspray), had split completely from side to side in two places with several smaller splits just waiting to let rip (see what I did there?).


    So a replacement tent should be arriving tomorrow, along with this summer's spray mask (I forgot to order one before now).

    Though I won't be using it immediately, I needed to reassemble my spray hanging frame as I'd cut it in half at the top so I could store it in the garage over winter. But as I had found it a bit narrow near the bottom, I cut the ends of the cross-piece at a slight angle, screwed some battens on both sides and so splayed the legs out. I should now be able to hang up any guitar and turn it around without risk of the body catching the supports. You can also see the wooden frame I made to attach the tent to so it can sit on the patio rather than having to be pegged down on the grass.


    I still have to weight the frame down in strong winds as it's not heavy enough to stop the tent moving once it gets to a force 4 or so, but the patio table's chairs have cast-iron frames, so a couple of those keep it in place.

  8. #28
    Overlord of Music McCreed's Avatar
    Join Date
    Oct 2018
    Location
    AUS
    Posts
    3,552
    It's funny (or not so sometimes) how one project turns into another just to get the first project done! (ie: finishing guitar requires rebuilding spray frame).

    I've lost count of the number of times a "15 minute job" took an entire day. (or more!)
    Making the world a better place; one guitar at a time...

  9. #29
    Overlord of Music McCreed's Avatar
    Join Date
    Oct 2018
    Location
    AUS
    Posts
    3,552
    I'm sure I've posted this here before, but an alternative to your turntable for flat spraying is a rotisserie (or variant) like mine. You can spray from any angle you like.

    Click image for larger version. 

Name:	New Paint Jig 2.jpg 
Views:	110 
Size:	230.5 KB 
ID:	40736

    This pic was taken on day one in 2018, it's covered in paint now
    Making the world a better place; one guitar at a time...

  10. #30
    Mentor dozymuppet's Avatar
    Join Date
    Jun 2020
    Location
    Perth, WA
    Posts
    842
    Quote Originally Posted by McCreed View Post
    It's funny (or not so sometimes) how one project turns into another just to get the first project done! (ie: finishing guitar requires rebuilding spray frame).

    I've lost count of the number of times a "15 minute job" took an entire day. (or more!)

Page 3 of 8 FirstFirst 1 2 3 4 5 ... LastLast

Posting Permissions

  • You may not post new threads
  • You may not post replies
  • You may not post attachments
  • You may not edit your posts
  •