My first kit arrived a few weeks ago and I'm really looking forward to starting it. Having inspected all the parts it doesn't look like there's any damage and looks like everything's there - to my limited knowledge.
Having trouble uploading pictures as they're too large, but this is the kit I'll be working on:
I've attached a picture of a Gretsch I'd like to try and model it on, I won't be putting a bigsby on as it's too expensive right now (also renovating a house!).
I'm unsure where to start, I'd like to try and match the binding and purfling of the gretsch if I can, but I'm not sure what order I need to do the tasks in:
Remove existing binding and purfling
Install gold binding and new purfling
sand, primer and paint guitar white
Would it be best to finish the body and then re-do the bindings, or the other way round and then protect the bindings whilst painting?
Is there another option to paint the existing binding rather than replacing it?
All thoughts welcome, this is completely new to me. Would also love to see any finished versions of this model.
You can certainly paint the binding if you want. I had to on my ES-1 because the stain I used leaked into the cracks in the binding and I couldn't remove it, so painting was the only way. This binding was painted white, with a slight amber lacquer over the top. You can see that the binding looks thinner on the top surface than the kit binding actually is, because I left the black/white strip section covered by the body lacquer .
Replacing the binding wouldn't really work because the kit binding is significantly thicker on the top than that Gretsch binding is, so if you could get the right stuff, you'd be left with a ledge around the binding cut-out. Plus finding suitable replacement binding isn't easy at all. From the looks of it, it's more akin to the stuff Gibson use on their LP Customs and I haven't found any binding like that. Plus almost all available binding is white, not cream.
Rothko and Frost sell a lot of binding styles, and whilst you can get plain cream binding, getting suitable cream/black.cream black binding is near impossible, unless you make it up yourself from individual strips. https://www.rothkoandfrost.com/guita...ar-binding-c31
So I'd suggest a bit of a compromise. Leave the kit binding on, but partially mask it off when you paint the top so that the inner two stripes are painted over, leaving a white/black/white/black pattern or even just white/black (whatever you think looks best and closest). I'd then spray the binding with some weak vintage amber tinted lacquer which will give a lot more of a cream look to the binding. Same vintage amber lacquer treatment with the rear binding and f-hole purfling. With a white body, it won't take much tinting for it to look relatively creamy.
Thanks so much for the information that's really useful to know, I'll definitely follow that advice in not removing the binding and just taping it when painting the body and then addressing the binding afterwards.
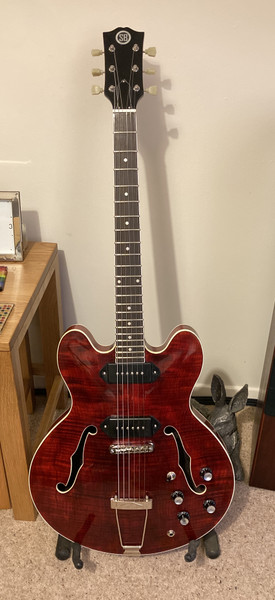
Your guitar looks great, I notice it has a trapeze tailpiece, was that something you requested when ordering the kit, or did you order and install it separately. Mine has come with an anchor and stud tailpiece, the holes have been pre-drilled for that as shown in the link to the original kit. Do you think it would be possible to put a trapeze tailpiece on instead and then plug and sand the existing holes?
I was also thinking of moving the output jack on to the side of the body rather than the front, as it's a hollowbody that should be straightforward I'm hoping.
That was a custom order ES-1, with P-90 routs, no stop bar holes, and dot inlays not trapezoids, so I could make quite like an ES- 33. it was also supposed to have thin edge binding, but it came with the standard binding.
Yes, certainly possible to plug, then fill and sand and paint over the stop tailpiece holes and then fit a trapeze tailpiece. Same with the output jack. It's easy enough to fit one on the side. Just drill a hole I'd suggest one on a curved metal plate, rather than just through a hole in the side. It makes it a lot easier to fit and gives the jack more support with that edge being pretty curved.


 Reply With Quote