Page 1 of 4 1 2 3 ... LastLast
Results 1 to 10 of 39

Thread: 2nd scratch build - Precipice

  1. #1

    2nd scratch build - Precipice

    Howdeee all

    So, I'm kinda tackling 3 builds at once (although my next kit hasn't shipped yet, hopefully this week)

    This thread covers the build of a Cliffenbacker.

    My journey began with an ill fated trip to a timber merchant. I was looking for rock maple and Ovangkol. Well the price for the maple was a bit absurd, and I knew where I could get it at a better price... for larger pieces. They didn't have any Ovangkol that was close to what I needed, the closest they has was a piece about 2 or 3 times as much as I wanted. When I inquired about it I was told that their next shipment will be their last, and that the timber had been listed. I went home empty handed, but the thought that I would not be able to get it again kinda stuck in my mind. The next day, in the rain (the beginning of the Sydney floods), I drove back out there and paid the ridiculous amount asked for the timber. I then found out that it wasn't listed, but three other species of the same genus (traded as Bubinga) had been. Not only that, but Ovangkol was listed as sustainable and "a species of least interest".

    Most of the luthiery community call it Shedua. The reason for wanting this timber, is that that is what Rickenbacker were using as the central laminate of the mid to late 70s 4001s. I figured on using it for finger boards for this and the other scratch build.

    But wait, there's more! I took it to the "Shed" to get a hand re sawing it on the big band saw into the pieces I needed. Sadly my guitar making pal wasn't there that day. The old fart who was going to help me, and with no clue what the timber was informed me "can't do it, it's hardwood." . Yeh, some help that was. He wanted to do what was convenient for him and have me wast expensive timber by cutting the whole thing in half, then making a few passes through the table saw to free the pieces I needed. Rather than do that, I suggested I don't cut it in half, do the cuts he suggested, which would leave a 30mm strip of timber to be cut through to free the slab. Again "can't do that, it's hardwood" . So in the end I didn't even get to use the table saw and ended up wasting my morning getting nothing done. I ended up doing what I suggested at home on my dodgy table saw and freeing the slab with a reciprocating saw.

    The fence on my saw wasn't stable enough for what I needed to so, so the cuts weren't square to the edge of the timber.What I ended up with was a bit of a mess and not all the strips were thick enough for the centre strip (one piece was). The rest was still thick enough for fret boards. A few days later my guitar building partner in crime helped me run them through the thicknesser to clean them up. here's what I ended up with:


    Pics of the rock maple we picked up last week will be posted in my first scratch build thread tomorrow night after I have photographed them .

  2. #2
    GAStronomist FrankenWashie's Avatar
    Join Date
    Jan 2016
    Location
    Glebe, NSW
    Posts
    5,666
    Hey Rabbit, If you are ever stuck for getting that sort of resaw stuff done, the Lab is happy to assist, if Glebe is in close enough proximity.
    I’ve fairly successfully resawn old hardwoods at my saw’s maximum 8” capacity.
    FrankenLab
    Hand crafting guitars, because Death Rays are expensive.


  3. #3
    Thanx for the offer Franky . It turns out that amongst the half dozen different bandsaws the shed has, there is a more substantial one in a back room that the old coot didn't bother to mention. I found out about it when we got our Maple because that's what the other guitar builder is going to use to resaw some maple tops.As for the rest of the two builds I don't need to resaw anything that wide. As it turns out, I was being a bit wasteful thinking I needed to make 100mm thick blanks. Both basses I'm building will fit within 50mm.
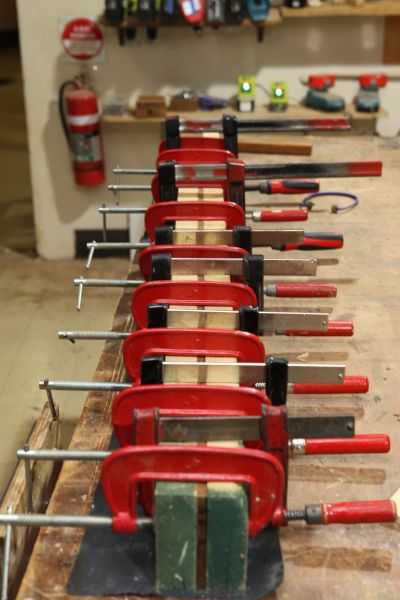
    The shed has rules to stop people from using tools they haven't been assessed on. Once I get assessed on some of the bigger tools I should be able to just get on with things.

  4. #4
    So things are underway, but not going quite to plan. collecting the hardware is a bit more of a challenge on this one.

    In terms of the woodwork, I got as far as gluing up a neck blank for two basses(some may have already seen this pic on my other thread):

    ]

    And after separating them, the one on the right *was* to be the blank for Precipice the Clifenbacker:


    Unfortunately, I marked a couple of lines, one I'm kinda not sure what it was for, the other was for the length of the blank. Guess which line I cut? Yeh, I was about 100mm too short

    Luckily, I have enough timber left to glue up another blank, but the centre stripe will be about 1mm narrower than a 70s Ric had. I don't feel like cutting up the 200mm, 12mm thick slab I have left over from cutting my original 4 strips of varying thicknesses.
    Last edited by Rabbit; 23-04-2021 at 10:17 PM.

  5. #5
    So I now have a blank of sorts, I just need to dress the sides with the thicknesser. Some fabric dye came yesterday.My plan was to dye the white pup covers I'd bought. When I was racing off road electric buggies we used to dye the nylon gears with fabric dye. Simon in another thread expressed some doubts as to the effectiveness of trying to dye plastic (perhaps I should call him Thomas?)

    The instructions are a little vauge. They tell you how much fabric you can dye with a packet, but no indication what so ever on how much water to use. The stuff I would normally use didn't come in a deep red. On the plus side it says on the packet "will also dye most plastics, acrylics, vinyls and other synthetic materials, such as 3D printed objects, frisbee discs , wigs, buttons and more."

    My first attempt was a bit of a disaster. I boiled the dye mix, threw in the parts ans simmered for 30 mins. They cam out warped and twisted, and almost black. Since I had 3 of the strat covers I waited for it to cool a little, poured off some of the solution, added some water and threw in a strat cover.
    It came out the right colour more or less, but there was clumps of solid dye that left dark blotches on the part. I poured it off into a glass bottle and let it settle over night.

    I poured off the solution from the bottle into a saucepan the next day, and threw in the remaining covers. Not much was happeneineg. You definatly need to heat this stuff up for it to work. I heated the solution, not to boiling, took it off the heat and let it soak for a while, stitrring and checking the colour every so often.Here's what I ended up with:


    Simons' idea of using the same stain as the varnish for the bass wouldn't have worked on the original covers, since they are black. I can't easily get the strat cover off (it's kinda epoxied to the pickup), and the cover has threads on it, I didn't realise that covers were part of pickup assembly, I thought they covered the covers 
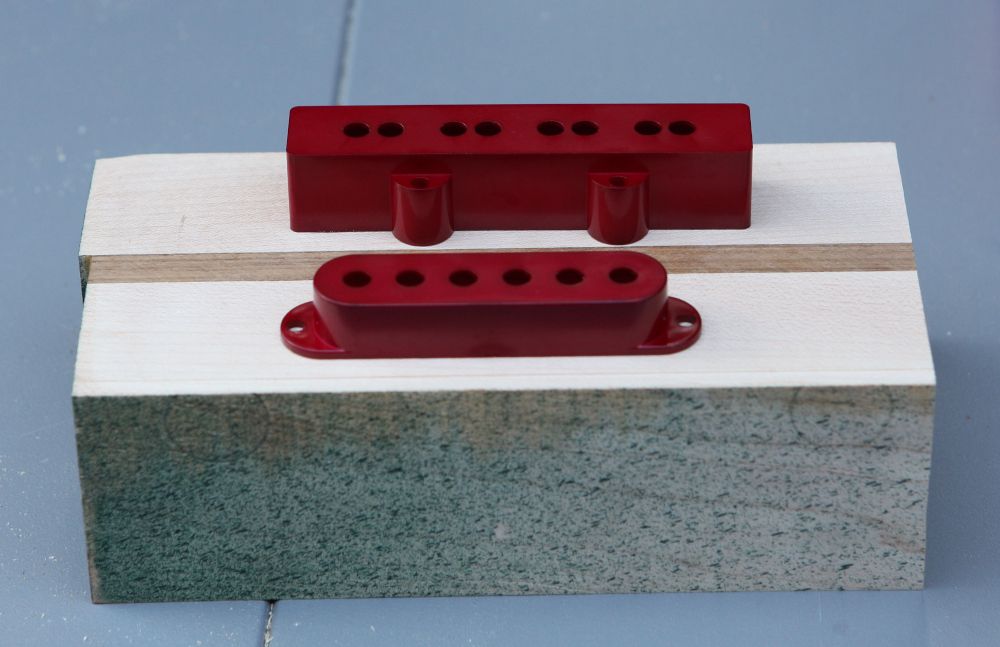
. The jazz pickup comes out of it's cover, the strat pup doesn't. I'll have to cut the top of the cover and glue it to the top of the cover already on the pup. You only get a glimpse of the top anyway, lurking underneath the bridge with the muting foam removed.

  6. #6
    GAStronomist Simon Barden's Avatar
    Join Date
    Oct 2016
    Location
    Reading, UK
    Posts
    10,547
    The Strat pickup is probably fully wax potted, and it's the wax that's holding the cover on. It could be glued on, but that's very unlikely.

    It should come off with constant prying between the base plate and the cover. If not, you could try heating it up with a hairdryer until you start to see melted wax dripping out, and then you can quickly pry the cover off. But it needs to be pretty warm to do that so it may distort the pickup cover and some thin latex/PVC/nitrile gloves are recommended to give at lest some protection from the heat whilst allowing you to grip firmly.

    You won't damage the pickup provided you use just enough heat to soften and just start to melt the wax. You can of course try pulling before you see any melted wax, as it will soften.

    It could be that it's just the windings and the tape that are pressing against the side of the cover. With a stacked pickup, you've got to fit two coils in the space you normally fit one, so the windings will occupy all of the bobbin capacity. If it is a proper SD stacked pickup, then I can't see them ever gluing the cover on as it would make the pickup unrepairable. So I'd strongly suggest either wax, the cover being pushed on over a very fully wound bobbin, or a combination of both.

  7. #7
    Quote Originally Posted by Simon Barden View Post
    The Strat pickup is probably fully wax potted, and it's the wax that's holding the cover on. It could be glued on, but that's very unlikely.
    Actually the edge of the bottom of the bobbin was glued... definitely not wax. Seemed a bit like cyano. But since you gave me inspiration, I tried to gently break the seal with a small Swiss Army knife. That worked. Thanx for the heads up.

    Quote Originally Posted by Simon Barden View Post
    With a stacked pickup, you've got to fit two coils in the space you normally fit one, so the windings will occupy all of the bobbin capacity. If it is a proper SD stacked pickup, then I can't see them ever gluing the cover on as it would make the pickup unrepairable. So I'd strongly suggest either wax, the cover being pushed on over a very fully wound bobbin, or a combination of both.
    Erm, yes and no. the pup is taller than a standard strat pup as far as I can tell. The cover fits, but it's not long deep enough. That's fine, no one will see it any way. Being a stacked pup I don't think I need to shield the cavity for it, and if I do I can always wrap the exposed part with electrical tape.

  8. #8
    GAStronomist Simon Barden's Avatar
    Join Date
    Oct 2016
    Location
    Reading, UK
    Posts
    10,547
    Glued on? Who'd have thought it. At least it was just a small blob. Glad you managed to separate it without too much trauma!

    The cover's plastic, so it's not doing any shielding itself, so copper foil shielding the cavity can only help, even if the pickup is humbucking. Because on any humbucker with two coils, the coils are physically separated, any noise signals they pick up will have slightly different amplitudes and phase. So the noise never cancels out 100%, though it can be greatly reduced.

    Shielding and reducing the noise that gets to the pickups is always beneficial, especially if you are currently in an environment that is generally electrically low noise, so it seems very quiet, but then play somewhere else where there is more noise and some hum does become apparent.

  9. #9
    Quote Originally Posted by Simon Barden View Post
    Shielding and reducing the noise that gets to the pickups is always beneficial, especially if you are currently in an environment that is generally electrically low noise, so it seems very quiet, but then play somewhere else where there is more noise and some hum does become apparent.
    I'll probably shield it, just because I can, but at the end of the day , aside from just messing about, I'll probably never use it. It's there because Cliff put it there, but personally I'll probably be leaning on the hot stacked jazz pup mostly. I ordered another fake Mudbucker. Will be interesting to see how it sounds with an effect in my amp called Hesher . Still trying to track down a couple of 330k volume pots. I've seen 300k, but no 330k.

  10. #10
    GAStronomist Simon Barden's Avatar
    Join Date
    Oct 2016
    Location
    Reading, UK
    Posts
    10,547
    Personally I'd fit 500k pots. Various forums talk about the Ric 330k pot having a measured value that's normally just below 500k, so maybe their agreement with CTS was to badge up 500k pots that measured slightly below 500k with their '330k' part number (also to put people off mimicking their circuit, so copies using real 330k pots have a lower value than Ric use)?

    It makes sense to me to use 500k pots because the way Ric wire their control circuits, the two volume pots are always in parallel and so the pickups always see a 250k resistance to ground. It's like wiring a 500k resistor across a 500k pot to get a 250k pot.

    Real 330k pots would have an equivalent resistance of 165k ohms, which is low, even for a single coil, and would knock off a lot of treble.

    I think I've said elsewhere that I fitted 1 Meg volume pots in a Ric 650D (mini humbuckers) that had 250k pots, and got all the missing jangle back.

Page 1 of 4 1 2 3 ... LastLast

Posting Permissions

  • You may not post new threads
  • You may not post replies
  • You may not post attachments
  • You may not edit your posts
  •